


Dental X-Rays: Tips for Accurate Vet Imaging Success

When it comes to evaluating a pet’s teeth, dental x-rays are the best way to see what’s happening “under the surface.” That is, under the gumline.
Dental radiographs help you obtain a full picture of tooth roots, evaluate for periodontal disease and damage, differentiate between different types of FORLs, and look for any other defects that may not be visible with your eyes alone.
Even though the value of dental radiographs (to both your patients and your practice) is hard to deny, there can be a learning curve when your team first begins to use them.
This is important, because in order for your x-ray images to be diagnostic, they need to be good quality.
Fortunately, with practice, dental x-rays become simple and routine—a process your team can quickly replicate for each patient.
Establishing a Dental X-Ray Routine
To make the dental radiograph process easy for you and your team—and as quick as possible for your patients—it’s best to establish a repeatable routine.
This means taking the same shots, in the same order, each time.
You may need a larger number of views depending on the patient’s size and the angle of their mouth, but in general you can start in the same place each time and move through your views systematically until images of all teeth and their roots are captured.
Use your digital software to set up the views in the order you prefer.
Once you establish a routine, it will only take a few minutes to shoot all views for a small patient. And large dogs should take a maximum of 15-20 minutes.
Positioning the Patient
Your patients will be under general anesthesia for their dental procedure, including dental x-rays.
After intubation, leave the patient in sternal recumbency, and simply place a towel under their chin to keep their maxilla parallel to the table. Then obtain your views of the maxillary teeth.
When you finish the views of the maxilla, move the patient to dorsal recumbency, this time using a towel or other prop under their neck to keep the mandible parallel to the table as you obtain your views of the mandibular teeth.
You can use a trough or sandbags to stabilize the patient and keep them from tilting to the side, if needed.
Adjust this plan if you find that another method better suits your needs. For example, you may find that lateral recumbency works best for you for some views.
Whatever system you choose, we recommend repeating the same steps each time and using a method that minimizes the number of times you need to move the patient.
Sensor or Film Placement
Select the right size sensor or film for your patient. For most veterinary patients, this would be either a size 2 (for small dogs and cats, or views focusing on a single tooth) or a size 4 (for large dogs, or for full-mouth/whole quadrant radiographic views).
Whether you’re using a sensor for digital x-rays, or regular dental film, placement is important to ensure you can see all of each tooth root. Remember the roots are much longer than the crowns (twice as long with canine teeth), so position your sensor accordingly.
Finally, determine which side of the sensor or film should be positioned toward the x-ray beam. This may be indicated by a small dot or “dimple” on films. If you have a digital sensor, the cord side should face away from the tube and the cord should exit the front of the patient’s mouth.
Beam Placement
A parallel angle is used for the mandibular premolar and molar teeth. For many pets, this part of the mouth allows the sensor to be placed parallel to the teeth, and the beam to be shot straight forward (perpendicular) into the sensor.
The rest of the mouth, however, prevents this placement (the palate and mandibular symphysis get in the way). So, you’ll need to use a bisecting angle for the rest of your shots (and possibly for the rostral mandibular premolars).
A bisecting angle might seem complicated, but it’s important—choosing the correct angle prevents distortion (lengthening or shortening of the tooth root in your image).
Here is how to determine the bisecting angle:
Position the sensor within the mouth behind the teeth you want to x-ray, as if the patient is biting on it (use gauze or other aids to hold the mouth open so there is no pressure from the teeth that could damage the sensor).
Estimate the angle between the tooth root and the plate.
Divide this angle in half, and draw an imaginary line with your mind.
Position the x-ray beam perpendicular (at a right angle, or 90 degrees) to this line you’ve just imagined.
If the tooth root is too long on your image, raise the angle of the tube relative to the sensor. If the root is too short, lower the angle of the beam (move it more parallel toward the sensor).
Developing a Simplified Technique
Using a simplified technique can allow you to skip the bisecting angle measurement. For example, one described technique uses just three angles for all oral views…
90 degrees for mandibular molars/premolars.
70 degrees for maxillary molars/premolars.
45 degrees for canines and incisors.
Since you can position these angles on your tube head without measuring (many units have predetermined angles marked by the tube head), this makes positioning much easier and faster for you and your staff.
Exceptions, Views of Specific Teeth, and Further Training
These guidelines are a good starting point for many patients. But, you may find you need to adjust your views to accommodate certain dogs and cats, depending on the shape of their mouth and tooth roots.
Cats in particular may need steeper angles than dogs to minimize interference from the zygomatic arch. And some patients will have tooth roots that curve significantly.
For all of these reasons, and for the benefit of hands-on experience, it helps to schedule a demo of your equipment, or to find an in-person training opportunity for your staff. That way, you can maximize your return on investment by using your dental radiography unit to its fullest potential.

Any time spent developing the proper technique for positioning will be well worth it, as you’ll be able to quickly take views that aid your treatment decisions and deliver value to your clients.
Disclaimer: This article is for general informational purposes only, and not intended as a guide to the medical treatment of any specific animal.
Written by: Dr. Tammy Powell, DVM

Midmark vs Dentalaire: Best Dental X-Ray Options for Vets

Midmark Dental X-Ray and Dentalaire Dental X-Ray for Veterinarians
Dental radiography is generally considered part of the standard of care for veterinarians who perform dental cleanings, extractions, and other procedures in their practice.
There are many reasons why dental x-rays are important. Just a few examples include: identifying different types of FORLs to determine the best course of treatment, confirming full removal of all root tips during a difficult extraction, discovering and documenting pathology such as the full extent of damage from periodontal disease and whether the location of a missing tooth is hiding a dentigerous cyst under the gumline.
If you’re new to dental x-rays or looking to replace or upgrade your equipment, here are some important considerations, as well as information on two major equipment providers: Midmark dental x-rays and Dentalaire dental x-rays.
Considerations for Purchasing a Dental X-Ray Unit
Here are a few questions to ask yourself (and discuss with sales reps and colleagues) prior to your purchase…
What equipment do you need? Do you need to purchase EVERYTHING? Or, do you just need a new sensor… a new generator or processer… or new software? If you don’t need an entirely new unit as a whole, purchasing just the pieces you need can save significant money. Just check for compatibility issues if you are purchasing components from a different manufacturer or newer components to pair with older models.
What’s your dental x-ray space like? Do you need a wall-mounted unit or something on a stand? Or even something handheld?
What type of service contract or warranty is provided? What are the ongoing and renewal costs? Is bite damage for sensors covered? And is loaner equipment provided while your equipment is being repaired?
How is the software? Is it user-friendly? Does it provide all the functions you need?
What type of sensor(s) do you need? Are you interested in film, CR (phosphor plates), or DR?
Some practitioners like DR for its speed, but dislike the limited size options and rigidity of the sensors. DR is also more expensive to replace. Film and CR, on the other hand, are generally available in sizes ranging from 0-4, to cover small, medium, and large patients. And CR can still be pretty fast. Opinions and preferences vary, so you’ll need to see what works best for you.
Does your staff know how to take dental x-rays? There’s a learning curve, so ask about training provided by the seller, if available.
Comparing Midmark Dental X-Ray and Dentalaire Dental X-Ray
Midmark and Dentalaire and both excellent providers that offer a wide array of dentistry equipment, including anything you’d need to start doing dental x-rays or update/replace your current equipment.
Here are some of the main selling points advertised by each company:
Generator settings and usability: Both Midmark and Dentalaire note their dental x-ray generators are user-friendly and simple to operate, with intuitive, easy-to-read displays and veterinary-specific options. Both have options to input your own settings or to use pre-programmed techniques. Additionally, Dentalaire notes that exotics and extremity settings are included.
Positioning arm: Both providers claim a well-constructed positioning arm that’s easy to move, with precision braking for preventing drift.
Image quality: Both Midmark and Dentalaire dental x-ray systems are generally well regarded by veterinarians for image quality. Additionally, they each advertise a focal point of 0.4mm for high-resolution images with sharp, clear details.
CR equipment: Midmark and Dentalaire both offer CR sensor plates in all sizes, as well as readers.
DR equipment: DR technology is continuing to evolve!
In fact, Midmark notes that they have the world’s first bite-resistant sensor, and they stand behind it with a 5-year warranty (including one free sensor replacement in case of catastrophic damage).
Dentalaire advertises a sensor that is also resistant to bite damage, especially when paired with their protective boot covering, and they offer a 3-year warranty for upgrades.
For both companies, DR sensors come in both size 1 and size 2.
Software: Both Dentalaire and Midmark have comprehensive and user-friendly software with DICOM capabilities and compatibility with PACS. Midmark advertises that their software integrates with leading practice management systems and offers the ability to enhance images. Dentalaire notes they have customizable patient reports and advanced image comparison available on-screen.
Training: Dentalaire offers four hours of on-site training in dental x-ray positioning. Midmark also offers in-clinic training, and their training is RACE approved for CE credits for both veterinarians and technicians.
Support: Each company offers technical support.
Conclusion
There are several excellent providers of veterinary dental x-ray equipment. Midmark and Dentalaire and two major contenders, and both have great offerings. The one you choose may come down to personal preference.
Consider asking your sales reps or providers for demos, and for references of other veterinarians who have the equipment and can give you the pros and cons they’ve experienced.

Also, ask about any ongoing or additional costs. By having as much information as possible, you can find the equipment that’s the best fit for your individual practice.
Written by: Dr. Tammy Powell, DVM

A Beginner’s Guide to Pathology Using Ultrasound

Sometimes, radiographs just don’t show the whole picture…
That’s especially true for analyzing the details of soft tissue structures—especially in the abdomen, but in other parts of the body as well.
Limitations of radiographs
One problem you may run into with radiographs is a “silhouette sign,” which basically means that two areas with a similar opacity border one another in your x-ray views. This makes it difficult to tell where one structure begins and the other ends.
A good example of a silhouette that could cause confusion is when the abdomen is full of fluid. Since fluid is approximately the same opacity as the abdominal organs, they may blend together, making it difficult to evaluate the abdominal structures.
In cases like this, an ultrasound can provide additional information. And, ultrasound has many other uses…
What an ultrasound is especially useful for
Radiographs can provide a lot of valuable information. But, they can’t always provide fine detail about texture, small defects, or other abnormalities of soft tissue structures. That’s especially true if the abnormalities don’t result in a big change in opacity or in organ size.
Therefore, ultrasound is often superior for detecting changes within an organ, especially if the change is small, in the early stages of a disease, or otherwise difficult to view on radiographs.
This may include conditions such as…
Nodules or masses within an organ such as the liver, which aren’t large enough to change the radiographic silhouette/size of the organ.
Pancreatitis or certain other disorders of the pancreas.
Calculi of the urinary bladder that are radiolucent.
Details of the gallbladder, an organ that is often difficult to see on radiographs since it is overshadowed by the liver.
Abnormal blood vessels, such as a portosystemic shunt.
Detailed cardiac evaluation, including diagnosing enlargements, congenital abnormalities, neoplasia, and more.
These are just a few examples—an ultrasound has many uses clinically!
Of course, there are some lesions that are better diagnosed using radiographs rather than ultrasound, especially in areas of the body that don’t transmit sound waves well (such as the lungs).
And, by looking at your x-ray views and ultrasound study together, you’ll get more information than you would with either technique by itself.
So, it’s not a matter of choosing between radiographs and ultrasound—instead, they work very well when used together to see the whole clinical picture.
How to use an ultrasound
It takes some experience to get the hang of directing your ultrasound probe and interpreting the images. Taking a course is often the best and fastest way to become proficient.
However, even though the process of performing an ultrasound study is different from obtaining radiographic views, some of the basic principles of interpretation remain the same for both.
Rely on the same good practices you do when reading a radiograph, such as…
Have a system and evaluate each organ (and spaces between the organs) in an order that works for you. Do it the same way each time, to be sure you don’t miss anything.
Examine cross-sectional images together—meaning views that are 90-degrees apart—of each area of study. An ultrasound, like an x-ray, produces a two-dimensional image. So, you’ll want to move the probe to look at each area at different angles (just like orthogonal views provide a complete picture when taking radiographs).
When in doubt, seek a consultation with a radiologist who can help you interpret your images.
Just like any other part of your clinical skills, ultrasound technique, and interpretation will come with time.
After all, they call it clinical “practice” for a reason—practice makes perfect.
But with a little time, you’ll likely see a good ROI on your investment since you can diagnose in-house rather than referring—and may find your ultrasound very useful if you need more diagnostic information in a pinch.

Ask for a free demo at your hospital to learn more.
Written by: Dr. Tammy Powell, DVM

Nomad Pro 2 Dental X-Ray Generator Benefits Your Practice
Dental radiographs are an important part of your patients’ dental care. These images allow you to diagnose dental or periodontal pathology, form the best treatment plan, and confirm the successful removal of any extracted teeth.
When it comes to dental x-rays, you have a lot of options in terms of finding a unit that suits your needs and your practice style.
If you’re looking for flexible use and high quality—especially if you’re a mobile practitioner, a practice where space is at a premium, or just like the convenience of a handheld unit—a Nomad Pro 2 dental x-ray generator from Aribex may be right for you.
How Can a Nomad Pro 2 Dental X-ray Generator Help Your Practice?
Every practice has different needs. For example, maybe your practice space or setup dictates the type of equipment that’s best for you. Or maybe the right payment plan, equipment capabilities, or required training for use may help you make your decision.
The following benefits of the Nomad Pro 2 Veterinary dental x-ray generator can meet the needs of many different practice styles and setups…
Simple and convenient operation. The generator is light to hold and easy to operate. Rather than being attached to a cart, a wall, or any other fixed structure, the generator is handheld, weighing merely 5 ½ pounds (2.5kg).
An ergonomic grip and an intuitive, simple display for the settings also allow for ease of use.
Easy setup. There’s no installation or re-wiring required—and no need to renovate your clinic to set up for dental radiographs. With a small, portable unit, you can make any table or space into an effective x-ray station.
Move the unit, not the patient. You can capture images from any angle, even difficult or oblique angles, without excessive repositioning of the patient.
Flexibility for your practice. Capture images anywhere! The cordless, battery-operated unit is suitable for dental, small animal, exotic, and equine use, and for use with film, phosphor plates, and digital sensors.
Location independence. Choose the best spot in your clinic for dental radiographs, without being limited by tight spaces. Handheld units are also ideal for mobile practitioner needs, and the generator may be used outdoors.
Safety for staff and patients. The unit operates with low radiation exposure.
Compare the annual, whole-body radiation exposure between the Nomad Pro 2 dental x-ray generator and other common exposure scenarios:
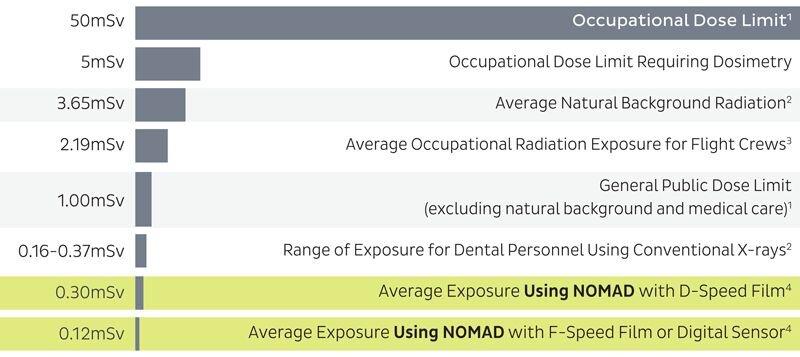
Internal shielding (which prevents leakage from the x-ray source) and external shielding (to block backscatter radiation) also contribute to safety, protecting your team from unnecessary radiation exposure.
This also means your team member can stay with the patient while taking x-rays.
Consistently sharp, clear images. Specifications include a 0.4mm focal spot, 60kV DC x-ray generation, and an mA of 2.5. The generator allows your team to quickly capture high-quality images.
Affordability. The easy setup, without major installation, makes it easy to get started. And simple monthly payments mean the generator can pay for itself each month—so you can start making a profit and return on investment right away.
Tips for Getting Started
Use the best financing option for your practice. Low monthly payments mean you can make a profit right away just by using your new generator a couple of times per month.
And if you need an intraoral sensor and software to go with your generator, ask us about an affordable bundle that includes all three.
Protect your investment. Ask about a warranty for your machine.
Invest time informal training. You probably know that new equipment is best utilized if your team feels comfortable using it. By training your team to take all the dental views you need, they’ll be able to comfortably and effectively capture images in a matter of minutes.
Work the cost of dental x-rays into your estimates. Client education can help your clients understand why dental x-rays are so important with any dental procedure. And by including the cost together with your dental procedures (rather than as an “add-on” service), it helps convey that dental radiographs are a necessary part of your patient care plan.

Envision what it would be like to have a quick and easy dental x-ray system in your practice, to help improve patient care and improve your bottom line.
Any questions about how a Nomad Pro 2 dental x-ray generator from Aribex can fit into your practice space, workflow, or budget? Just give us a call or contact us here!


Ultrasound Techniques: Visualizing the Adrenal Glands

The adrenal glands, those tiny but very important glands, can be tricky to find and evaluate during an ultrasound exam.
However, having a system and knowing where to look can make your job much easier.
There are many reasons you want to visualize the adrenal glands on every scan, including checking for neoplasia and other masses and looking for any changes that could be associated with Cushing’s or Addison’s disease.
Here are some tips to help save you time and allow for a clearer view of these small glands…
Have a repeatable system
When you perform an abdominal ultrasound, it’s important to have a systematic approach to look at everything. And that includes keeping small structures like the adrenal glands and abdominal lymph nodes on your list, so they don’t get overlooked.
Do your scan in the same order every time—whether that’s cranial to caudal, clockwise, or some other system that works for you—and it’s much less likely that anything will be missed or any abnormalities overlooked.
Adrenal gland landmarks
The right and left adrenal glands are respectively located near the right and left kidneys. However, the kidneys are relatively large, whereas the adrenal glands are small. So, the kidneys can overshadow these small glands.
The kidneys are the first things you’ll locate because they’ll point you in the right general direction. After that…
Vascular landmarks are most helpful when it comes to locating the adrenals.
Specifically, the aorta, caudal vena cava, renal vessels, and mesenteric artery are what you’re going to be looking for.
Color Doppler can help you visualize the vessels.
Also note, if the patient allows you to apply gradual pressure, it helps to minimize the distance between your probe and the glands as much as possible.
Finding the LEFT adrenal gland
The left adrenal gland is located ventrolateral to the aorta and cranial to the left renal artery.
Start by scanning the left dorsal mid-abdomen and visualizing the aorta in a long view.
Find the spot where the left renal artery branches off from the aorta, and just cranial to that you’ll see the left adrenal gland.
Finding the RIGHT adrenal gland
The right adrenal gland is dorsolateral to the caudal vena cava, and just cranial to the cranial mesenteric artery. It’s also more cranial and dorsal compared to the left adrenal gland.
Scan the right cranial abdomen, with the caudal vena cava in long view.
Apply some pressure with the transducer which will cause compression of the caudal vena cava and help you visualize the right adrenal gland. The gland is right next to the vessel, slightly oblique to it.
Are the adrenal glands normal?
Evaluate the qualitative properties of the gland, and then measure the glands from their cranial pole to caudal pole. Also, measure the thickness of each pole.
Normal adrenal glands are hypoechoic to surrounding fat, and have a characteristic “peanut” shape (although the right adrenal may have more of an “arrowhead” appearance). Typically, adrenals are 4-7mm thick in dogs and 3-4mm thick in cats.
Abnormalities may include…
Evidence of hyperadrenocorticism.
If pituitary-dependent, the adrenal glands may be normal in appearance, or they may be “plump” (symmetrically enlarged). An ultrasound exam alone is not enough to diagnose Cushing’s, but may be helpful in context with additional diagnostic tests.
If adrenal-tumor related, you may be able to visualize a mass.
Evidence of Addison’s disease or hypoadrenocorticism.
You may notice smaller or thinner adrenal glands. As with Cushing’s, you’ll want to use this information in conjunction with clinical symptoms and other diagnostic tests.
Adrenal masses.
Many are incidental findings only.
Pheochromocytoma is a possibility.
Malignancies are possible and may lead to invasion of adjacent tissues, especially blood vessels.
You’ll use your clinical judgment and the patient’s clinical signs to help you determine whether more diagnostics are needed, or to start by monitoring the growth with repeat ultrasound exams over time.
Age-related changes.
Nodular changes and remodeling may be normal in old adrenal glands. Practice will help to develop clinical judgment of what’s normal and what’s not.

The ability to find the adrenal glands quickly will come with experience, and knowing the right tips and techniques will make it easier to get the information you need even when you’re first learning.
Written by: Dr. Tammy Powell, DVM

Autoclave Sterilization: A Necessity in Veterinary Medicine

In 2021, you’ve probably thought more about sterilization and disinfection than you ever have before.
Of course, you’ve always practiced safely and hygienically. But, this year’s pandemic brought the need for drastic measures like curbside service, face masks during everyday interactions, and washing your hands even more frequently…
… and, you and your staff probably feel like you’re cleaning, cleaning, cleaning all day long!
Best practices for cleaning surfaces and equipment
According to many experts, the best way to avoid viral exposure is the elimination of the risk.
This is where isolation and social distancing protocols come in. Your distancing measures of curbside service, telemedicine, and a limited number of people inside your hospital can all help.
Social distancing within the practice and avoiding the sharing of spaces and equipment as much as possible can also help.
Then, there’s PPE to help minimize any potential exposures—as well as your cleaning and disinfection protocols.
You wear gloves and face masks, you wash your hands and use hand sanitizers, and you clean the surfaces and equipment in your practice.
During your cleaning efforts, don’t forget about a powerful piece of sterilization equipment you probably use frequently…
Maximize your use of this key piece of veterinary equipment…
If your own or work at a veterinary practice, there’s a good chance you have at least one autoclave available for use.
Autoclaves use steam under pressure to kill microbes and are one of the most powerful disinfecting tools you have in your arsenal.
Surgical equipment—and beyond!
An autoclave is a tried and true method of sterilization for surgical packs, drapes, and tools.
But, maybe there are a few more items you don’t always think of that could be put into an autoclave for quick, thorough disinfection.
Things your autoclave can be used for include…
Gowns for surgery, isolation, or general use as an extra layer of protection.
Cloth caps.
Cloth face masks.
Surgery light handles.
Nitrile exam gloves or surgical gloves (ideally these would be single-use, but there are procedures described to maximize the lifespan of your PPE during shortages).
Dentistry tools.
Wound care items such as Penrose drains.
Cones/specula for otoscopes.
Pipette tips.
Certain muzzles.
Certain nail clippers.
Biological waste—in case you suspect viral contamination and want to sterilize waste prior to disposal.
There may be other items you can sterilize, too—so get creative!
Just be sure to check the manufacturer’s guidelines before you sterilize a new item—they’ll guide you on what’s safe or not safe to go in your autoclave.
But, once you get into the habit, this will save you time and do a more thorough job of eliminating microbes than most hand cleanings could ever do.
Why invest in a top-of-the-line autoclave?
In modern times, we can’t help but think of an autoclave as a potent killer of coronavirus!
But really, a good autoclave is useful to you all the time, pandemic or no pandemic. It ensures your equipment is properly sterilized from all microbes prior to use.
A good quality autoclave is dependable and makes your life easier via the simplicity of use. Here’s what we recommend you look for…
Several setting options including solid or liquid items, and wrapped or unwrapped items.
The option to choose a preset that suits your needs.
Large water reservoir so you don’t have to refill as often.
A tabletop model with a large chamber capacity so you can fit more items per cycle.
Locking mechanisms for safety.
A strong warranty and excellent customer service.
Our pick is this Full-Size Veterinary Autoclave because it meets all of these criteria, and has an industry-leading 3-year warranty (which includes a loaner autoclave if yours ever needs to be serviced).
How to keep your autoclave healthy
It’s always important to protect your investments by caring for your equipment—and that’s even more true during times when the business may be slower due to social distancing.
Here are a few tips to keep your autoclave in tip-top shape…
Use distilled water, not tap water.
Post guidelines for routine maintenance (otherwise, it’s easy to forget!).
Look for debris when the autoclave is cool, and clean it as needed.
Wipe the trays clean weekly.
Note any water or steam leaks.
Listen for any unusual sounds.
Observe the tape indicator each time, to ensure the autoclave is functioning as it should.
With a little attention and care, your autoclave will stay healthy—and in turn, it can help keep your equipment pathogen-free!

Mental Health and Work-Life Balance for Veterinary Practice Owners

Veterinary medicine can mean a busy schedule and emotional ups and downs.
Unfortunately, recent data suggest that this, along with other factors of daily practice, can take a toll mentally and emotionally.
Plus, as a practice owner, there’s the additional pressure of running a business.
You got into this profession because you love pets and want to help them—and that can make for a very rewarding career.
The trick is finding ways to care for yourself.
This may look a little different for everyone, but here are some popular suggestions that have helped many veterinarians find more energy, wellbeing, and balance…
Set Boundaries
When you love animals, it’s natural to want to help every pet who needs care. But failing to set boundaries can lead to burnout.
In addition to the turmoil it causes in a person’s life, burnout can also interfere with the ability to help pets over the long-term.
Setting boundaries can mean a number of different things, depending on your personal preferences and what your work rules allow. Here are a few suggestions…
Put breaks into your schedule
Giving yourself 5-20 minutes to recharge in the morning and afternoon (in addition to your lunch break) can be immensely helpful during a busy day.
Have clear cut rules for scheduling
For example, is double booking allowed? Can you go to lunch rather than seeing the patient that walks in at lunchtime (assuming it’s not a life-threatening emergency)?
To accommodate these and other scheduling surprises, it helps to leave a few appointment slots open each day—that way, you have enough time for all patients rather than running yourself to exhaustion trying to fit everyone in.
Set boundaries with clients
For example, if you give your phone number out to pet owners, be sure they know when and under what circumstances they can call you.
Or if a client is acting really outrageous and causing stress for all employees, it may be in your team’s best interest to “fire” that client to protect everyone’s time, energy, and morale.
Say “no” sometimes
This might mean coordinating with another doctor at your practice to take over care of your patients on your day off, so that your team isn’t calling you at home unless absolutely necessary.
You deserve to enjoy some days off!
Focus On the Positive
Despite your intelligence, knowledge, and passion, some things are out of your control.
Even with your best efforts, sometimes pets don’t get better—due to the nature of their medical condition, or due to owners not agreeing to the type of care you’d like to provide.
This happens to everyone. And while it’s hard to accept, it may help to focus on all the good memories—all the times you’ve helped pets, all the thank you cards from clients, etc.
Sometimes negative thoughts—whether it’s a client who said something rude or the loss of a patient you care about—dominate our minds. It’s human nature.
But usually, the good days outweigh the bad. It’s just a matter of training our brains to refocus on the positive.
Figure Out What Brings You the Most Fulfillment
Find ways to make your daily work life as enjoyable as possible.
This could mean cultivating relationships with clients.
It could also mean community involvement, such as charity efforts, puppy/kitten classes, or informational talks on pet nutrition or other topics.
Fulfillment may also mean specializing, or being the “go-to” doctor in your practice for specific procedures or medical conditions that you enjoy working with.
Cultivate Joy
In addition to professional fulfillment, it’s important to cultivate joy in your personal life.
This means some type of human connection—whether that’s a partner, friends, or family.
If you’re working long hours, it’s easy to feel isolated. By doing your best to schedule time with people you care about—even just a quick phone call—you may find that your mood lifts.
Additionally, physical activities, hobbies, learning new things, and other pursuits outside of work can remind you that “there’s more to life.”
This makes it easier to reframe a bad day as something that, while hurtful, is probably small in the scheme of things.
Schedule Time to Slow Down
If you need to sleep or binge-watch a show after a tiring week, go for it!
Or find time to read a book, take a bath, or meditate.
In addition to activities that bring you joy, scheduling “slow time” may help you feel centered, recharged, and in control of your schedule.
Seek Out Support
It’s helpful to find caring people who can listen.
Depending on your needs and circumstances, this may include…
Friends and family.
Colleagues you trust.
Veterinary support groups such as…
Vets4Vets®
A confidential support group for veterinarians associated with the VIN Foundation, which includes everything from weekly group discussions to one-on-one support.
Not One More Vet
An online support network of over 20,000 veterinarians with additional resources, including support in finding temporary relief workers for vets who need a few days off.
A therapist or counselor. Nowadays, there are convenient and reasonably priced online services such as Talkspace and BetterHelp.
Sometimes, just venting to someone in a safe, confidential setting can really lift the weight off of a person’s shoulders.
The National Suicide Prevention Lifeline: 1-800-273-TALK (8255), or text 741 741 to speak to a trained crisis counselor.
The Truth About Balance…
The thing about balance is, it’s dynamic, not static.
That means that as you go through different stages of life, your schedule, priorities, and tricks for recharging yourself may change. The key is to be aware and to adjust as needed.

The better you care for yourself, the better you’ll be able to care for pets—and the more joy you’ll get out of your daily work and personal life.
Resources:
Not One More Vet: https://www.nomv.org/
Talkspace: https://www.talkspace.com/
BetterHelp: https://www.betterhelp.com/
The National Suicide Prevention Lifeline: 1-800-273-TALK (8255), or text 741 741 to speak to a trained crisis counselor.
Written by: Dr. Tammy Powell, DVM

Five Simple Questions for Financing Your Veterinary Practice

How to Budget for Your First Year as a New Veterinary Practice Owner
Starting your veterinary practice can be an exciting journey, but securing financing is often one of the process's most significant (and intimidating) steps. Many new practice owners don’t have large cash reserves or private investors, so financing is usually necessary. Working with financial experts and veterinary consultants can help you make informed decisions that support your long-term success.
Here are five essential questions to consider as you plan your financing journey.
1. What Will I Need Financing For?
Before diving in, assess strictly what expenses will require financing. Here are some major categories:
Practice Space: Your first decision will be where you’ll practice. This could mean purchasing an existing clinic, leasing a new space, or even constructing your facility from the ground up. Some veterinarians also consider buy-in options at practices where they’ve been associates or even franchise opportunities.
Equipment: Equipment expenses can add up quickly. Think x-ray machines, exam tables, surgery lighting, dentistry units, and computers. Many lenders offer capital leases to alleviate upfront costs, letting you pay over time and start generating revenue sooner. You could also explore high-quality used equipment on platforms like usedvetequipment.com, which can provide substantial savings.
Daily Supplies: Daily supplies—such as pharmaceuticals, syringes, cleaning agents, gloves, and more—are essential for smooth operation, but they’re recurring expenses that can add up.
Operating Costs: Besides equipment and supplies, ongoing costs include salaries, insurance, utilities, and more. Factoring these into your business plan is crucial for understanding your monthly expenses.
2. How Much Can I Afford to Live On?
Realistically, your practice might not turn a profit for the first 1-3 years. You may not be able to draw a regular salary during this time. Consider how this financial reality will impact your life, especially if you have personal financial responsibilities like dependents or other expenses.
Purchasing an established practice can sometimes mean quicker revenue, as you’re starting with an existing client base. However, building a practice from scratch may require a longer timeframe to become profitable. Understanding your financial tolerance—and having a personal financial plan—can give you confidence as you take on the demands of a new practice.
3. How Will My Student Loans Affect My Financing?
Veterinary lenders generally don’t require you to have your student loans fully paid off before you apply for a practice loan. Still, your student debt status matters—lenders are unlikely to approve a practice loan if your student loans default. Remember that you must account for your student loan payments in your personal budgeting and financial planning.
If you’re uncertain about how your student debt might impact your financing options, don’t hesitate to consult a financial expert to explore your eligibility and options.
4. Do you know where I can find the Right Lender?
Some lenders specialize in veterinary practices, and they can be an excellent option because they understand the field's unique financial needs. On the other hand, Small Business Administration (SBA) loans offer flexible terms and government-backed security, making them another viable choice.
When assessing lenders, compare factors like:
- Required down payment
- Loan term and interest rates
- Fees and penalties
- Options for graduated repayments (small initial payments that increase as your practice grows)
A business plan and financial projections are typically required, so be prepared to present these documents when applying.
5. How Can I Navigate the Financing Process?
Even though starting a practice involves uncertainty, planning and preparation can help you make informed choices. Consulting with a CPA, a veterinary management expert, and a demographics professional can provide valuable insights. These experts can guide you in developing a business plan and financial projections to support your financing application.
Investing in expert advice, along with doing your research, will pay off as you move toward achieving your practice ownership dreams.
Feel free to reach out to me if you need personalized guidance on securing financing for your practice. I’d be happy to help.
Brad Haven, Jr.
Call or text me: 530-355-5886

Hidden Profits: The Value of Regular Pet Dental X-rays

Beneath the Surface: How Routine Dental X-rays and Cleanings Improve Pet Health and Your Bottom Line
In the busy life of a veterinary practice, we know it can be easy to place dental health on the back burner.
After all, pets coming in for vaccinations, surgical procedures, or more obvious pain management often seem more urgent.
Prioritizing dental health through regular teeth cleaning and routine dental X-rays can benefit your patients' well-being and your practice’s financial health.
Let’s talk about why this is a worthwhile investment and why these procedures are essential to our standard of care.
The foundation of good health starts with routine dental cleanings.
Periodontal disease is among the most common health issues in dogs and cats, affecting around 80% of pets over the age of three.
Yet pet owners often underestimate the impact it can have.
Poor dental hygiene doesn’t just affect the mouth, it affects the entire body, leading to issues such as:
Chronic pain
Behavioral change
Weight loss
Systemic infections
Regular cleanings under anesthesia and using a well-equipped dental cleaning station allow us to remove tartar and plaque before they cause these more significant health issues.
They also allow us to discuss pet dental care with clients, which helps improve long-term compliance with at-home care.
Regular cleanings can extend pets’ lives and improve their overall quality of life.
After seeing their pet healthier and more comfortable, our clients often feel reinforced trust in our recommendations and the value of our services.
By encouraging routine dental care, our patients can experience benefits like:
Pain-free eating and play
Prevention of systemic disease
Fresher breath
Enhanced energy and comfort
Lower risk of dental complications
Dental X-rays are an underestimated diagnostic tool and offer an indispensable view of dental health.
Around 60% of dental disease is hidden below the gumline, making it impossible to assess a pet’s oral health without imaging fully.
A tooth may look healthy on the outside, but dental X-rays often reveal hidden problems like:
Root abscesses
Bone loss
Retained roots or resorptive lesions
When we skip these X-rays, we risk missing pain-causing issues that erode the pet's health and comfort over time.
If we avoid routine dental X-rays due to time, cost, or anesthesia concerns, our patients are the ones who ultimately suffer.
Undetected dental disease can progress until it’s obvious enough to require a more aggressive intervention, such as multiple extractions or management of a full-blown abscess.
At that point, the patient has already experienced unnecessary pain and discomfort, and the client faces a larger treatment bill than if the issue had been caught early.
Without early intervention, periodontal disease can lead to chronic infections that eventually spread to other organs, adding further complications to the pet’s health.
For older pets, untreated dental disease may contribute to a shortened lifespan.
Investing in dental health and digital imaging is an opportunity to enhance the health of your practice.
Clients who understand the long-term benefits of preventive dental care and regular checkups will likely invest in these services.
This is especially true when they recognize the care your practice offers—thanks in part to digital imaging technology.
In many cases, veterinary practices that establish clear dental protocols, including routine X-rays, report increased client retention and an expanded service portfolio.
When clients see the advanced diagnostics and appreciate that you’re doing everything possible to prevent disease, they tend to return and spread positive word-of-mouth referrals!
If your practice is ready to integrate or expand digital dental imaging, here are a few tips to ease the transition:
Demonstrate the Importance: educate clients by using examples of cases where X-rays uncovered unseen issues. This helps to give a real-world understanding of what’s at stake.
Offer Dental Packages: Consider bundling dental cleaning and x-ray services for a comprehensive approach. This encourages pet owners to embrace both as part of a complete care package.
Train Your Team: Ensure your entire staff knows the value of digital X-rays and dental cleanings to discuss these services with clients confidently.
Incorporating regular dental care isn’t just about filling appointment slots. It’s about providing your patients with the highest level of care and adding a consistent revenue stream that reflects the value you bring to patient care.

First Aid for Pets: Essential Steps in Emergencies

Preparing for the Unexpected: tips to give pet parents for handling emergencies at home
As veterinary providers, we’re often the first responders to patient emergencies. Yet, as much as we try to be available, pet parents should also be prepared to act quickly when their pets are distressed.
Offering education on responding at home before they reach our practices can significantly affect the outcome of a critical situation.
Here are some key strategies we can share to help them stay calm and competent during a crisis.
1. The Importance of a Pet First Aid Kit
A well-stocked, pet-specific first aid kit is one of the most essential tools for any pet owner. While most households already have basic first aid supplies, reminding clients to include items specific to pets can help them be better prepared. Essentials include:
Sterile gauze and bandages (self-adhesive)
Tweezers and blunt-tipped scissors
Hydrogen peroxide (for inducing vomiting under professional guidance)
Non-stick wound pads
Thermometer and lubricating jelly
Emergency contact information (vet clinic, after-hours ER, poison control)
2. Recognizing Signs and Symptoms of a True Emergency
It’s not uncommon for pet parents to hesitate in determining whether their pet's behavior or symptoms warrant immediate care. Advise them to seek immediate veterinary attention if their pet is experiencing:
Difficulty breathing or choking
Seizures, collapse, or ataxia
Persistent vomiting or diarrhea (especially if blood is present)
Severe pain (vocalizing, limping, or reluctance to move)
Ingestion of toxins (medications, chocolate, plants)
Major trauma (e.g., from a fall or vehicle accident)
Heatstroke symptoms (excessive panting, lethargy, bright red gums)
3. Pet CPR: Basic Instructions
Teaching the basics of pet CPR can save lives in critical moments. While pet parents shouldn’t attempt to handle all medical emergencies at home, understanding CPR for pets can be crucial while on route to the hospital.
Consider offering short workshops or providing clear, visual handouts on CPR for both dogs and cats. Some simple steps to share for CPR include:
Ensure the airway is clear
Check for breathing and a heartbeat
If no heartbeat, begin chest compressions (compressions vary based on size)
Combine with rescue breathing (mouth over muzzle for dogs, mouth over nose for cats)
Remind them this is a temporary measure while getting the pet to a veterinarian, not a solution.
4. Handling Common Injuries at Home
Pet’s may experience injuries like cuts, burns, or bite wounds, which need immediate care. Giving pet parents clear instructions on stabilizing the pet and controlling bleeding can prevent complications. For example:
Cuts or lacerations: Clean the wound with a saline solution and apply gentle pressure with a non-stick pad. Elevate the area if possible to reduce blood flow.
Burns: Cool the burn with cold water for several minutes, but avoid ice. Bandage the area loosely to prevent further injury.
Bite wounds: Rinse the wound with clean water and cover it with a sterile bandage until it reaches the clinic.
While these steps help, professional veterinary care is critical for preventing infection or further complications.
5. Stay Calm and Keep Safe
One of the most valuable things we can instill in pet parents is the importance of staying calm in an emergency. Reassure them that it's okay to feel overwhelmed and that staying composed will allow them to make clearer decisions.
Encourage them to avoid putting themselves at risk, such as reaching into a pet's mouth during a seizure or attempting to break up a dog fight without tools.
7. Preparing for Natural Disasters
Whether they live in a region prone to wildfires, hurricanes, or earthquakes, encourage pet owners to include their pets in their disaster preparedness plan. Having a checklist on hand can be a helpful way to help them prepare.
The checklist might include:
A portable carrier or crate for each pet
A week's worth of food and water stored in an easily transportable container
Copies of medical records, vaccination status, and any necessary medications
Identification tags or microchip registration up to date
Empowering Pet Parents During Critical Moments
By offering guidance on handling emergencies at home, we can empower them to act swiftly and effectively. Whether teaching them the signs of a severe emergency, demonstrating CPR techniques, or helping them prepare a disaster kit, these steps help bridge the gap between the initial crisis and the moment they walk through our clinic doors.
Prepared pet parents make all the difference in those critical moments, and with our support, they can be ready to give their pets the best care possible.

The Power of Telemedicine in Veterinary Critical Care

Telemedicine in Veterinary Emergency Care: A Lifesaving Tool for Our Patients
Most of us have seen the chaos that can unfold during an emergency visit…
Adrenaline spikes, and we rush to stabilize and strike the problematic balance between time, skill, and resources to save a life.
Whether it's a dog hit by a car or a cat in respiratory distress, time is often the one thing we don’t have enough of.
Telemedicine has emerged as a powerful tool, changing how we respond to emergencies, offering real-time expertise, and, most importantly, saving lives.
Expanding the Reach of Critical Care in Veterinary Medicine
Telemedicine allows veterinarians to provide expert advice without delay, making it invaluable in emergencies.
Many practices, especially in rural or remote areas, might need more access to specialists or advanced diagnostic equipment. With telemedicine, that barrier disappears.
Instead of relying on limited resources, veterinarians can consult with specialists—board-certified surgeons, neurologists, or radiologists right from their hospital.
Imagine the power of receiving expert radiographic interpretation for a suspected GDV case in the middle of the night when no specialist is physically nearby. Or having access to a cardiologist’s input in a heart failure case, where every second counts.
Veterinary telemedicine can empower more informed decisions on patient care, guiding whether a patient can be stabilized in-house or requires referral to a higher level of care.
The peace of mind comes with being able to tap into a virtual lifeline of expertise.
Faster Triage and Treatment Decisions for Veterinary Patients
One of telemedicine's biggest impacts on veterinary emergency care is in triage. In busy emergency rooms or during after-hours calls, it’s essential to prioritize cases based on their urgency.
However, assessing a patient's condition can be tricky over the phone or in text descriptions.
Telemedicine platforms incorporating video and photo capabilities bridge this gap, allowing veterinarians to see the patient.
We’ve all taken a phone call about a “slightly lethargic” dog only to find a critically ill patient when they arrive. With telemedicine, the guesswork in these situations diminishes significantly.
Whether it's giving hope to a worried owner, being able to stabilize a patient sooner, or ensuring recovery post-crisis, telemedicine is quickly becoming an essential component of lifesaving care.
During the height of the COVID-19 pandemic, when curbside care became the norm, some were fortunate to witness how video consultations transformed emergency response.
Triage teams could assess vital visual cues like mucus membrane color, respiratory effort, or pain response. This not only gave us more precise information but often sped up decision-making.
Elevating Veterinary Post-Emergency Follow-Up
The telemedicine advantage doesn’t end when the immediate crisis is over. The follow-up care for an emergency patient is just as critical.
From reviewing radiographs to monitoring wound healing, telemedicine can offer flexibility in virtual check-ins, which can be valuable to a patient’s recovery plan.
Pet parents appreciate the convenience of telemedicine follow-ups, especially when transporting a recently hospitalized pet can be stressful or unnecessary.
Additionally, it allows veterinary professionals to ensure that pet parents are correctly administering meds and following post-op care instructions.
With a video call, you can watch them handle their pet, address any concerns, and adjust before minor issues become more significant complications.
The Future of Telemedicine in Veterinary Emergency Care
Telemedicine in veterinary emergency care has challenges—such as technological limitations in certain areas and concerns about missing vital information when relying on virtual consultation. But as technology evolves, so will the opportunities it provides.
What’s most exciting about the future of telemedicine is its potential to revolutionize access to care, offering flexibility in location, clinic hours, and specialist availability.
Whether we’re providing life-saving care in the middle of the night or potentially guiding clients through urgent situations, telemedicine allows us to expand our reach in ways that were unthinkable just a few years ago.
In the world of veterinary emergency care, where every minute can make the difference between life and death, telemedicine is a tool we can’t afford to overlook. There’s no telling how far it will take us and how many more pets will benefit from the care we can provide.
For those who spend countless hours in the emergency room, it’s heartening to know that telemedicine lets us extend our expertise where it’s needed most.

The Power of Teamwork in Veterinary Emergency Care

Leadership in Veterinary Emergency Care: Fostering Teamwork and Resilience
In the world of veterinary medicine, very few things rival the intensity and pressure of an emergency situation.
Every moment matters, whether it’s a dog hit by a car, a blocked cat, or a toxin ingestion case.
For anyone on the frontlines of emergency care, there’s a shared understanding that it’s never just one person saving a life. It’s the power of a well-coordinated team that truly makes the difference.
Each Role and Skillset Matters during a Veterinary Emergency
Veterinary emergency teams operate like a well-oiled machine, each person stepping into their role with a purpose.
While the Veterinarian is diagnosing and making rapid decisions, the entire team performs the treatment plan.
Veterinary technicians prepare equipment, monitor vital signs, and complete patient treatments while anticipating what a patient or doctor might need next.
Receptionists and client care coordinators are known as the valued gatekeepers, calming anxious owners, completing paperwork, and ensuring that communication flows smoothly.
Communication Comes in Many forms During Critical Moments.
In a genuine emergency, there’s often no time for long explanations or instructions. This is where the bond of a well-trained team shines through.
A nod, a glance, a quick cue—veterinary teams communicate quickly, efficiently, and sometimes without a spoken word.
Please think of the technician who hands over a catheter or prepares an oxygen mask before the veterinarian even finishes asking for it. This silent communication is built on trust, experience, and a deep understanding of each team member’s strengths.
That trust goes beyond task management and extends to emotional support, too. The stress and stakes of emergencies can weigh heavily on everyone involved.
A cohesive team knows when to step in and support each other, whether it's taking over a task or offering a calming word during the chaos.
Holding Space for Compassion for Veterinary Teams, Patients, and Pet Parents
Veterinary emergency care is not just about clinical efficiency; it’s also about holding space for the emotional needs of the team, the pet, and their parents.
Each team member creates an environment where the pet’s comfort and the client’s fears are acknowledged and addressed.
A veterinary nurse might take the time to comfort patients as they wake up from anesthesia. Meanwhile, another team member talks with the pet parent, shares an update, and provides reassurance about one of their life's most stressful moments.
Together, they help the client feel like their pet is in the best possible hands, cared for by a genuinely caring team.
The Lifesaving Impact of Teamwork During a Veterinary Emergency
It’s hard to measure the impact of teamwork, but anyone who has worked in emergency medicine knows its power firsthand.
Whether it’s resuscitating a patient in cardiac arrest or making quick decisions about a critical surgery, the outcome is often directly tied to how well the team works together.
The complexity of medical care, combined with the unpredictability of emergencies, means that no one can manage it alone. It’s the collective effort of each individual’s expertise, compassion, and calmness under pressure that creates a successful emergency intervention.
Building Strong Teams is an Ongoing Effort
Creating a culture of teamwork takes time, training, and intentional effort to build trust and communication that allows a team to function well in a state of urgency.
As leaders of these teams, veterinarians play a pivotal role in creating an environment where every team member feels valued and empowered to contribute. This fosters a sense of ownership and responsibility that benefits the entire practice and, most importantly, the patients.
Put, it’s up to the leaders of a hospital to lead by example and cultivate this type of environment.
The power of teamwork is often the very lifeblood of patient survival. When a team comes together in critical moments, lives and families are kept whole.
Furthermore, we, as veterinary professionals, experience the profound satisfaction of knowing that we made a difference together.
Witnessing teamwork during emergencies is a reminder that in those life-and-death moments, no one is ever truly alone.

Behind the Scenes - The Emotional Toll of Veterinary Critical Care and Emergency

As veterinary critical care and emergency service providers, we have the unique opportunity to save lives and support clients through some of their most challenging times.
We enjoy the rush of never knowing what will walk through the door and are always prepared to step into life-or-death situations.
What sets veterinary emergency/critical care teams apart from the rest is our ability to triage quickly in times of high stress and our high degree of resourcefulness.
When it comes to saving a patient’s life, we make no excuses and exhaust every possible option—even those that are unconventional.
What many don’t see behind the scenes of veterinary emergency and critical care is the significant toll many of us face daily.
Working in a unique area of our field comes with a unique set of challenges we face every day.
One of the biggest challenges we face is the sheer intensity of the work. We often deal with traumatic, life-changing situations that are stressful and emotionally draining.
Long hours, high-pressure situations, and a constant influx of critical cases can damage our mental and emotional well-being.
It’s not uncommon to experience things like:
Ethical dilemmas – such as if/when to euthanize and client financial constraints
Challenging client interactions – clients may not agree or respond well to treatment options or cost
Emotional toll – long periods of high stress, burnout, and unsuccessful patient outcomes can take a significant toll
Compassion fatigue – experiencing constant loss and supporting grieving clients can result in feelings of emotional exhaustion.
Feeling undervalued – resulting from a lack of acknowledgment and low compensation
Many don’t see the heartache we experience when a client cannot afford their pet’s care.
Not only because it's often painful for our clients to admit, but it’s emotionally challenging to offer a lower-grade treatment than the patient deserves.
This is where we tend to run into a crossroads with our resourcefulness—we’re often able to get creative to enhance our patients' level of care, but we’re saddened by the constant need to perform treatments “off label,” knowing there’s a better way.
The Hidden Struggles of Working Long Hours and Holidays
The nature of emergency and critical care means that we are often required to work long hours, weekends, and holidays, leaving little time for rest.
It’s no wonder we see high cases of burnout, compassion fatigue, and guilt for not being able to spend enough time with our families and pets
So, what can we do to help move the needle from “taxing and fatiguing” to “fulfilling and valued”?
As tempting as it is to put a band-aid on things by buying our team lunch or bringing in doughnuts, it’s less impactful to the bigger picture.
It’s important to recognize the emotional toll that working in this high-stress environment can take on our teams and to acknowledge hard work and a job well done.
As much as everyone loves some free food, what’s deeply rooted is our need to feel seen, heard, and appreciated.
It’s easy to forget how impactful these simple attributes contribute to our feelings of fulfillment and value.
Start by setting the example…
Culture change happens one person at a time, and the age-old saying “lead by example” is still a practical approach to change.
It’s okay to start small:
Give an acknowledgment a day by authentically extending appreciation to a team member or group for something specific they’ve done. This could be a simple thank you for staying late or kudos for working with a difficult client.
Take breaks, practice self-care, and seek support from colleagues to demonstrate prioritizing your well-being. Encourage your teams to do the same.
Empower your teams to speak up when they’re feeling burned out. Share some examples of options they’ll have to help them recover. They must know we’re invested in their well-being.
The Power of Compassionate Leadership in Veterinary Teams
Working in veterinary emergency and critical care requires compassionate leadership.
This leadership style is rooted in empathy, kindness, understanding, and clear expectations.
Compassionate leaders prioritize the needs of their teams, can connect with those they work with, and are effective at active listening.
Understanding differing perspectives, feelings, and challenges is a skillful practice. Compassionate leaders handle difficult situations with understanding and grace.
Leading with a compassionate leadership style does not mean allowing your team to make excuses, act outside the rules, or disrespect boundaries. Rather, it encourages a respectful environment enhanced by psychological safety.
We often forget that our ability to work in veterinary emergency and critical care is a privilege. We’re uniquely positioned to make a meaningful difference in the lives of our patients and pet parents.
However, we must remember that we are human, too, and it is okay to feel the weight of the emotional toll of our work.
By supporting each other and taking care of ourselves, we can continue providing the best care possible for our patients while maintaining our own well-being.

Online Reviews: Your Veterinary Practice-Part 2

Getting More of the Good and Dealing with the Bad
In part one, we offered an introduction to online reviews, including why online reviews matter so much to the success of your veterinary practice.
As a reminder… online reviews can affect your veterinary practice’s reputation, how high you show up in online search results, your ability to attract new clients, and your practice’s bottom line.
Considering that over 90% of consumers read online reviews, it’s more important than ever to “take the reins” and use online reviews to your advantage.
Here’s how…
How To Ethically Solicit Good Reviews for Your Veterinary Practice
Keep it simple.
Your clients are busy, so the easier you make it to leave a review, the more likely they are to do it.
Try placing links to review sites on your website or social media.
Automate the process.
Consider sending automated follow-up emails (or even text messages, which are gaining in popularity as a communication tool for businesses) for well patient visits.
In the message, you can include links to review sites—or even an invitation to leave a review, so long as your invitation follows the rules (some review sites don’t allow you to ask clients for reviews, while others do).
Maximize your use of positive reviews.
Frame and display them in your lobby, use them as quotes on your website, or share them on social media.
Follow up on ALL reviews.
Positive reviews deserve a response just as much as negative reviews do.
In fact, responding to positive reviews can help bond those happy clients to your practice and show future clients that you are attentive and caring.
Thank clients who leave reviews.
If a client goes out of their way to leave you a glowing review, a phone call or thank you card is a quick but effective way to let that client know you appreciate them.
In some cases, it may be appropriate to offer a small thank you gift, such as a bag of treats for their pet. Just be sure to follow the review site’s guidelines for gifts—and use the gift is an unexpected “thank you” after the fact, not as an incentive offered in exchange for a review.
As you can imagine, angry or dissatisfied clients are far more likely than happy clients to take time out of their busy day to leave a review…
Fortunately, you can combat this issue by using the above strategies to acquire more good reviews.
That way, a couple of negative reviews here and there will seem less relevant.
How do you deal with bad reviews?
A bad online review may feel like a punch to the gut—especially if it’s very accusatory or a WRITTEN IN ALL CAPS angry review.
To make matters worse, it can affect new clients’ perceptions of your veterinary practice.
Don’t worry, though… it happens to everyone.
Here are a few tips to help you deal with those inevitable negative reviews…
Take a deep breath.
An emotional, knee-jerk response never helps…
Don’t respond until you’ve had a chance to not only investigate the facts, but answer from a calmer frame of mind.
Determine if the review is legit.
Mistakes happen, and sometimes clients of a different veterinary clinic may mistakenly leave a review on your site. Or, a fake review could come from a disgruntled ex-employee or someone else with their own agenda.
If you’ve determined that the review is false (from someone who isn’t a client), communicate that fact politely in response, then contact the platform or directory and request they remove the review.
Go on a fact-finding mission.
If the review is, in fact, from someone who visited your clinic…
Talk to your team, do some research, and figure out what actually happened.
Look at this as an opportunity to grow.
Sometimes, negative reviews are invaluable opportunities to improve your practice’s communications, customer service, or quality of care. In that regard, a negative review could be a blessing in disguise.
Try to contact the client.
Whether the review was accurate or not, it’s often a good idea to call the client as soon as possible—within 24 hours is a good rule of thumb to diffuse the situation.
Express your concern for the wellbeing of their pet. Listen with empathy, even if their review made you angry. Sometimes, just being listened to will help an angry client calm down.
If appropriate, take measures to make the situation right with the client.
Some people are impossible to please…
On the other hand, some clients will be perfectly happy if you try to make amends.
If the situation seems to be resolved, give the client an opportunity to update or remove the review themselves—and if they don’t do so in a few days, it’s usually okay to politely ask (check on their pet’s wellbeing when you contact the client, too).
Respond to the online review if it’s not removed.
If you haven’t been able to reach the client, write that you hope they will contact you so you can learn more and help to resolve the situation.
If you have contacted them, mention that you were glad you were able to resolve the situation (if applicable) and express your good wishes for their pet.
Always be kind and helpful.
It may be tempting to defend yourself or get into an argument…
But taking the high road and focusing on your sympathy for the client’s pet will leave the impression that you’re professional and caring—something future clients will notice since they’ll read your response along with the original review.
Good rules of thumb…
Always be authentic and caring in your communications, and let your love of pets shine through.
Craft a unique response to each review, rather than using a “cookie-cutter” phrase that’s exactly the same each time.
Respect each client’s privacy, even if their negative review is inaccurate. Revealing personal information (like names or their pet’s medical history) could land you in hot water.

If all of this seems overwhelming, you’re not alone…
Many veterinary practices consult with marketing professionals to help them with online reviews and communications. You may find this option saves you a ton of time, and helps you effectively accomplish your goals so your practice can thrive.
Written by: Dr. Tammy Powell, DVM

Now YOU Can Choose the Best Veterinary Lighting for Your Surgery Room

When it comes to surgeries, good lighting is crucial.
Without good quality light, it can be hard to see all the details of what you’re working on, whether that’s a spay, a wound repair, and abdominal exploratory, or anything else.
Dim or subpar lighting can make you strain your eyes while trying to place or tie your sutures. And, adequate lighting is important to accurately note the color, texture, and general appearance of tissues for your medical record—that way, nothing gets missed.
Not to mention, good visualization of your field of work keeps you from craning your neck to see better—which can be helpful for your posture and for preventing aches and pains from hunching over.
Maybe you already understand the importance of good surgical lighting—but did you realize how affordable it is?
In the past, LED lights have been very expensive compared to halogen bulbs—and maybe that seemed cost-prohibitive.
However, new lights are available at 30-40% less (and that includes a better warranty, too).
So, considering the energy efficiency and performance of LED lights, there’s really no competition—affordable, high-quality LEDs are a great investment for your practice.
Plus, many cities, counties, states, and even electric power companies offer rebates for upgrading to LED lights, due to the decrease in power used.
Specific requirements for rebates vary by location—so be sure to check with your local municipality and utility providers to see what’s available in your area. Because it’s always great to get a cash rebate that can help cover the cost of your upgrades!
So, how do you choose the right surgical light?
When it comes to selecting the best surgical light, there are many things to consider…
Affordability. LED lights are much more affordable now than they used to be, so shop around and be sure you’re getting a good deal (be sure to compare all the other factors on this list, too).
Quality. Look for dependability, durability, and a good-value warranty to back up your investment.
Range of lighting brightness, including high-intensity light, and dimming options to use as needed.
Adjustable. The light pattern can be adjusted from a smaller, focused pattern, to a larger area of coverage, depending on your needs.
Precision positioning. You should be able to adjust the entire head and arm of the light, and know it will stay precisely where you put it (we recommend limitless arm rotation and a drift-free design that moves easily when you adjust it, but then stays put where you want it).
Easy to clean (and sterilizable handles are a plus).
User-friendly, with dimming and focusing controls on or near the handle.
Shadow-free illumination—or at least a design that minimizes shadows as much as possible.
Mounting options that match the layout of your surgery room or suite.
What’s our recommendation?
We recommend the new Burton veterinary LED surgery light.
Why? Because this light checks all the criteria above. Plus, it has a dependable LED, is assembled in the USA, and is backed by an industry-leading 5-year warranty.
At a competitive price point that optimizes design, performance, and value, it’s pretty hard to pass up!
Is a Burton light right for you?
When it comes to investing in new equipment for your practice, maybe the lighting isn’t always the first thing on your mind…
However, surgical lighting is something you use many times every week—maybe even several times per day, depending on the nature of your practice.
That’s probably more often than you use some of the other equipment in your hospital.
So, be sure not to overlook this crucial piece of equipment. You may be surprised how better lighting can make your time in the surgery suite more comfortable and efficient.

Combining X-Rays / Ultrasound for Cat Orthopedic Assessment
X-Rays are a very commonly used diagnostic technique in veterinary clinics.
Feline patients are notoriously reticent when it comes to overt signs of pain and illness, and therefore diagnostic imaging plays a vital role in the assessment of cats in veterinary clinics.
Despite the inherent radiation risks, radiographs are a non-invasive tool with fewer complications or unwanted sequellae than more invasive diagnostic modalities, but a higher sensitivity and specificity for many conditions than most less invasive techniques.
In many ways, we can consider radiographs to be the optimal middle ground in imaging technology for the diagnosis of a remarkable variety of conditions.
Why use radiographs?
X-rays are a common imaging modality used in veterinary clinics due to their ability to penetrate tissue, and so reveal internal structures.
They are therefore used to assess solid structures and are particularly useful in areas with contrasting densities, such as in the thorax.
Radiographs can be an important part of a diagnostic pathway and should be used alongside a full clinical history, physical examination, and other diagnostic tools such as bloodwork and other imaging modalities.
Why not use radiographs?
X-rays are usually considered non-invasive for patients in a veterinary setting, as they are unlikely to alter or exacerbate any underlying pathology.
However, it should be remembered that X-ray exposure can be harmful at certain levels, and positioning cats for X-rays may cause stress and discomfort. For this reason, chemical restraint is always preferred, when clinically possible.
Why are radiographs particularly useful in cats?
Cats are notorious for their ability to mask clinical indicators of pain, illness, and disease. Their tendency to withdraw at times of physiological, physical, and behavioral stress can lead to both owners and veterinarians missing clinical signs, and make a comprehensive physical assessment more difficult.
This means that objective measures of disease are important, with accurate diagnostic methods beyond physical assessment needed.
Indications for X-rays in cats
Radiographs have a role in the diagnosis of many conditions, but they are of particular value in disease processes affecting:
The thorax
One of the most commonly imaged areas in cats is the thorax. Due to the pleural potential space providing mechanical coupling between the chest wall and lung, invasive imaging techniques – such as thoracoscopy – are very high risk. In the acutely dyspnoeic patient, ultrasonography may be more rewarding and lower risk, but in most cases, radiography gives more useful information due to the radiolucent air-filled spaces preventing ultrasound penetration.
X-ray imaging of the thorax may be used for the determination of respiratory, cardiovascular, oncological, and traumatic conditions.
The standard radiographic projections should include left and right lateral and a VD or DV view; although the VD should be avoided in patients with severe pulmonary or cardiac disease, as the resulting V/Q mismatch may prove rapidly fatal in a brittle dyspnoeic cat.
Fortunately, the range of densities from gas-filled lungs to solid bone provides high contrast, meaning that a resting “cat-o-gram" will often prove diagnostically useful, if the patient’s medical status precludes a more correctly positioned radiographic series.
However, findings can be non-specific and require further investigation, in particular, if there is profuse pulmonary, pleural, or pericardial fluid or solid lesions in the lungs.
The abdomen
Abdominal radiographs have many diagnostic uses, including changes to the size, shape, or architecture of organs, foreign bodies, fluid or gas accumulations, and trauma.
Common views taken are the left and right lateral and a DV or VD. However, radiographic interpretation is not always straightforward, as the mass of overlapping soft tissue structures produces a complex palimpsest where three-dimensional relationships are obscured.
Moreover, while different fat: water ratios in different tissues do give subtly different radiographic density (and thus shade), these subtle variations are difficult to appreciate. In many cases, only the major organs are visible on a plain film radiograph. Remember too that obese patients can be more difficult to assess, due to the accumulation of fat around organs.
However, even a simple survey radiograph has its advantages, as being relatively quick and easy, while an ultrasound scan can give different information, it is not possible to visualize the entire abdomen in a single view, unlike with a radiograph.
And while an exploratory laparotomy or even laparoscopy would indeed allow the surgeons to access and examine every structure in the cavity, these are invasive procedures with a relatively high complication rate.
The essence of obtaining – and interpreting – a diagnostic abdominal radiograph is in understanding the contrast. For example, intestinal gas – especially in the colon – shows a clear contrast to the soft tissue around it, as do radio-opaque foreign bodies.
For a more detailed examination of the intestinal or urinary tracts, contrast radiography is an under-utilized and powerful technique that bypasses the fundamental problem of poor tissue differentiation and should always be considered, especially if a structural or functional bowel obstruction is suspected.
Bones and joints
Fractures, deformities, and injuries of bony structures can all be assessed in cats using X-rays. Joint and soft tissue imaging can be more challenging, as the density of ligaments and tendons is extremely similar.
Orthopedic imaging is classically considered to revolve around radiography; however, if soft tissue lesions are suspected (or no bony lesions are detected), the parallel use of radiography and ultrasonography is an exceptionally powerful combination.
When performing orthopedic radiographs, orthogonal views are critical, as the X-ray produced is a two-dimensional image of a three-dimensional anatomic site, requiring the opposing view to fully visualize the area.3 In essence, with the exception of some of the more specialized glenohumeral and coxofemoral views, any limb radiograph can be considered to comprise a dorsopalmar/dorsoplantar view and a mediolateral view.
It is usually important to image limbs from medial to lateral, as the limb being imaged should be as close to the imaging plate as possible. Imaging the upper, rather than lower, limb will result in excessive magnification due to an elongated object-film distance; in addition, due to the resultant angularity of the limb, variable magnification along its length may be seen. In both cases, it is impossible to accurately measure lesions or bones for the selection and fitting of plates.
In some cases, with subtle or highly focal pathology, additional oblique views may also be necessary to skyline the lesions.
These should be selected based on the location, size, and any suspicions based on simple DP and ML views.
However, in the majority of cats, the bone opacity is low enough that most lesions can be appraised from a simple paired view.
Dental X-rays
Dental disease is extremely common in cats, and management can be complex. Radiography allows for a thorough assessment of oral structures, including those below the gingival margin.
Using dental X-rays in cats allows for success in both treatment planning and evaluation.
Radiographs can provide a rapid, non-invasive, and clinically useful assessment of many internal structures in the cat.
However, X-rays should be used alongside other clinical options such as a physical exam, bloodwork, and other imaging. It is important to remember the limitations of a plain film radiograph (the reduction of three-dimensional structures into a flat palimpsest, and the limited differentiation between soft tissue structures).
As a result, a good knowledge of feline-specific anatomy and a good radiographic atlas are invaluable aids in interpreting the images. However, no other imaging modality is as versatile and as quick and easy to perform in the clinic, and with cats frequently presenting late into the course of a range of pathologies due to their masking behaviors, this makes radiography an excellent first choice for imaging most body systems.
References
del Regato JA: Wilhelm Conrad Röntgen, in Radiological Physicists. American Institute of Physics, 1985.
Larson, M. Feline Diagnostic Imaging. Published 2020 John Wiley. Ed. Holland & Hudson. ISBN:9781118840948
Lavin L: Small animal soft tissue, in Lavin L (ed): Radiology in Veterinary Technology, ed 3. Philadelphia, WB Saunders, 2003
DuPont, G. & DeBowes, L. Atlast of Dental Radiography in dogs and cats. Saunders Elsevier Missouri, 2009
Ismael Hernandez-Avalos, Daniel Mota-Rojas, Patricia Mora-Medina, Julio Martínez-Burnes, Alejandro Casas Alvarado, Antonio Verduzco-Mendoza, Karina Lezama-García & Adriana Olmos-Hernandez (2019) Review of different methods used for clinical recognition and assessment of pain in dogs and cats, International Journal of Veterinary Science and Medicine, 7:1, 43-54
Borgeat, K. and Pack, M. (2021), Approach to the acutely dyspnoeic cat. In Practice, 43: 60-70. https://doi.org/10.1002/inpr.15

An Introduction: Online Reviews and Your Veterinary Practice

Nowadays, many people search online for local businesses before deciding where they’d like to spend their money—and yes, that includes searching for a veterinarian or veterinary practice.
You’ve probably done this yourself when searching for a specific type of restaurant, hotel, dentist, hairstylist, etc…
Have you ever been more inclined to use a business because of a good review—or avoided it because of a bad review?
Well, your potential clients think the same way when it comes to finding a veterinarian…
How much do online reviews matter?
Research indicates that over 90% of consumers read online reviews, and nearly as many incorporate those reviews into their purchase decisions.
Star rating is the number one factor used to judge a business, and 40% of consumers form an opinion about a business by reading just 1-3 reviews online.
This is especially relevant to the Millennial generation—the largest pet-owning population in the U.S.—who are very likely to do online research before choosing a veterinary practice.
In short, all of this means that online reviews can affect your veterinary practice’s reputation, how high you show up in online search results, your ability to attract new clients, and your practice’s bottom line.
So yes—online reviews are VERY important.
Where do online reviews live?
When we say online reviews, that could include a large number of different online platforms where consumers post reviews of products, services, and businesses.
However, there are a few places where you may want to focus your attention since they are the most commonly used platforms…
Google.
When it comes to online reviews, Google is HUGE.
Not only is it one of the most commonly used platforms for reviews, it’s also connected to other modalities such as Google Maps and general online searches.
So even if a pet owner just wants to find your website or get directions to your clinic, there’s a good chance your Google reviews will pop up and be prominent on the page.
Facebook.
This includes “official” reviews, as well as social media posts made by clients on your page or on their own pages.
Yelp.
Whether you love Yelp or hate it, there’s no denying that Yelp pages often feature prominently in online search results.
Other review sites like Angie’s List.
Online directories such as Yahoo Local, InsiderPages, SuperPages, YellowPages, and more.
The Better Business Bureau.
Your own website.
How do you ethically obtain good online reviews?
So, you recognize that online reviews are important to your veterinary practice… but how do you obtain more good reviews in an ethical way?
When we say “ethical,” that basically means the reviews must be genuine, honest, and unbiased—and there are rules in place to help enforce this.
This is important because violation of the rules can result in stiff financial or even legal penalties.
If you fail to follow the rules, you may be in violation of not only the platform’s policies, but also in violation of the Federal Trade Commission (FTC) rules.
Penalties may include a serious plummet in your rankings (Yelp will even add a Consumer Alert warning about your business on their site), removal of reviews, and significant financial penalties.
All of this is in place to ensure reviews stay as honest and unbiased as possible.
To stay on the right side of the rules, here are some things NOT to do…
Don’t “incentivize” reviews—in other words, don’t offer your clients a payment or other reward in exchange for an online review.
Don’t place undue pressure on clients to write reviews.
Don’t pay third parties to write reviews.
Don’t flood review sites with biased reviews from yourself, your employees, or family and friends.
Don’t leave negative reviews for your competitors.
Don’t remove reviews.
If you feel a review is inaccurate or fake, contact the platform to discuss removal.
Stay up to date on the rules, and keep in mind that different sites may have different rules.
For example, at the time of this writing, Yelp is more strict than other review sites when it comes to asking your clients for reviews—it’s against their policies altogether.
Where should I start?
Obviously, there’s a lot to keep up with here…
To simplify the task at hand, focus on these things initially…
Claim all of your online business listings, like Google My Business, your business’s Yelp page, and online directories.
Keep all information up to date, including your location and hours of operation.
Focus on the “big ticket” review sites first and foremost—especially Google, Facebook, and Yelp.
Include reviews on your own website—it’s the only place you have total control over what content you include.
When in doubt, stay on the conservative side of the rules for asking your clients for reviews, to ensure you’re in compliance.
Next week, we’ll have more specific tips for you in terms of how to gather good reviews.
We’ll also cover a topic that’s surely on your mind—that is, how to deal with negative reviews…

Stay tuned for part 2 of this very important topic!
Helpful statistics for online reviews:
https://www.vendasta.com/blog/50-stats-you-need-to-know-about-online-reviews
Written by: Dr. Tammy Powell, DVM

How To Make Your Veterinary Practice Part of the Community

By now, you may have a location in mind for where you want to open your own veterinary practice.
In addition to strategic reasons for choosing your location, it’s important to think about the community you’ll be a part of.
Maybe you already live in the area and know exactly what to expect in terms of clientele and local pet events.
Or, maybe you’re a new arrival and are eager to learn as much as possible about the community.
Either way, here are some things to consider that could help your practice thrive and become a household name among local pet owners…
Partner With Local Businesses
A good way to become part of the local pet network is to get out there and meet your “neighbors”—that is, other owners of pet-centric businesses in your neighborhood, town, or city.
This could mean…
Pet groomers.
Boutique pet gift and supply shops.
Boarding facilities.
Pet trainers.
Rescue groups or shelters.
Other veterinarians, especially with complimentary services like acupuncture, exotics, and specialty or emergency services.
Of course, you’ll resonate with some of these business owners’ pet care and business philosophies more than others.
But you won’t know which ones are a good match until you make the effort to meet them.
When you find colleagues with whom you’d like to partner, think about setting up a mutual referral program.
For example, if your clients ask about a groomer, you can tell them about the pet salon you recommend—and tell them to mention you referred them, for a discount (pre-arranged with the pet grooming salon’s owner, of course).
And vice versa, the groomer could refer new clients to you if they notice allergic dermatitis, ear infections, anal gland issues, or other concerns during grooming.
Set Up a Charity Effort
This may be a little bit of a challenge at the beginning when you’re trying to get your business up and running and cash flow is tight.
But even small efforts or funds could be helpful to start. It’s all about goodwill and showing how much you care about pets.
Plus, on tough days, it may make you smile to think about a good deed that’s not directly tied to the ups and downs in your appointment schedule.
One example of charity is a small donation to a local animal shelter or rescue group.
You can fund this yourself. But also consider having a collection jar on the counter where clients check out. That way, clients who feel inclined to do so can help with your charity effort.
During social distancing and curbside service, this may look a little different, of course…
Instead of a physical donation jar, you could include a checkout prompt that asks clients if they would like to donate—the same way many grocery stores have an option to leave $1 or more for charity when you pay with a credit card.
Teach Pet Owners About Local Pet Care Interests
While some pet health concerns are universal, such as obesity, others may have a higher or lower risk depending on climate and other location-based factors.
Different parts of the country face different pet health issues and concerns, including specific types of parasites and infectious diseases.
For example, if you live in a warm, humid climate that sees fleas year-round and has a high prevalence of heartworm disease, that’s something to talk to your clients about.
You could also include factors such as tick-borne diseases, heatstroke, certain fungal infections, foxtail plants, emergency-preparedness for hurricanes, and other weather-related and outdoor factors.
This is a good opportunity to use technology, too. Look for data from sites such as CAPC or the CDC. Some even have interactive maps and other visual tools you can show to clients.
In addition to talking to clients during an appointment, consider writing blog posts and sending out a newsletter with seasonal, local information, to keep your clients informed.
Social media is also a great place to share this sort of information.
Include fun local information, too! Your clients may enjoy hearing local news about pet events, charity drives from other pet organizations, and more.
Go To (Or Host) a Pet Event
“Pet events” could include many different things, such as…
Meetup groups for dog walkers.
Charity or fundraising events.
Pets in costume Halloween parades and contests.
Informative talks for pet parents on things like emergency preparedness or nutrition.
Puppy or kitten socialization classes.
Local sporting events where businesses can set up booths.
Farmers’ markets.
Pet adoption events.
In the time of quarantine and social distancing, this may also include virtual events.

See what works best for you. Since your days will be busy, try to choose events that are fun for you—so you can have a great time and renew your energy while allowing pet owners to get to know the real you and how much you love animals.
Written by: Dr. Tammy Powell, DVM

Choosing and Interpreting In-House FIV/FeLV Combo Tests

Feline immunodeficiency virus (FIV) and feline leukemia virus (FeLV) are contagious retroviruses that can cause serious illness in cats.
Infected cats may develop bone marrow suppression, chronic inflammatory conditions, and cancer (especially lymphoma), and be more susceptible to other infectious diseases due to a weakened immune system.
With all these health consequences, it’s no surprise that a retroviral infection may significantly shorten a cat’s lifespan.
Prevention is key for limiting the prevalence of these diseases. Since these viruses are typically spread by close contact (mutual grooming, catfights, etc.), it’s important to identify and isolate infected cats, to prevent exposure and spread of the disease to other cats.
For all these reasons, the American Association of Feline Practitioners (AAFP) recommends testing for FIV and FeLV when a cat is first adopted, prior to initial vaccination against these diseases, after a potential exposure, and if clinical signs of retroviral infection develop.
Which Tests are Available for FIV/FeLV Testing in Cats?
Tests are available for in-house (point of care) use. Laboratory testing is also available, which includes a wider range of testing options and confirmatory testing.
For point of care tests, here are two popular options for veterinary practices…
IDEXX SNAP FIV/FeLV Combo Test
IDEXX claims to have high sensitivity and specificity, with reference lab quality technology. Results are available in 10 minutes, using 3 drops of sample. A SNAP Pro Analyzer is available to automatically activate and read tests, and add results to the medical record.
Zoetis WITNESS FeLV/FIV Rapid Test
The WITNESS test is meant to be easy to use and affordable. It works with just 1 drop of sample, with results available in 10 minutes. The test offers room temperature storage, an extended (12-month) shelf life, and no need to snap the test.
Zoetis also offers the VETSCAN FeLV/FIV Rapid Test, which appears to have very similar specifications to the WITNESS. One difference is that the VETSCAN test has a single test window, versus two separate test windows for the two diseases in the WITNESS test.
Considerations for FIV/FeLV Testing
To get the most accurate results, it’s best to use serum or plasma rather than whole blood. Although test instructions specify whole blood (and most of the time this works just fine), many experts note that occasionally, whole blood can result in a faint false positive. This is due to a protein or interference from red blood cells.
It’s also important to note that the FeLV test is an antigen test, and the FIV test is an antibody test. Therefore, the FIV test may pick up on an antibody response from a vaccination rather than a natural infection. This may complicate testing in some cases, and it’s recommended to know a cat’s FIV status prior to vaccination.
Additionally, in-house testing is often considered a screening test, in the sense that confirmatory testing is recommended for positive results. This commonly includes IFA testing for FeLV, and Western Blot testing for FIV.
Purchasing Considerations
Here are a few important considerations before making a purchase…
Brand preference. Maybe a veterinarian or their team has had good experience with a particular brand. Or, if the company has any additional equipment or tests (such as hematology or chem analyzers) the practice is also interested in, it might be possible to negotiate a better deal for everything together.
Contracts. It’s always important to check the contract closely when making a purchase, to see if there’s a minimum requirement of tests per month or any other stipulations.
Quantity sold and expiration dates. See if you’ll be able to use all the tests before they expire, or if the company will refund any unused tests.
Available support. Is there a helpline for any technical questions or for help with confusing or inconsistent results? And does the company help with confirmatory testing, especially if in-house test results are inconsistent or don’t seem to line up with the cat’s history or symptoms?

Details and specifics of these tests may evolve over time. It’s important to check directly with the company for the most up-to-date information before making a purchase.
With all these factors in mind, see which option works best for the needs of your individual practice.
Written by: Dr. Tammy Powell, DVM

Old X-ray Table and Generator Be Used with a New Digital X-ray System?
Can My Old Universal Easymatic X-ray Table and Generator Be Used with a New Digital X-ray System?

Some of the Universal Easymatic systems look like this
Some veterinarians purchased their x-ray table and generator 25+ years ago and they still work perfectly!
Through care and good maintenance, they have been able to produce diagnostic images over the years using film.
For some veterinarians, 2017 is the year they would like to stop using chemicals and standard film.
However, they do not want to spend the 17k-25k on a new table and generator when their old system is producing excellent mas/kvp options for each case.
The good news is your existing system can work well with proper installation with your new digital x-ray equipment. For computed radiography or CR it is a simple calibration that will enable the old table and generator be ready for use the day of the installation.
This installation should be carried out by the installer on the day of installation and prior to the training session with the veterinary staff.
For direct radiography or DR, the plate may be wired into the foot switch as a prep switch. The old universal Easymatic x ray table and generator send out a 120-volt prep and expose signal.
A conversion box is brought by our onsite installers so that the cesium technology can convert the voltage down to a high of 5 volts and a low of 0 volts.
Another item that we include with our system is a new foot pedal switch. Often times the old switch can be worn out and the wiring loose.
A new foot pedal switch ensures a smooth transition from prep to exposure. In some instances, we also include a hand switch which can be mounted on the wall.
This secondary option is nice especially if the foot switch was to go out you always have another backup to take a high-quality digital x-ray.
You do not always need to buy a new table and generators to enjoy the speed, safety, and quality of digital x-rays.
Contact us today.
We can help you upgrade your system to digital.
Here is a video showing the conversion from film to digital using the old table and generator.