


Old X-ray Table and Generator Be Used with a New Digital X-ray System?
Can My Old Universal Easymatic X-ray Table and Generator Be Used with a New Digital X-ray System?

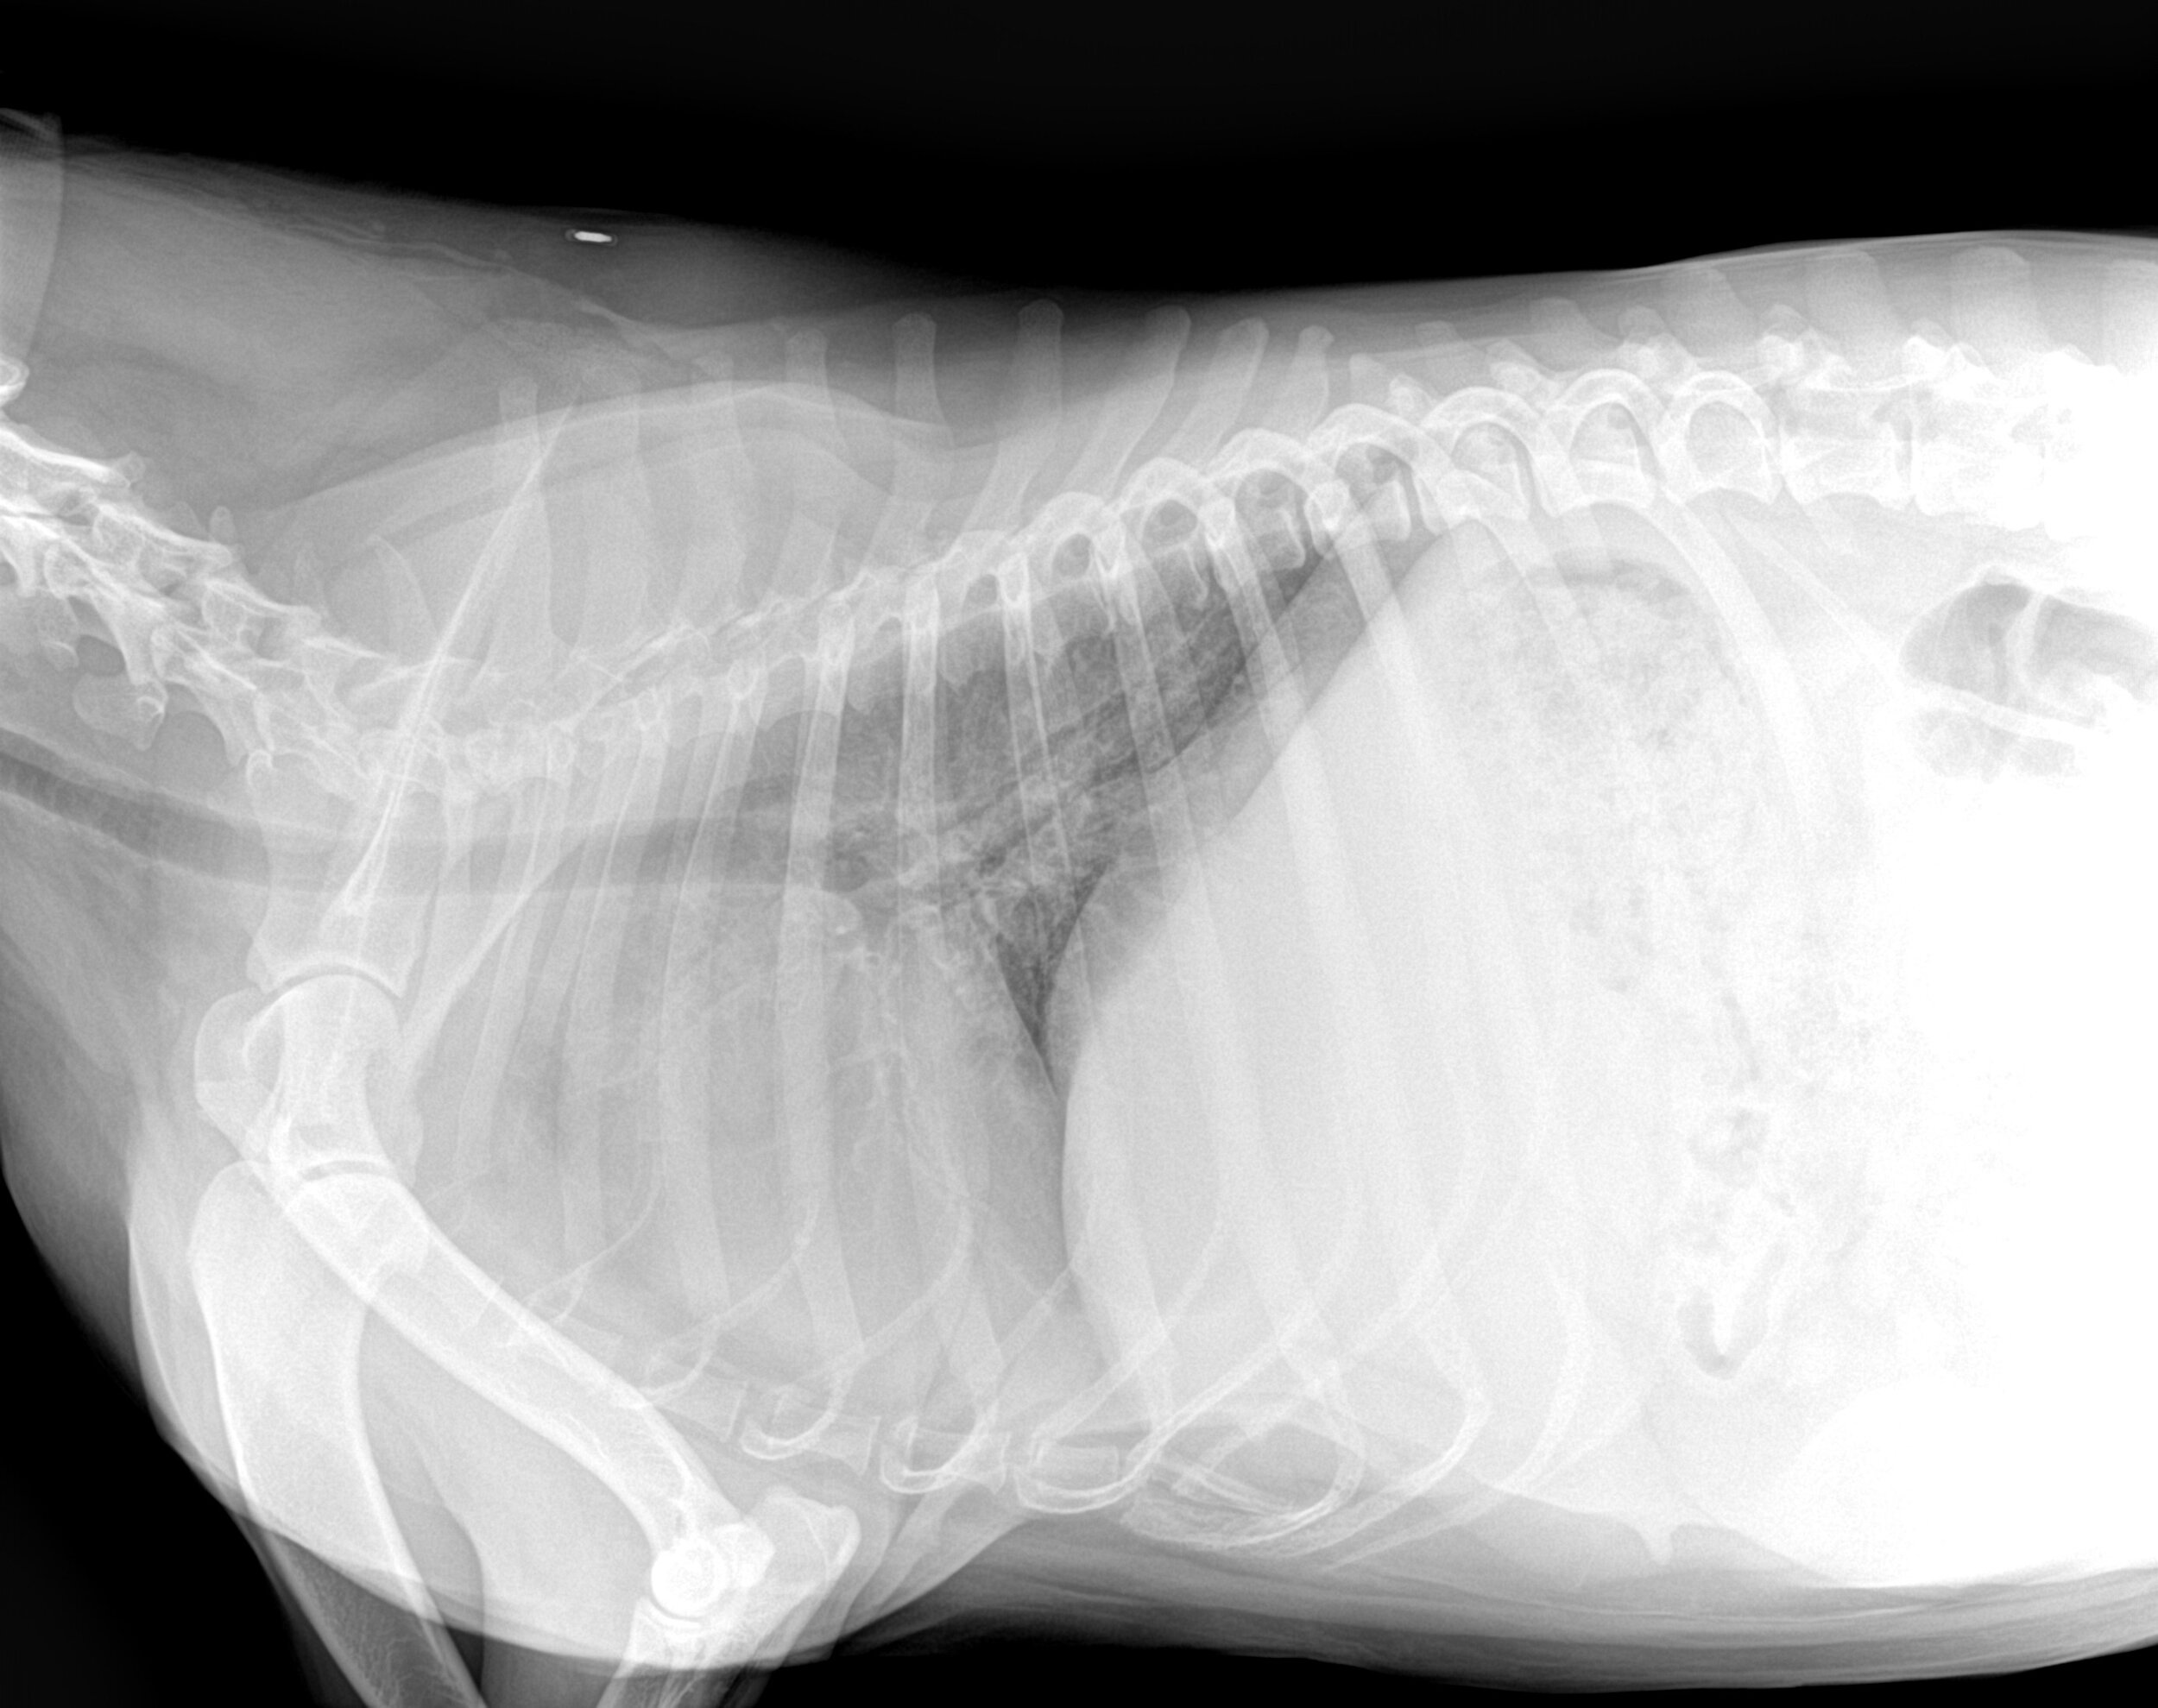
Some of the Universal Easymatic systems look like this
Some veterinarians purchased their x-ray table and generator 25+ years ago and they still work perfectly!
Through care and good maintenance, they have been able to produce diagnostic images over the years using film.
For some veterinarians, 2017 is the year they would like to stop using chemicals and standard film.
However, they do not want to spend the 17k-25k on a new table and generator when their old system is producing excellent mas/kvp options for each case.
The good news is your existing system can work well with proper installation with your new digital x-ray equipment. For computed radiography or CR it is a simple calibration that will enable the old table and generator be ready for use the day of the installation.
This installation should be carried out by the installer on the day of installation and prior to the training session with the veterinary staff.
For direct radiography or DR, the plate may be wired into the foot switch as a prep switch. The old universal Easymatic x ray table and generator send out a 120-volt prep and expose signal.
A conversion box is brought by our onsite installers so that the cesium technology can convert the voltage down to a high of 5 volts and a low of 0 volts.
Another item that we include with our system is a new foot pedal switch. Often times the old switch can be worn out and the wiring loose.
A new foot pedal switch ensures a smooth transition from prep to exposure. In some instances, we also include a hand switch which can be mounted on the wall.
This secondary option is nice especially if the foot switch was to go out you always have another backup to take a high-quality digital x-ray.
You do not always need to buy a new table and generators to enjoy the speed, safety, and quality of digital x-rays.
Contact us today.
We can help you upgrade your system to digital.
Here is a video showing the conversion from film to digital using the old table and generator.


Buy Veterinary Digital X-ray Equipment with Confidence

How to Buy Veterinary Digital X-ray Equipment without Experiencing Buyer's Remorse
Have you ever bought something and regretted the purchase?
I think I have at one time or another. However, it’s one thing to regret ordering a cheeseburger and fries, but quite another when I regret buying a $50,000 car or truck.
When I make a big purchase, I want to feel good about my decision. I want to make sure that I made the right choice.
I want you to feel great about buying from me! I understand it is no small thing for a Veterinarian to spend $20,000 or $30,000 on digital x-ray equipment, and I want you to feel great about buying from us.
So, here is my “purchase without buyer's remorse” plan:
The 30-day satisfaction guarantee, or your money-back offer. When you make a digital x-ray system purchase, I will give you 30 days so that you feel comfortable and confident that you made the right choice.
And if you are not satisfied, return your digital x-ray equipment for a full refund.
Yes, that is correct! A FULL refund!!
I know that after the vet digital x-ray equipment is installed in your clinic, and once you learn how to use the software, you will be very happy with the results you get.
I can offer this guarantee because I am very confident with the quality of the digital x-ray equipment we sell, and I want you to be completely satisfied.
Here is the fine print:
Equipment must be returned in original packaging.
Equipment cannot be returned if damaged by the user during your 30 days.
The buyer pays the cost of shipping/packing/insurance of all returned equipment.
You must give us a reasonable chance to correct any dissatisfaction.
The main reason I am offering this “30-day satisfaction guarantee or your money back” is to give you peace of mind.
I understand I’m not as big as Idexx, Cuattro, or Sound-Eklin. Perhaps that makes you think twice about trying us out.
But I am confident that our equipment is as good, if not better, and now we have a “30-day satisfaction guarantee or your money back” - which the big boys do not offer!

The bottom line is simple:
I am offering quality digital x-ray equipment for the veterinary industry at an amazing price, with a great warranty, and now a 30-day guarantee.
I want to do the right thing, treat you with respect, and help you be successful in your veterinary practice.
Call or text me - Brad Haven, Jr. - 530-355-5886

Diagnosing Tumors of the Heart in Dogs and Cats

Cancers of the heart are uncommon in dogs and cats. When they do occur, it’s important to differentiate a tumor from other conditions that could cause generalized or focal enlargement of the heart and cardiovascular symptoms.
Which cancers occur in cardiac tissues?
A cancerous lesion based at the heart could be a primary tumor, or due to metastasis.
Primary tumors that occur at the heart include:
Hemangiosarcomas—the most common heart cancer in dogs, usually occurring at the right atrium. These occur most frequently in larger dogs with longer noses, such as Golder Retrievers, Doberman Pinschers, and German Shepherds.
Chemodectomas, also known as aortic body tumors or heart base tumors. Generally thought to be slow-growing, these tumors occur most commonly in brachycephalic breeds like Boxers, Bulldogs, and Boston Terriers.
Myxomas.
Sarcomas.
Ectopic thyroid tumors.
Lymphoma/lymphosarcoma—the most common heart cancer in cats.
Other cancers are possible, but these are the most commonly diagnosed types. Breeds may vary as noted above, but most pets with tumors of the heart are middle-aged or older.
How are heart tumors diagnosed?
If slow-growing, tumors near the heart base are often an incidental finding, seen on thoracic radiographs that are taken for another reason.
Other times, diagnostics are pursued because of clinical symptoms—which are often sudden in onset.
Once a mass is large enough to push on the heart and major blood vessels, many cardiovascular symptoms are possible, such as:
Coughing
Ascites
Lethargy
Weakness
Vomiting
Loss of appetite
Difficulty breathing
Collapse
Sudden death
Note: If a dog presents with some of these symptoms, especially sudden weakness and collapse, a quick ultrasound scan may help to identify pericardial effusion and aid in guiding a needle for emergency pericardiocentesis.
Finding heart masses early
As with most cancers and disease processes, discovering a problem earlier rather than later can allow for more treatment options.
General screening radiographs or ultrasound checks—such as with a senior wellness health check—can be a good opportunity to discover heart base tumors before they cause cardiovascular dysfunction and symptoms.
An echocardiogram performed via ultrasound can help to provide more information on the location, size, and invasiveness of the mass.
In some cases, a presumptive diagnosis may be made based on the appearance and location of the mass on an ultrasound study, along with the patient’s signalment. If possible to perform without undue risk, an ultrasound-guided aspirate of the mass can provide more information about which type of tumor is present.
Treatment options for cancers of the heart
Treatment will be based on the type of neoplasia, how fast the mass is growing, whether metastasis is present, and whether or not the pet is symptomatic.
When a tumor of the heart is diagnosed, a good next step is to screen for metastasis and concurrent conditions via chest x-rays (if not already done), bloodwork, lymph node evaluation, and abdominal ultrasound.
Once a diagnosis is made, treatment options may include:
Periodic monitoring with a cardiologist (especially for slow-growing chemodectomas/heart base tumors) prior to pursuing more invasive treatments.
Surgery to remove the tumor.
Pericardiectomy to remove the pericardium and prevent life-threatening cardiac tamponade or pericardial effusion.
(A pericardiocentesis may be necessary on an emergency basis prior to diagnostics in a pet who presents with acute symptoms. After that, a planned pericardiectomy can help to prevent further emergency episodes of fluid buildup around the heart.)
Chemotherapy, often in conjunction with surgery.
Radiation therapy—either conventional, or via Cyberknife therapy.
Even though cancers of the heart are uncommon in pets, they can be scary to pet owners because of the possibility of sudden onset of serious clinical symptoms (especially with hemangiosarcomas).

By performing diagnostics, referring to specialists as needed, and giving your clients as much information as possible, you can help them make an informed decision for their pet.
Disclaimer: This article is for general informational purposes only, and not intended as a guide to the medical treatment of any specific animal.
Written by: Dr. Tammy Powell, DVM

How COVID-19 Affects Pets: Safety Tips for Pet Owners

Veterinarians play an integral role in public health. Your education helps you understand zoonotic diseases and other health concerns that can affect both humans and animals.
And even though pets don’t appear to play a significant role in transmitting coronavirus (SARS-CoV-2) in the current global pandemic, your knowledge can still help both people and pets.
Here are some important things we know so far about COVID-19 in cats and dogs, and how that knowledge can affect your team, your clients, and your patients…
Can dogs and cats get COVID-19?
So far, there have been millions of cases of novel coronavirus infecting human beings…
However, the disease was only documented in a handful of pets worldwide.
Of the pets infected with SARS-CoV-2, many did not exhibit symptoms—which indicates pets could be a dead-end host for the virus.
Between dogs and cats, cats seem more likely to develop clinical disease—although this is based on only a small number of confirmed cases and knowledge in this matter is still evolving.
Ferrets may also be at risk.
And besides housecats, tigers at a New York City zoo have tested positive and shown clinical symptoms of COVID-19.
According to the CDC, clinical signs of SARS-CoV-2 in pets are not yet well defined, but may include respiratory or GI symptoms, as well as fever and lethargy.
Can humans get COVID-19 from dogs and cats?
Right now, there’s no evidence that humans can contract COVID-19 from their dog or cat. The risk of zoonosis is considered low.
If anything, it’s the other way around—pets who have been infected probably caught the virus from their human companions.
For that reason, the CDC recommends that if a person is sick with COVID-19, they should…
Self-quarantine from their dog or cat, for the standard, recommended quarantine time. Try to stay in a separate room and avoid petting, cuddling, being licked, and sharing food or bedding.
Ask another household member to take care of the pet during their quarantine, if possible.
If the person must care for their own pet, they should wear a face mask and wash their hands before and after interacting with their pet.
Worried pet owners should call a vet practice before coming in. A telehealth consult may be recommended in lieu of an in-person visit.
And of course, besides being infected themselves, it’s also possible that a non-infected dog or cat could act as a fomite—for example, if their fur was exposed to respiratory droplets from an infected person.
Testing for SARS-CoV-2 in pets
At this time, the CDC doesn’t recommend routine testing of dogs, cats, or other companion animals. Instead, the need for testing must be determined on a case-by-case basis.
Here are some factors to consider…
Testing is available for mammals only.
A thorough history should be taken to assess for a possible exposure within 2 weeks prior to symptoms.
Other, more common causes of these symptoms should be ruled out first.
If you feel testing is needed, contact your state public health veterinarian or state animal health official to discuss testing options—and they should be immediately contacted again if the test is positive.
According to the USDA, positive samples from private veterinary laboratories require confirmatory testing at USDA’s National Veterinary Services Laboratories.
The OIE (World Organization for Animal Health) recommends testing via RT-PCR on oral, nasal, and fecal/rectal samples, while carefully avoiding contamination from the environment or people during the process.
Currently, Antech and Idexx both offer PCR testing options.
And in April of this year, Idexx announced the availability of a commercial test for veterinarians to use (although they recommend consulting with public health authorities prior to ordering the test).
Treatment for COVID-19 in pets
For many pets, care at home may be the best option. This will depend on the owner’s ability to safely provide care for and quarantine their pet—and household members not being at high risk due to age or health conditions.
In some cases, isolation at a veterinary clinic or hospital may be preferred.
Just like human beings, there’s no specific cure or preventive vaccine for pets for SARS-CoV-2… so, treatment is primarily supportive care.
How to help clients during this time
If any of your clients are concerned, you can help present the facts and avoid the spread of misinformation.
Consider sending out a newsletter—that will not only update clients with accurate information but also help them stay bonded to your practice during social distancing.
For the vast majority of pet owners, you can reassure them there’s no reason to abandon pets… On the contrary, due to stay-at-home orders and staffing limitations at animal shelters, right now is NOT a good time for anybody to abandon a pet they care about.
In general, it’s best to treat a pet as if he or she were a person—they should practice social distancing, too, and avoid more contact with people and other pets outside the home than necessary…
Also, consider stocking up on two weeks of supplies (food, medicine, etc.) for pets, just as you would for human members of the household…
Note that pets differ from humans in that they should NOT wear face masks.
And, you can advise your clients on best practices for veterinary visits during this time—including whether to come in now or wait until later for routine care … what to expect when they arrive at your practice parking lot … which viral testing options are available … and anything else they need to know.

In our next blog post, we’ll have some information about animal hospital protocols and COVID-19. Until then, best wishes and stay safe!
Disclaimer: This article is for general informational purposes only, and not intended as a guide to the medical treatment of any specific animal.
Written by: Dr. Tammy Powell, DVM

Ultrasound vs. X-Rays for Monitoring Dog and Cat Pregnancies

When it comes to pregnancy in pets, sometimes it’s hard for clients to wait…
They want to know right away whether there are puppies/kittens present… how many there are… and if the babies are doing OK.
It’s understandable—whether this is a professional breeder or a pet parent who’s decided to proceed with a litter, the arrival of new puppies and kittens is an exciting time.
There are a few ways to check for pregnancy in dogs and cats. Each method has its own pros and cons, which you can explain to your clients to help set up realistic expectations and develop a plan that best suits their pet’s needs.
Early pregnancy checks may include…
Abdominal palpation
This method of pregnancy detection can yield information as soon as 3-4 weeks into the 9-week pregnancy.
Abdominal palpation has been used by vets for many years—and can often result in the detection of fetal “bumps.”
However, this method isn’t always accurate. There are plenty of things that could render palpation inconclusive. For example, in large breeds or overweight dogs, palpation is more difficult.
Relaxin testing
Testing for the relaxin hormone—a hormone unique to pregnancy—can be performed as soon as 20 days into gestation.
This test gives your client a very important “yes or no” answer—and helps to distinguish between true pregnancy versus pseudopregnancy—but it doesn’t provide information on how many fetuses are present.
The next test to consider is an abdominal ultrasound.
Canine and Feline Abdominal Ultrasound
The procedure of abdominal ultrasound in veterinary medicine involves examining the internal organs of dogs and cats. To begin the ultrasound study, transverse scanning is performed to locate the urinary bladder and colon, with the uterine body positioned between them.
Once the uterine body is identified, the scan is directed cranially towards each kidney, following the uterine horn towards the ovary. Along this path, each fetus can be identified by its appearance as a round, fluid-filled gestational sac.
Compared to other imaging methods like X-rays, abdominal ultrasound offers several advantages in veterinary practice.
One significant advantage is the ability to confirm pregnancy several weeks earlier than X-rays. Typically, an ultrasound is performed around 30 days into the pregnancy, although it's possible to detect a pregnancy as early as 20 days. At 30 days, it becomes easier to detect fetal heartbeats.
In addition to early pregnancy detection, ultrasound provides other valuable benefits for veterinarians, including:
1. Counting the number of puppies or kittens: The ideal time for this is between 30 and 35 days of pregnancy. After 50 days, the uterine horns may overlap, making it more challenging to accurately count the fetuses.
2. Assessing fetal viability: Ultrasound can confirm the presence of viable fetuses by detecting their heartbeats or movement.
3. Predicting gestation duration: Measurements of fetal size or certain anatomical structures can help estimate the gestation duration.
Another advantage of abdominal ultrasound in veterinary practice is its ability to involve clients in the process. Unlike X-rays, clients can be present during the ultrasound, allowing them to witness the heartbeats of the puppies or kittens.
This experience enhances the bond between the client and their pet, as well as strengthens their connection to the veterinary practice.
However, in the later stages of pregnancy, X-rays also play a valuable role in veterinary medicine. X-rays provide more information when the fetuses have developed significant skeletal structures, usually around 45 to 55 days after breeding.
At this stage, a single set of X-rays is safer for the fetuses compared to earlier in the pregnancy.
Radiographs (X-rays) are particularly useful for:
1. Confirm the fetal count.
2. Assessing the size ratio between the fetal skulls and the pelvic canal. This information helps in planning for potential dystocia and the need for a C-section.
As a veterinary practitioner, you have various diagnostic tools at your disposal to detect and monitor a healthy pregnancy in dogs and cats.

By utilizing the best combination of methods, you can reassure your clients along the way, and increase the chances of a healthy delivery of puppies or kittens!
Written by: Dr. Tammy Powell, DVM

Radiographs for CCL Injuries and TPLO Surgery

When it comes to cranial cruciate ligament (CCL) injuries in your patients, x-rays play a key role in your diagnosis, treatment, and follow-up.
So whether you’re the surgeon performing the procedure or a GP referring your patient to a specialist, having a good understanding of what to look for on your radiographic images can help you provide great patient care.
It all starts when the patient first comes in to see you…
The initial visit
More than likely, you’ll be seeing a middle-aged, medium or large breed dog who suddenly started limping on one of their hind limbs.
During the exam, you determine that the pain is in the stifle. Then, using sedation, you perform more thorough palpation, followed by radiographs.
Your detailed exam of the knee reveals some swelling and a positive drawer sign, and you take x-rays to confirm your suspicion of a CCL tear.
Considering this is one of the most common orthopedic injuries in dogs, you’re probably correct. However, occasionally there may be a surprise—such as a fracture near the stifle, or even an osteosarcoma lesion for older patients.
Radiographs will help you correctly diagnose and document the problem, and rule out concurrent conditions.
With a recent CCL injury, you might not see a lot of obvious evidence on your views—that’s because it can take more time for radiographic evidence of a CCL problem to show up.
However, you will likely see compression of the infrapatellar fat pad—which indicates joint effusion.
If the condition is chronic, you may notice arthritis and other signs of long-term inflammation.
Planning for a TPLO surgery
If your patient is a good candidate for surgery, then it’s time to discuss options with the owner. A tibial plateau leveling osteotomy is a good option for many otherwise-healthy dogs, but of course, the recommendation may vary for each individual pet.
Now’s the time when pre-op radiographs come in, by helping you to measure the tibial plateau angle and determine the saw blade size and position of the bone plate and screws.
The importance of post-op radiographs
After a surgery such as a TPLO, it’s important to document that everything went well—that all implants are in place, the tibial plateau has been repositioned as planned, and that there were no complications such as bone splintering.
This will be very reassuring to a worried pet parent, and will also be a valuable part of your medical record.
These post-op radiographs can also provide more information if a problem or complication comes up later, by using these initial images as a frame of reference for comparison.
Radiographs are useful if complications arise
More than likely, your patient is doing great. In that case, follow-up x-rays will help you confirm and document that the bone has healed as expected.
However, if they do run into any problems—such as an infection or a fracture—an additional set of radiographs can help you diagnose the issue and treat it ASAP. And follow-up rads will allow you to monitor the patient’s healing progress and their response to treatment.
Basically, radiographs give you an “inside view” throughout the whole process of diagnosing and treating a CCL injury, and are useful for common surgical options such as a TPLO.
Digital radiographs are especially helpful in terms of sensitivity for soft tissues such as a joint space, and also for providing rapid results within seconds.

But no matter which radiology equipment you choose, your X-ray images will provide valuable information for diagnosis and treatment of CCL—for happy patients and clients.
Disclaimer: This article is for general informational purposes only, and not intended as a guide to the medical treatment of any specific animal.
Written by: Dr. Tammy Powell, DVM

Vertebral Heart Score: How and Why to Calculate One

A vertebral heart score (VHS) is a measurement used to determine if a patient’s heart is enlarged.
The VHS can provide valuable insight to complete your clinical picture, especially at times when you hear a heart murmur, for a general pre-anesthetic check, or to look for cardiac changes on breeds that are predisposed.
It’s a simple, non-invasive way to get more information and to monitor for changes over time.
How to calculate a vertebral heart score
Obtain a high-quality lateral thoracic radiograph. Be sure…
To collimate.
That the patient is straight and not twisted or at an angle.
That you can see enough detail, especially the thoracic vertebrae and the borders of the cardiac silhouette.
Make your first measurement along the longest axis of the cardiac silhouette, from the ventral border of the carina of the mainstem bronchus to the apex of the cardiac silhouette.
You don’t need to measure this in centimeters or inches—instead, just hold up a sheet of paper to your x-ray viewer and make a mark for your measurement, or use calipers. Or, with your digital x-ray system, use the VHS function to mark the measurement right on your screen.
Now, hold the measurement up to the vertebrae, starting with the cranial edge of T4—this is the 4th vertebra to have a rib connected. Count the number of vertebrae (including the vertebral body and the following disc space) that fall into the long axis measurement.
Measure to a decimal place of 0.1 (for example, let’s say your first measurement was 5.2 vertebrae).
Make your second measurement. This time, you’ll measure along the short axis, which is the widest part of the cardiac silhouette. It should be perpendicular (at a 90-degree angle) to your first measurement.
Repeat the process of transferring this measurement to the thoracic vertebrae, starting with the cranial edge of T4. For this example, let’s say your measurement was 4.5 vertebrae.
Add these two numbers together.
In this example, your VHS would be 5.2 + 4.5 = 9.7
How to interpret the results
For dogs, a normal vertebral heart score is less than 10.7 (with an average range of 8.5 to 10.5). For cats, an average VHS is 7.5 (with a range of 6.8 to 8.1).
Anything larger than that is considered abnormal.
Of course, this doesn’t tell you exactly what’s going on—you’ll need further information such as an echocardiogram to determine whether there is DCM, HCM, or some other issue causing the enlargement of the cardiac silhouette.
However, the VHS is a great screening tool to let you know to investigate further. And, if you have a patient who already has cardiac disease, a VHS can help you monitor their disease progression over time, and provide tangible information to a client who wants to know how their pet is doing on treatment.
Keep in mind that, as with any diagnostic tool, there is some individual variation. Some pets—especially certain breeds such as boxers—may fall outside the normal VHS range even if they’re completely healthy.
So, look at the overall clinical picture when assessing a patient. But with that in mind, a VHS is a quick, easy, valuable addition to your toolkit when it comes to evaluating and monitoring cardiac health.
Vetebral heart score tool video

Disclaimer: This article is for general informational purposes only, and not intended as a guide to the medical treatment of any specific animal.
Written by: Dr. Tammy Powell, DVM

How to X-Ray a Cat Safely Without Sedation or Anesthesia

If you’ve ever tried to radiograph a fractious cat without sedation or anesthesia, then you know what a difficult challenge it can be.
In addition to blurry, crooked, non-diagnostic images, maybe you or your team members received some scratches and scars to show for the experience.
So, it’s understandable you might not want to try that again—both for your safety and for the cat’s safety.
However, there are some situations where you may want to avoid sedation or anesthesia—or, if it can’t be avoided entirely, to use the lowest dose possible to get the results you need—during an x-ray study on a feline patient. For example…
Cats with advanced heart disease or other conditions that could make sedatives and anesthetic drugs dangerous.
Patients with kidney disease or other conditions that cause less predictable metabolism of anesthetic drugs—possibly resulting in a cat that’s excessively drowsy for a whole day, and an unhappy client.
A patient who’s otherwise friendly and great to work with, just very wiggly for their x-ray shots. A few tweaks may make the experience more comfortable for them and make sedation unnecessary.
Contrast studies such as a barium GI study, where the patient has to be awake to avoid aspiration of the barium.
Of course, sometimes sedation or anesthesia may be safer, decreasing the kitty’s stress and risk of injury.
Only you know what’s best, using your clinical judgment. However, if you do have a situation where it’s worthwhile to try the radiographs WITHOUT sedation or anesthesia, here are a few tips…
Tips to get diagnostic radiographs on an awake cat
Practice feline-centered protocols from the beginning.
Have team members use quiet voices throughout the clinic, especially near the x-ray room or area.
Use pheromone products, including diffusers or spraying the products directly on towels your patient will be in contact with.
Lock the door to the x-ray room or area if possible. That way, no one will walk in by surprise and cause your patient to suddenly look in the direction of a swinging door.
Give the cat a place to hide between views and try to complete the views as quickly as possible. Less time is usually better when it comes to felines. Try a test view to confirm your settings, and then either use digital radiographs or if using film shoot all views at once and then develop them while the cat is resting comfortably in a kennel or carrier.
If the patient is just too stressed that day and it’s not an urgent matter, consider rescheduling. Sometimes starting fresh—having the kitty return first thing in the morning and completing the radiographs quickly—is better for you and the patient (and the client may feel better about it when they see the decreased stress level in their pet).
Make the cat as comfortable as possible during radiographs. For example, use a trough for VD views—it’s a lot more comfortable for them than having their spine right up against the x-ray table.
Remember the machine’s noise. Many cats are fine during positioning, but then panic, wriggle and squirm once they hear the whirring and “beep” that happen when you push the button to take the shot. To avoid this problem, try talking to the cat in soothing tones, or have another background noise such as a white noise machine or calm music. That way, the sudden noise from the machine won’t stand out so much compared to the other background noises.

Remember, making the whole experience less stressful for the cat can also make everything less stressful for you and your staff.
So if possible, making a little extra effort to accommodate a feline patient can help you get diagnostic views more quickly, with a better time for everyone.
Written by: Dr. Tammy Powell, DVM

What Is an Over-Exposed X-Ray, and Why Does It Matter?

In the last blog post, we talked about under-exposed radiographs and how to get better results.
But, it’s important to remember that overcompensating too far in the other direction can give you a problem in the other extreme: that is, over-exposed images.
This is basically the opposite of an overly white or light radiograph. Instead, the image may appear “burnt out,” and overly dark or black, making it difficult to see all the information you need to make your diagnosis.
Over-exposed radiographs can make your life difficult because of the obliteration of normal anatomy
An over-exposure usually means the x-ray beam was too powerful, and that a larger percentage of x-rays passed through the patient’s tissues to reach the film or plate. So, rather than seeing information about the patient, you end up with a blackened image with not nearly enough detail.
Some structures, such as small blood vessels in the thorax, might not be visible at all.
In other words, over-exposure could cause you to miss important lesions or interfere with your interpretation of normal anatomical structures.
Reasons why your radiographs might be over-exposed
Here are some possible culprits…
An error in technique (kVp or mAs settings).
A machine or equipment error.
Using grid technique without a grid.
Variations in screens.
Too short of a distance between the x-ray source and the film or plate.
Also, scatter radiation can contribute to darkening an already over-exposed image.
What to do about over-exposed images
To decrease your radiograph procedure time and minimize x-ray exposure to patients and staff, it’s best to get your shots right the first time. But if your images are overexposed, try…
Using a “hot light.” Sometimes, an overexposed radiograph can still be read by holding it up to an extra bright light known as a “hot light.”
However, if that doesn’t work, you will probably need to retake the radiograph. Here are some tips for getting a better shot the next time…
Adjust your settings. Typically, lighter images can be obtained by lowering the kVp or mAs.
Check for errors in technique, such as using or not using a grid setting.
Collimate. That way, you reduce the area of the primary beam and reduce scatter radiation, giving your image an overall better quality.
Measure patients in the position they will be in during the shot. For example, when taking a lateral thorax view, the thorax may be thinner when the patient is laying on their side than it was when they were standing up. If that happens, your settings would probably be too high based on the measurement obtained from a standing patient.
Also, be sure to follow these general tips for producing good X-ray images…
Use technique charts for a good starting point for exposure settings. A good technique chart will remove much of the guesswork.
Keep your equipment in good repair, including routine maintenance as necessary.
Consider digital radiography, which can take film development out of the equation, and shorten the waiting time between views (allowing you to adjust settings prior to taking more shots).
Use appropriate patient restraint to minimize artifacts from movement.
With practice, good quality equipment, and a few tips for adjusting your settings… Getting a properly exposed image doesn’t have to be hard!

And getting the right exposure will help you save time, avoid the headaches of struggling with poor-quality images, and get to your diagnoses faster.
Disclaimer: This article is for general informational purposes only, and not intended as a guide to the medical treatment of any specific animal.
Written by: Dr. Tammy Powell, DVM

What Is an Under-Exposed X-Ray, and Why Does It Matter?
When it comes to your x-ray images, there’s a fine balance between too much or too little exposure.
Of course, you’ll always want to use the lowest settings possible to get the image you need, to minimize x-ray exposure to both your patients and your staff.
But, it’s possible to go too low on your exposure settings—and often that results in an under-exposed, possibly non-diagnostic, image.
Why should you care about an under-exposed x-ray image?
The short answer is because your images will look very light and might not show enough detail or contrast for you to make a diagnosis. An under-exposed radiographic image could mean…
Increased “noise.” This can show up as cloudiness, mottled areas, or even stripes on the image. In the areas outside of the patient, that’s not necessarily a problem—but extra noise or grainy patterns overlying the area you’re looking at could create artifacts or obscure details.
White or light radiographs that are difficult to read. An under-exposed radiograph means there was less penetration of the x-ray beam through the patient’s tissues. This results in an x-ray image that looks overly white or light compared to a properly exposed radiograph. That “whitewash” effect can make it more difficult to see certain lesions or abnormalities.
In other words, under-exposure could mean artifacts, non-diagnostic results, or other confusion when it comes to interpreting your films or digital images.
Reasons why your radiographs might be under-exposed
Here are some possible culprits…
An error in technique (kVp or mAs settings).
A machine or equipment error.
Using grids with a non-grid technique.
Having two films on the same cassette.
Variations in screens.
A long-distance between the x-ray source and the film or plate.
This isn’t an exhaustive list, but it represents good areas to explore for getting better images.
How to get it right the first time
Using the least amount of radiation necessary to get your images is a good practice. However, if your beam isn’t strong enough to produce a diagnostic image, then you’ll have to retake the shots, which produces more potential exposure to patients and staff.
So, it’s best to get it right the first time. Try these tips…
Use technique charts. Charts will give you a good starting point for exposure settings, and take out much of the guesswork. Usually, you’ll have to increase kVp or mAs to improve an underexposed image.
Keep your equipment in good repair, including routine maintenance as necessary.
Use appropriate patient restraint, whether physical or chemical. This can minimize movement artifact, as well as any changes to tissue density that could happen if a patient moves their body in a way that’s different from when you measured them.
Consider using digital radiography. This will minimize wait times between views (allowing you to adjust settings prior to taking more shots).
Digital radiography also prevents errors that come from the film development process. That’s not the same thing as under-exposure… But, taking film development out of the equation does give you one less thing to worry about and makes it faster to troubleshoot if you ever do come across problems with your images.

Have an overexposed radiograph? Check here for more information and tips.
Disclaimer: This article is for general informational purposes only, and not intended as a guide to the medical treatment of any specific animal.
Written by: Dr. Tammy Powell, DVM

How to Talk to Pet Owners about Radiographs

“Does he really need an x-ray? Can’t you just give him some medicine and see how he does?
“Why is this so expensive? You just want to make money while my cat is sick!”
As a veterinarian, you’ve probably heard all of this and more.
Of course, most clients want the best for their pets, and many will understand why you want to perform certain tests like radiographs. However, even the most loving of pet parents may show some hesitation or “sticker shock” when you present the estimate…
Often, this isn’t personal. Many pet owners just aren’t prepared for a sudden expense, even if they want to do the best for their furkids. Here are some tips that may help take the conversation in a more positive direction…
Stay calm during the initial reaction
If an owner’s initial response is similar to the examples listed above, try to ignore the knee-jerk reaction to defend yourself. Get comfortable with allowing a moment of uncomfortable silence.
Often, clients will try to fill the silence themselves and offer more of their thoughts and questions. But even if they don’t do this, a quiet moment may give everyone the chance to take a breath and start over, calmly.
Don’t pile onto an owner’s guilt
Of course, you’ll need to explain why the radiographs are important for your treatment decisions, and what dangers exist for the pet if radiographs are delayed.
However, if a pet owner understands this and is just having trouble affording the x-rays, they’re probably already feeling guilty. This causes them to lash out.
In this case, having empathy during the conversation can really help. Think about your tone of voice, body language, and anything else that may help elicit a productive conversation.
If you make an owner feel understood and accepted, they’re likely to come back to you as soon as they CAN afford the tests, rather than seeking care elsewhere.
Bundle your radiographs when possible
Often, estimates are presented as “a la carte,” with different options presented by cost, line by line.
While this may work well in some situations, the client may try to pick and choose, asking which items can be eliminated in order to decrease the cost of treatment.
Instead, try estimates that list a total cost, with radiographs included. Some situations where this may work well include:
Dental procedures with dental rads.
Senior wellness testing, with bloodwork and screening rads.
A blocked cat, with x-ray views included as part of the treatment plan.
For three-view thoracic radiographs, bundle them together rather than listing the individual “per view” charges separately.
Of course, you can still list each item of the treatment plan, so the client knows the value they are receiving. But, list it as a total cost, rather than an itemized estimate.
Explain the benefits and limitations of radiographs
Many pet owners nowadays, especially Millennials, want to be fully involved in their pet’s care—that’s part of the reason why so many owners seek answers from Dr. Google prior to coming for a vet visit.
Those clients will want to receive answers about their pet’s condition right away—so, let the client know that radiographs will help to provide the answers they’re looking for. And since radiographs are available the same day, they can get answers to their concerns very quickly.
On the flip side, also prepare an owner that a radiograph might show normal results. If the pet is feeling well, then the client gets peace of mind. If the pet is ill, further testing may be required—by preparing the owner for this possibility ahead of time, you can avoid upset reactions as much as possible.
Ask about their biggest concern
Even though you probably already know the biggest concerns and questions clients have about x-rays, it never hurts to ask an owner why they’re hesitant. They may appreciate you listening to them, and it saves you time so you can address their biggest concern.
Some examples you may encounter include:
Finances. In this case, you can suggest third-party financing options, such as Care Credit.
Fear for their pet’s comfort, or having to leave their pet at the hospital. Here, discuss the procedure. If sedation is used, explain how this can minimize pain. Or, if digital radiographs are used, explain how this allows the views to be done fast so the pet can go home sooner.
Show clients the value you offer, even after the x-rays are finished
Be sure to go over the results of the radiographs with your client. Try using a quiet exam room rather than the treatment area, so they won’t be distracted.
Give the client a brief “x-ray orientation,” so they know which end is toward the pet’s head and what is abdomen versus chest, etc. Then, explain your findings.
Whenever possible, bring a normal x-ray for comparison, so clients can really see the difference with an abnormal finding.

If you have digital images, share a copy with the client that they can look at after the visit. Offer to let them record you talking about the findings. That way, when the client goes home and shares the findings with their partner or family, everyone is more likely to understand and be on board with your recommendations.
With a little planning of the whole x-ray experience from the client’s perspective, you can make things easier on them—while at the same time, increasing compliance and getting better care for the pets you see.
Written by: Dr. Tammy Powell, DVM

Identifying Trauma in X-Rays of Hit-By-Car Patients

It’s been a slow day, and you just got back from lunch. Your first-afternoon appointment is waiting, and you look through their chart, preparing to go into the room…
All of a sudden, the clinic doors burst open. You hear a big commotion upfront…
You walk up to see what happened and discover a distraught pair of pet owners holding carrying their Border Collie, who’s just been hit by a car.
How to avoid further surprises…
Of course, as a veterinarian, you’re probably used to something like this happening from time to time—panicked pet parents arriving at your clinic with a dog or cat in need. And you’re probably well-prepared to triage and decide what to do next…
However, you’ll want to avoid unpleasant surprises down the line—liked missed diagnoses—by ensuring that you find and plan for unexpected injuries.
For example, maybe that Border Collie has an obviously broken leg and some nasty road rash.
You’ll address those injuries, but first, you’ll explain to the owners that there are other conditions you need to check if their fur kid has just been hit by a car—conditions that could be life-threatening.
What to look for on the x-rays
Your physical exam will help direct you on what to look for. For example, if you feel a painful joint with crepitus, or hear crackles or decreased lung sounds when you auscult the chest, those will be areas you want to explore with radiographs.
But, even if the lungs sound fine and you don’t find any other obvious abnormalities, it’s always good to evaluate the thorax and abdomen radiographically.
Sometimes, x-rays will need to wait…
For example, if the pet is in critical condition, they need stabilization first. And, you’ll use your judgment on whether sedation is needed and safe, for clearer and more diagnostic x-ray images, as well as for relief from pain and stress.
Then, when you read the radiographs, it’s important to evaluate EVERYTHING on your set of x-ray images.
The impact of being hit by a car can cause trauma to many different parts of the body all at once, including serious internal injuries.
Here are a few things to check for on your radiographs…
Pulmonary contusions. A strong trauma to the thorax can cause dangerous bleeding in the lungs, often visible on radiographs as alveolar or interstitial opacities.
A ruptured bladder and uroabdomen. Look for signs of fluid in the abdomen, especially if you notice bloody urine. Try to visualize the bladder.
Internal bleeding or damaged organs. If an organ such as the spleen has been injured, you may notice a hemoabdomen (although radiographically, this would be difficult to distinguish from a uroabdomen). In the case of ruptured intestines, you may notice spots of free air in the abdominal cavity.
Broken bones, including the ribs and vertebrae. Visually trace along the bones one-by-one to be sure no lesions are missed.
Dislocations, such as a dislocated hip. Also, check for tail-pull injuries, especially in cats who may get their tail caught under a car’s wheels.
Diaphragmatic hernia. Look for evidence of intestines or other abdominal organs in the thorax.
Air or fluid in the pleural space. Seen as gas opacity, or fluid opacity.
Skull and jaw radiographs if needed—in case of suspected head trauma.
Of course, other abnormalities are possible, too. As you know, pets don’t always “read the book” and clinical practice can be full of surprises! If you’re unsure of something on the films or digital images, it may be good to recheck it down the line to be sure no problems are brewing internally.
The number of views you take will vary depending on the size of the pet.
For emergency situations such as this, it may be worth having digital radiographs, for faster results without waiting for films to develop.
Also, it’s important to take orthogonal views. That way, you get the full pictures and lesions are less likely to be missed.
Re-evaluate and repeat radiographs as needed
This will depend on what you see on the first set of images, in addition to how the pet is doing in real life. Use your best clinical judgment to determine if and when repeat radiographs are needed, and keep the pet under close observation.
If there’s any doubt, consider using contrast studies to obtain more information, too.
By developing a plan for radiographs—and remembering to check everything on the images—you’ll increase the chances of finding unexpected injuries and addressing them earlier. Or, in case the radiographs are normal, you may be able to give more peace of mind to the worried pet owners.

Disclaimer: This article is for general informational purposes only, and not intended as a guide to the medical treatment of any specific animal.
Written by: Dr. Tammy Powell, DVM

Hands-Free X-Rays: The Next Step in Veterinary Safety

Is it time to put restraints on veterinary radiography?
By Julia Bitan, RVT
When Dr. Debrah Berman, a Thornhill veterinarian with over 30 years of experience felt a lump in her tongue, she didn’t think much of it.
Up until that point, her health had been excellent and she was following all current radiology safety regulations such as monitoring her dosimeter values and using all protective equipment.
The diagnosis of Mucoepidermoid Carcinoma of the salivary gland (a type of cancer often associated with excess radiation exposure) came as a shock and made her start questioning the safety of today’s veterinary radiography.
“Since the 1990s, numerous jurisdictions in North America, and worldwide, have strengthened their regulations and best practice guidelines to actively move away from holding patients, in recognition that exposure to scatter radiation poses a risk.”
Outdated regulations
Although there are several provincial and federal laws in place to protect radiation workers in Ontario, the clauses specifically concerning veterinary workers have not been updated since 1990.
According to a veterinary radiography survey conducted in partnership with the Ontario Association of Veterinary
Technicians (OAVT) in April of 2016, 8 out of 10 RVTs still hold their patients during x-rays most of the time, while 7 out of 10 respondents choose to sometimes forgo the use of gloves and other protective equipment simply due to inconvenience.
Our human radiology counterparts in Ontario are rarely present in the room when x-rays are taken because regulations state that no person should regularly perform manual restraining for x-rays.
Technicians commonly request parents hold their own children if x- rays are required.
Since the 1990s, numerous jurisdictions in North America and worldwide have strengthened their regulations and best practice guidelines to actively move away from holding patients, in recognition that every x-ray taken increases the overall risk of cancer.
Because we don’t see regular reports of veterinary workers dying of radiation exposure, we may naively assume that modern science has overcome the dangers with newer machine design and intensive research.
In reality, current occupational exposure limits are derived from decades-old research and we know that the risk of getting cancer increases with every exposure.
Recent findings do show that extended exposure to a low level of radiation increases the risk of developing leukemia, while radiation-induced cataracts are observed at a much lower radiation dose than previously believed. In veterinary medicine, the damage caused by ionizing radiation is simply too low to be felt right away and the ALARA principle (As Low As Reasonably Achievable) is much too ambiguous in the context of our profession.
Change is happening
A small number of veterinary clinics in Ontario, including Toronto Veterinary Emergency Hospital and Referral Center (TVEH), began enforcing a strict no-hold, out-of-the-room x-ray policy to keep their veterinarians and RVTs away from ionizing radiation emitted by the x-ray machines.
TVEH started enforcing the 100% -out-of-the- room radiography six years ago.
RVT Ashley Jenner, head of radiology at TVEH, has developed a number of tools and techniques to make out-of-room x-rays possible.
“Non-manual veterinary radiography is much easier and faster than most people believe,” Jenner says. “All it takes is proper techniques and some extra tools.”
Jenner uses positioning devices alone on 75% of her cases (non-sedated patients), and sedation on the remainder.
Dr. Debrah Berman is now “cancer-free” and back to practicing veterinary medicine. She now endeavors to obtain all her x-rays using positioning/restraining devices or sedation.
“Radiation exposure is cumulative,” says Berman. “You may not realize until 20 or 30 years down the road that you have received too much. It may take a little more effort, but had I known that I would need to have a quarter of my tongue removed because of cancer and that I'd have permanent nerve damage and varying degrees of chronic pain, I wouldn't hesitate. And, I am one of the lucky ones. We need to protect ourselves”.
Transitioning to non-manual radiography is not always an easy task.
Change is rarely welcomed in our profession and as long as the minimum standards are followed, there is little reason or incentive to change.
We do, however, know there are risks involved with radiation, and alternatives do exist.
A program was created to guide clinics through transitioning to non-manual radiography using different tools and techniques.
The Hands-Free X-Rays Initiative aims to promote awareness and encourage change to current veterinary radiography.
For more information about the program, visit our website - www.handsfreexrays.com.
For comments, feedback or help to bring change to your clinic, please contact us at:
email: info@handsfreexrays.com
Phone - +1 (647) 502-4843.
Written by By Julia Bitan, RVT


Your Warranty and Service Coverage for Veterinary X-Ray

Today, every veterinarian recognizes the importance of incorporating digital X-rays into their animal hospitals.
A considerable number of them plan to transition from traditional film and chemical X-rays to digital systems this year.
While the initial concern typically revolves around the cost of acquiring a digital X-ray system, it is equally crucial to inquire about the warranty and its coverage.
Here are some pertinent questions to ask the prospective vendor when considering the purchase of a veterinary digital X-ray system:
1. What is the duration of the hardware warranty for my veterinary digital X-ray plate?
2. How long does the software warranty for my veterinary digital X-ray software last?
3. For how long will I receive software upgrades for the X-ray system used in my animal hospital?
4. How long will my veterinarian technicians have access to tech support, enabling them to seek answers to any queries that may arise during the daily implementation of digital X-rays in my animal practice?
5. What are the costs associated with continued phone support, software upgrades, and technical assistance after the warranty period ends?
6. Which entity is responsible for providing software and technical support? Who developed and owns the software?
7. Does the warranty cover labor and shipping expenses, as needed?
8. In the event that my X-ray plate requires repair, will a temporary replacement plate be provided?
It is common for vendors operating in the animal health sector to offer a minimum of a 1-year warranty.

Not all vendors possess ownership of the software that operates their veterinary digital X-ray plate, which holds significant importance. While a digital X-ray plate can remain functional for many years, the software it relies on may become outdated within a short span of time.
An example of this can be observed with Windows XP platforms. Unless companies continually update their software, it becomes incompatible with new computing platforms.
When veterinarians transition from computed radiography (CR) to direct radiography (DR), the predominant issue they encounter is not the failure of the CR system itself but rather the poor performance or lack of support for the software.
This issue is not limited to small companies alone. Renowned brands like Idexx and Sound have discontinued support for their older product lines by ceasing software upgrades.
Our aim is to offer you transparent service and support. Our animal health software has been developed in-house by JPI which has been manufacturing x-ray equipment, writing software, and providing telephone support for these products since 1994.
Here are the responses to the eight frequently asked questions:
1. What is the duration of the hardware warranty for my veterinary digital x-ray plate?
- The hardware warranty lasts for 5 years.
2. How long is the software warranty for my veterinary digital x-ray software?
- The software warranty is also valid for 5 years.
3. For how long will I receive software upgrades for my x-ray system to be used in my animal hospital?
- You will receive software upgrades for 5 years.
4. How long can my veterinarian technicians receive phone support for any questions they may have regarding the daily implementation of digital X-rays in my animal practice?
- Our tech support helpline will be available for your veterinarian technicians for 5 years.
5. What is the cost of continued phone support and software upgrades after the warranty period?
- The cost for continued phone support and software upgrades after the warranty period is $750.00 per year.
6. Who provides the software and tech support? Who developed and owns the software?
- Our Examvue Veterinary software is developed, supported, and owned by JPI. They have been offering industry support since 1994. For technical support, please call 516-513-1330, and select option 2. Our support team is based in New York.
7. Are labor and shipping costs covered under the warranty if needed?
- Yes, labor and shipping costs are included in the warranty as required.
8. Will a loaner plate be provided in case my X-ray plate needs repair?
- Yes, we will provide a loaner plate in the event that your X-ray plate requires repair.

Is the New Digital X-ray System Compatible with Innovet?

Many veterinarians invested in X-ray systems in the ’90s. Most purchased an Innovet Summit table and generator.
They used the table and generator along with cassettes enclosing film to capture X-rays and provide life-saving next steps for their pet patients.
Processing the film in the chemical rinse and developing the images in the darkroom enabled the practicing veterinarian to review the X-ray.
If the X-ray proved complicating or just interesting then the veterinarian would mail the X-ray to a specialist for a review or save the X-ray case for the next ‘radiology rounds’ in upcoming weeks and months.
During these radiology rounds, X-ray cases would be reviewed amongst veterinarian piers and sometimes even veterinary radiologist.
Even if the patient was deceased by the time of the review huge advances in pet medicine were and still are to this day applied.
If you're reading this you use to film with your old X-ray generator and table. You want to impact the neighborhood and village who depend on precise and timely diagnosis to treat their pets.
Digital X-rays can speed up the process not only of image acquisition but also provide clear diagnostic radiology rounds.
Most old tables and generators still can produce excellent X-rays.
Often times these old systems have new light bulb collimators and replaced fuses that enable the old workhorse to continue to provide the power for an X-ray.
Yes, you can use your old table and generator with two types of digital X-rays.
The first is computed radiography or CR which will work today with any generator as the image is captured on an erasable film cassette then scanned into the software where the digital image can now be interrupted, adjusted or emailed to pet owners.
The next is an AED cesium plate. Automatic exposure detection.
This allows the plate to prepare itself for the exposure to capture the image and send in second the inmate to the display monitor.
This is the newest way to capture X-rays.
Not having to wire the old X-ray system to the new digital X-ray system is a confinement advantage.
It removes an element of future failure in hardware by eliminating the interference box!
We can help answer more questions surrounding your old X-ray table and generator.
Reach out today and we would be happy to help.