


From Referral to Diagnosis: The MRI Patient Journey in a Busy Practice

When practices first start considering MRI, it’s easy to focus on the machine itself.
The specs. The installation. The financial investment.
But eventually another question surfaces: “What would this actually look like in our hospital day-to-day?”
And honestly, it’s such a good question to ask.
Because successful MRI integration isn’t just about having advanced imaging, it’s about creating a workflow that feels manageable, efficient, and sustainable for your team.
The good news is that most practices don’t build perfect MRI workflows overnight. They build them one protocol, one patient, and one team adjustment at a time.
Let’s walk through what the MRI patient journey can realistically look like inside a busy veterinary practice.
It Starts Before the Appointment Is Even Scheduled
One of the biggest shifts in practice experience after adding MRI is becoming more intentional about case selection. Not every patient needs advanced imaging. But the right cases become much clearer over time.
Common MRI candidates often include:
Suspected IVDD cases
Seizure patients
Chronic neurologic symptoms
Unexplained pain or lameness
Patients are not responding to treatment as expected
As your team gains confidence, scheduling becomes more streamlined because everyone begins to recognize which cases are most likely to benefit from MRI. That’s where strong communication between doctors, technicians, and client care teams becomes incredibly important.
When everyone understands which patients are appropriate candidates, which diagnostics should be performed beforehand, and how to prepare clients for the process, the entire workflow runs more smoothly before the patient even walks through the door.
The Day-of Workflow: Organized, Not Chaotic
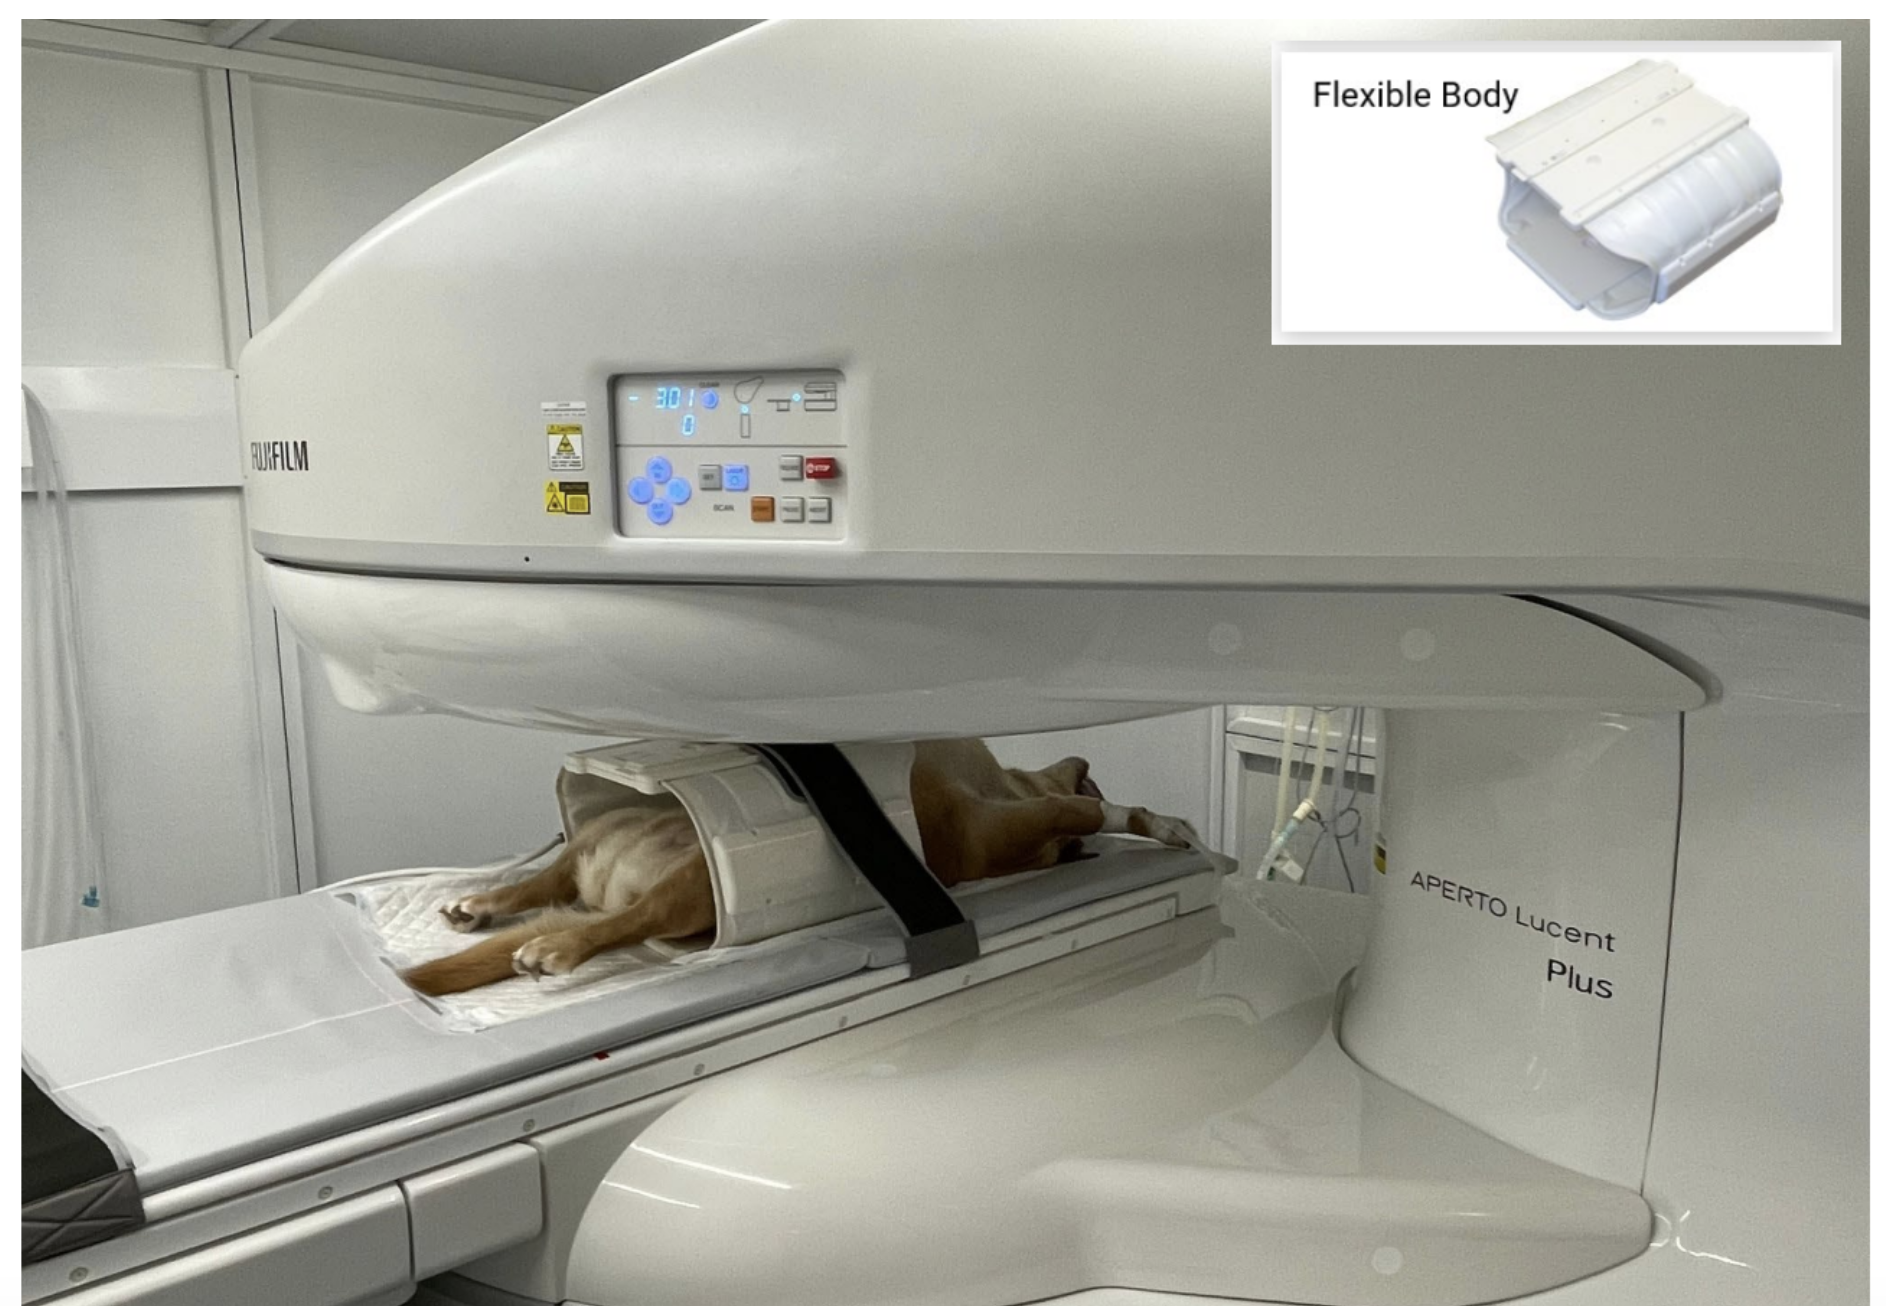
From the outside, an MRI can seem an intimidating operation. In reality, many practices discover that once protocols are established, MRI days become surprisingly structured. Especially using an MRI like theFujifilm Aperto Lucent 0.4T MRI system.
Typically, the workflow looks something like this:
Morning admission and patient assessment
Sedation or anesthesia preparation
MRI safety checks
Positioning and imaging
Recovery and monitoring
Image review and reporting
The key is consistency. The more repeatable your protocols become, the less stressful the process feels for everyone involved. And unlike many areas of veterinary medicine, which can feel unpredictable by nature, MRI often rewards preparation and routine.
Team Roles Matter
MRI is one of the clearest examples of how veterinary medicine truly functions as a team effort. A smooth imaging day depends on multiple moving pieces working together:
Veterinarians selecting appropriate cases
Technicians managing anesthesia and positioning
Assistants supporting patient handling and workflow
Client care teams coordinating communication and scheduling
Every role impacts efficiency. And interestingly, many hospitals find MRI creates opportunities for team growth:
Technicians developing advanced anesthesia skills
Staff are becoming more confident with neurology cases
Improved collaboration between departments
For some teams, adding MRI becomes more than a service expansion—it becomes a professional development opportunity across the hospital.
Positioning and Preparation Can Make or Break the Scan
One thing that practitioners learn quickly is that MRI quality doesn’t depend solely on the machine itself. Patient preparation matters. Good positioning:
Improves image consistency
Reduces repeat sequences
Shortens anesthesia time
Helps radiologists interpret studies more accurately
And in busy hospitals, efficiency matters. Even small improvements in preparation and workflow can significantly reduce recovery times, improve scheduling, and lower stress levels.
That’s why many successful MRI programs focus heavily on protocol refinement early on.
Report Turnaround: Where Answers Start Taking Shape
For both clients and clinicians, the moment that matters most… when the scan is complete. Now everyone wants answers. Depending on the hospital setup, MRI studies may be:
Reviewed internally by specialists
Sent to teleradiology services
Interpreted collaboratively between teams
Fast, clear reporting can dramatically improve workflow momentum:
Treatment plans move forward faster
Surgical decisions happen sooner
Client communication becomes more confident and direct
And perhaps most importantly, patients spend less time in diagnostic limbo. That’s something both veterinary teams and pet owners deeply appreciate.
The Reality: Workflow Evolves Over Time
No MRI workflow is perfect from day one. There will be adjustments:
Scheduling tweaks
Protocol refinements
Team training moments
Efficiency improvements
That’s normal. The practices that succeed with MRI aren’t necessarily the ones that start with flawless systems; they’re the ones willing to continuously refine the process as their confidence grows.
And over time, what once felt like a major operational leap simply becomes another integrated part of how the hospital delivers care.
MRI ROI Calculator
Total Cases to Pay Off: 0
Weekly Revenue: $0
Monthly Revenue: $0
Yearly Revenue: $0
Time to Pay Off Machine:
0 Years


Is MRI Worth It for Your Practice? A Real-World Discussion
If you’ve ever found yourself sending a case out for advanced imaging and thinking,
“I wish we could keep this in-house.”
You’re not alone.
For many veterinary practices, MRI sits in that category of “maybe someday.” It feels like a big leap, financially, operationally, and even mentally. But the conversation around MRI has shifted more recently. It’s no longer just for large specialty centers. More general and hybrid practices are starting to ask a very practical question:
Does this actually make sense for my hospital?
Let’s break that down in a way that feels real.
It’s Not Just the Cost, It’s the Cases You’re Losing
When most practices evaluate MRI, the first number they look at is the price tag. That’s fair. But focusing only on upfront cost can miss the bigger picture.
Think about the cases you’re already seeing:
The down dog with suspected IVDD
The seizure workup that needs answers
The chronic lameness case that just isn’t adding up
Right now, what happens to those patients?
They get referred out.
And when they leave, a few things often go with them:
Diagnostic revenue
Treatment plans
Follow-up care
Long-term client loyalty
Not every referral is lost forever, but many don’t come back in the same way. MRI changes that dynamic. It allows you to keep the case, guide the course of care, and remain at the center of the patient’s care.
Revenue Per Scan Adds Up Faster Than You Think
Let’s keep this easy.
MRI isn’t about running dozens of scans a day. In fact, many successful veterinary practices start with just a handful of cases per week. Even at a conservative pace:
A few scans per week
Consistent demand from neurology and complex cases
Gradual growth as your team gains confidence
That can translate into meaningful, steady revenue, not just from the scan itself, but from everything that follows:
Surgical procedures
Ongoing treatment plans
Rechecks and monitoring
MRI often feeds into the rest of your services.
Referral Retention vs. Referral Dependence
There’s nothing wrong with referring. In many cases, it’s absolutely the right call.
But there’s a difference between strategic referral and default referral.
When MRI isn’t available in-house, even cases you could manage often get sent elsewhere simply because you don’t have the diagnostic clarity to move forward confidently.
Bringing MRI into your practice shifts that balance and you refer when it truly benefits the patient, not just when you’re missing a diagnostic piece
That distinction matters for both patient care and business sustainability.
The Confidence Factor (For You and Your Clients)
There’s also a less tangible, but incredibly important, ROI: confidence.
When you can move from “this is what we think is going on…” to “this is what we’re seeing and here’s the plan…”
…it changes everything.
Clients feel it, and decision-making becomes clearer and faster.
That level of clarity often leads to:
Higher case acceptance
Stronger trust
Better compliance with treatment plans
MRI provides answers, and we all know how powerful clear answers can be.
Growth Doesn’t Have to Mean Overwhelm
One of the biggest hesitations around MRI is the fear of disruption:
Will this slow us down?
Can our team handle it?
Is this going to complicate our workflow?
Those are certainly valid concerns, but they’re also manageable. Many practices gradually integrate MRI, starting with select case types, building protocols over time, and training the team in phases.
It doesn’t have to be an overnight transformation. In fact, the most successful implementations rarely are.
So… Is It Worth It?
The honest answer is: it depends on your goals. But if your practice is:
Seeing a steady stream of complex cases
Looking to retain more advanced diagnostics
Wanting greater control over patient outcomes
Focused on long-term growth rather than short-term volume
…then MRI becomes less of a “nice to have” and more of a strategic next step.
MRI ROI Calculator
Total Cases to Pay Off: 0
Weekly Revenue: $0
Monthly Revenue: $0
Yearly Revenue: $0
Time to Pay Off Machine:
0 Years
Built for Busy Surgery Days: Making the Most of the Veta 3X in High-Volume Veterinary Practices
In a practice where surgery days stack up quickly, and anesthesia is part of the daily rhythm, your equipment has to do more than just function. It needs to keep up with the pace.
When you’re moving from one procedure to the next, efficiency, consistency, and ease of use start to matter just as much as performance.
That’s where a system like the VETA 3X really supports a high-volume environment, especially when it’s set up and used intentionally.
Keeping Turnover Smooth Between Cases
In busy hospitals, the time between procedures can add up fast. Small inefficiencies like switching circuits, adjusting setups, or troubleshooting equipment can slow your entire day.
The VETA 3X has both rebreathing and non-rebreathing options readily available (including the Bain system setup), allowing for quicker transitions between patients of different sizes. Instead of reworking your setup each time, your team can move efficiently from one case to the next.
Tip: Keep commonly used circuits (like your Bain and standard rebreathing system) prepped and easily accessible. Even shaving a few minutes off each case can significantly improve overall flow.
Supporting Consistency Across Multiple Team Members
In high-volume settings, anesthesia isn’t managed by a single person; it’s often shared among technicians and doctors throughout the day. That makes equipment consistency especially important.
The VETA 3X layout and accessible controls help create a more consistent experience for everyone who uses it. When each team member knows exactly where to look and what to expect, it reduces variability in setup and monitoring.
Consideration: Standardize your anesthesia protocols alongside your equipment. When your machine and your processes align, it creates a smoother, safer experience across the board.
Reducing Setup Fatigue
On long surgery days, even experienced teams can feel the effects of repetition. Equipment that’s overly complex or difficult to handle increases the risk of small errors, especially later in the day.
A streamlined system with clearly organized components helps reduce that mental load. Features like the fixed-mount pour-fill vaporizer and simple hose connections mean fewer steps and less second-guessing during setup.
Tip: Build a quick pre-anesthesia checklist specific to your machine. This helps catch small issues early and keeps your team consistent, even during busy or fatiguing days.
Managing Smaller Patients Efficiently
High-volume practices often see a mix of routine procedures: spays, neuters, dentals, many involving smaller patients. Having a reliable non-rebreathing option readily available is essential.
The included Bain system kit and disposable Bain circuit make it easier to quickly set up for these cases without needing additional equipment or adjustments.
Consideration: Keep a dedicated small-patient anesthesia station or a similar setup if your caseload leans heavily in that direction. It minimizes switching and keeps your workflow tighter.
Planning for Maintenance Without Disruption
In a busy practice like yours, downtime isn’t just inconvenient; it can throw off your entire schedule. Reliable equipment helps, but proactive maintenance matters just as much.
The VETA 3X's simple design and accessible components make routine checks and maintenance more manageable, which is key when you’re relying on it daily.
Tip: Schedule brief, regular equipment checks (daily quick checks, weekly deeper reviews) rather than waiting for issues to arise. It’s far easier to prevent disruptions than to work around them mid-day. (see tips below)
The Bigger Picture
Your day already demands a lot: balancing a packed surgical schedule, managing your team, handling administrative responsibilities, and navigating the emotional weight of patient care.
The last thing you need is equipment that adds friction or uncertainty.
Your anesthesia machine should be one of the most dependable parts of your workflow, something your team can trust without hesitation. When that piece is solid, it’s one less thing pulling your attention, and one more way to support a smoother, more manageable day.
Daily Quick Checks (The "Pre-Flight" Routine)
Perform these every morning before the first patient is prepped.
Perform a High-Pressure Leak Test: Close the pop-off valve, occlude the Y-piece (with your thumb or a stopper), and use the $O_2$ flush to pressurize the system to 30 cmH2O. Ensure the pressure holds for at least 10–15 seconds.
Check Vaporizer Levels: Ensure the vaporizer is filled to the appropriate line. Verify the fill cap is tightened securely to prevent anesthetic gas leaks.
Inspect CO2 Absorbent: Check the color of the soda lime or Baralyme. If 1/3 to 1/2 of the canister has changed color (usually to purple), replace it immediately. Remember: color can "revert" overnight, so trust your usage logs if the granules look white but are exhausted.
Oxygen Supply Verification: Check your tank pressure or central line. Ensure you have more than enough volume to get through the day's scheduled procedures.
Verify Scavenging Connection: Ensure the scavenging interface (active or passive) is properly connected, and the charcoal canister (if used) is not expired by weight.
The "Open Pop-Off" Rule: Immediately after your leak test, re-open the pop-off valve. A closed pop-off valve is a leading cause of barotrauma.
Weekly Deeper Reviews
Schedule these for a specific day (e.g., Friday afternoon) to prep for the coming week.
1. Seal and O-Ring Inspection
Check the O-rings on the vaporizer mounting and the CO2 canister. Dry or cracked O-rings are the primary source of "phantom leaks" that are hard to find during daily checks.
Apply a tiny amount of medical-grade lubricant if seals appear dry.
2. Breathing Circuit & Bag Integrity
Fully extend your breathing hoses and check for small cracks or "milky" discoloration in the plastic.
Inflate your reservoir bags and check for brittleness or tiny pinholes, especially around the neck where they connect to the machine.
3. One-Way Valve (Flutter Valve) Inspection
Unscrew the clear domes over the inspiratory and expiratory valves.
Ensure the thin discs are clean, dry, and not "sticking" due to moisture or residue. A sticking valve can cause a patient to re-breathe $CO_2$.
4. Flowmeter Function
Turn the oxygen flowmeter up and down slowly. Ensure the bobbin or ball moves smoothly without sticking or "jumping," which can indicate debris in the flow tube.
5. Bain System / Non-Rebreathing Kit
Since the Veta 3X is often used for smaller patients, inspect the inner tube of the Bain circuit. Ensure it is not disconnected or kinked, as this can lead to a failure in delivering fresh gas to the patient.
5 Factors That Make or Break Your Next Veterinary Anesthesia Machine Purchase

Veta 3X
Investing in a new anesthesia machine is one of those decisions that quietly shapes your entire surgical workflow. It’s so important to choose equipment your team can rely on every single day, across every patient, in every procedure.
If you’re in the process of evaluating options, here are five key factors worth paying close attention to.
Let’s dive in…
1. Reliability of Anesthetic Delivery
At the core of any anesthesia machine is its ability to deliver consistent, controlled anesthesia. Variability can directly impact patient stability, so, as you know, it’s not something to be taken lightly.
Look for systems with dependable vaporizers and pressure management features that help maintain steady anesthetic depth throughout a procedure.
A fixed-mount isoflurane vaporizer with a pour-fill system, like the one included with the Veta 3X, supports consistent output while minimizing handling complexity.
This is one area where simplicity and precision go a long way.
2. Compatibility with Your Patient Base
Not every practice has the same caseload, and your anesthesia machine should reflect that.
If you’re seeing a wide range of patients, from small cats and exotics to larger dogs, you’ll want flexibility in your breathing systems.
Machines that support both rebreathing and non-rebreathing setups allow you to adapt quickly without needing separate equipment. The inclusion of a Bain system kit and disposable Bain circuit makes it easier to safely anesthetize smaller patients without overcomplicating your setup.
Versatility here directly translates to smoother case flow.
3. Ease of Use for Your Team
Anesthesia is managed by a team, often in fast-paced environments. Intuitive, easy-to-use equipment reduces training time and helps minimize errors.
Features to look for:
Clearly labeled and accessible controls
Logical component layout
Straightforward switching between systems
When components like the APL valve, CO₂ absorber, and breathing circuits are easy to access and manage, your team can stay focused where it matters most…on the patient.
It’s also worth considering how well a new anesthesia machine will integrate into your existing workflow without slowing your team down.
The goal is to create a smoother, more predictable surgical environment. Equipment that’s quick to set up, easy to maintain, and intuitive to use can reduce delays between cases and help your team stay efficient throughout the day.
4. Included Components and Setup Readiness
One of the most overlooked factors when purchasing a new anesthesia machine is what actually comes with it. A more complete system, like one that includes:
Fixed mount Iso vaporizer (pour fill)
O₂ hose
US gas hoses (DISS/DISS)
Bain system kit
Disposable Bain circuit
…allows your team to get up and running quickly without sourcing additional parts or troubleshooting compatibility issues.
It’s a small detail that makes a big difference during setup.
5. Cost, Warranty, and Long-Term Value
Price always matters, but it should be evaluated alongside what you’re actually getting.
A system priced at $4,000 (including shipping) with a 3-year parts-only warranty offers a clear, predictable investment. Beyond the upfront cost, consider:
Expected lifespan of the equipment
Ease of maintenance
Availability of replacement parts
A well-balanced machine provides not just affordability, but dependable performance over time, without constant repairs or workarounds.
Reliability Where It Counts
Choosing the right anesthesia machine goes beyond specs on a page. It’s about finding a system that fits your patients, supports your team, and performs consistently under real clinical conditions.
When you evaluate options through that lens, reliability, flexibility, usability, completeness, and long-term value, you’re far more likely to land on a machine that truly supports your practice day in and day out.
The Warming Gap No One Talks About in Veterinary Surgery
Most veterinary teams don’t struggle with whether to keep patients warm—we all know it matters. The real challenge is consistency.
You can have all the right intentions, trained staff, and monitoring in place… and still end up with a patient whose temperature dips halfway through a procedure. Not because your team isn’t doing a good job, but because your warming setup isn’t working with you.
That’s the gap many veterinary hospitals are starting to notice, and it’s where theHoverHeatwarming blanket fits in.
The Reality of a Busy Surgery Day
Let’s zoom out for a second and look at a typical day in practice.
Back-to-back dentals. A couple of surgeries are running longer than expected. Different team members are rotating through anesthesia monitoring. Patients of all sizes, from a 5 lb cat to an 80 lb dog
In that environment, warming methods need to be simple, reliable, and low-maintenance.
Because if a system is cumbersome or inconsistent, it doesn’t reach its full potential. That’s where many traditional warming methods fall short. They often require constant adjusting, layering, or troubleshooting to stay effective.
Why Some Warming Setups Fall Apart Mid-Procedure
Even with multiple warming tools in place, temperature drops still happen. A few common reasons:
Heat isn’t reaching the areas that need it most
Warming is uneven or inconsistent
Setups shift during patient repositioning
Staff are too busy to continuously adjust equipment
In other words, it’s not just about having warmth; it’s about having dependable warmth that holds up throughout the entire case.
A More Practical Approach with HoverHeat
The HoverHeatwarming blanket was designed with real veterinary workflow in mind.
Instead of requiring constant attention, it provides a steady, even source of warmth that supports the patient without needing frequent adjustments.
Its underbody warming design helps address one of the most common breakdown points in temperature management—losing heat through prolonged contact with the surgical table.
For teams, that translates to:
Less time troubleshooting warming setups
Fewer last-minute “we need another blanket” moments
More consistent temperature trends on the monitor
And those small wins add up over the course of a full surgery day.
Especially Useful for Dental Days
If you’ve ever had a full dental schedule, you know how tricky temperature management can be. Dentals tend to involve:
Longer anesthetic periods than expected
Water exposure that contributes to heat loss
Frequent repositioning
Smaller patients who cool quickly
It’s the kind of setting where warming can easily become reactive instead of proactive.
Using a system like HoverHeat allows teams to build warming into the setup from the start, rather than chasing temperature drops later in the procedure.
Supporting Your Team (Not Just the Patient)
One overlooked benefit of a reliable veterinary patient warming system is how much it helps the team. When warming is predictable:
Anesthesia monitoring feels more controlled
Technicians can focus on trends instead of constant adjustments
There’s less mental load during already busy procedures
For former veterinary technicians, especially, this is a big deal. You know how many moving parts there are in anesthesia, and any tool that reduces friction is worth paying attention to.
Small Changes, Noticeable Differences
What makes the HoverHeatComplete Set appealing for many veterinary practices isn’t that it completely overhauls your workflow; it’s that it fits into it.
You’re not reinventing your surgery setup. You’re simply improving one piece of it in a way that’s:
Easy to implement
Simple to maintain
Consistent across different types of procedures
And over time, those small improvements show up in ways that matter, like with smoother recoveries, more stable anesthetic events, and less scrambling mid-procedure.
Where It Fits Into Your Current Setup
HoverHeatis designed to strengthen your approach to patient warming. It works alongside your existing protocols and equipment, helping create a more complete warming strategy for:
Surgery
Dentals
Recovery
Even longer or more complex cases
In real-world veterinary medicine, the goal isn’t perfection; it’s reliability.
You already understand the importance of keeping patients warm. But understanding it and achieving it consistently are two different things.
The HoverHeatwarming blanket helps close that gap by offering a practical, dependable solution that works with your team.
And when your warming system becomes one less thing to worry about, your entire surgical workflow benefits.


Preventing Hypothermia in Veterinary Patients: A Smarter Approach to Surgical Warming
Every veterinary team has experienced this:
You glance at the patient monitor halfway through a procedure and notice the body temperature slowly drifting downward. You add another towel, turn up the warm water blanket, maybe grab a heated air blanket—and still, keeping the patient warm can feel like an uphill battle.
Hypothermia during anesthesia is one of the most common challenges in veterinary surgery and dentistry. But with the right veterinary patient warming system, maintaining an ideal body temperature becomes far more manageable.
That’s exactly where the HoverHeat warming blanket is making a difference for veterinary hospitals.
Why Patient Warming Should Be a Priority in Veterinary Medicine
When your patient is under anesthesia, their body loses the ability to regulate temperature effectively. Combined with hair clipping, surgical prep, and exposure to a cool operating room, body heat begins to drop quickly.
That temperature drop matters more than many people realize. Anesthetic hypothermia can lead to:
Slower anesthetic recovery
Increased anesthetic complications
Delayed drug metabolism
Longer patient recovery times
In smaller patients, such as cats, puppies, or toy breeds, the temperature drop can occur even more quickly. That’s why many veterinary hospitals are investing in active warming systems designed specifically for veterinary surgical patients.
How the HoverHeat Warming Blanket Works
The HoverHeat veterinary warming blanket takes a different approach to temperature management than many traditional warming methods.
Instead of simply placing heat on the patient, the system uses a cushion of circulating warm air beneath the patient. This allows warm air to move evenly under the body, warming one of the largest heat-loss areas during surgery.
The result is more consistent heat distribution and improved patient warming throughout the procedure. For veterinary hospitals performing procedures like:
Routine spays and neuters
Dental procedures
Orthopedic surgeries
Soft tissue surgeries
…this type of active warming can make a noticeable difference in maintaining stable body temperatures.
Multiple Ways to Warm Patients
One advantage of the HoverHeat warming system for veterinary practices is its versatility.
The system can be used for:
Surgical Procedures: helping to maintain patient temperature throughout anesthesia, especially during longer procedures.
Veterinary Dental Procedures: dentals often involve extended anesthesia times and significant heat loss due to water exposure and patient positioning. Active warming helps keep temperatures stable during these cases.
Recovery: Patients recovering from anesthesia are often still prone to hypothermia. Maintaining warmth during recovery helps support smoother, more comfortable wake-ups.
Designed for Busy Veterinary Hospitals
Veterinary teams need equipment that works with their existing workflow, not something that adds extra complexity to surgery days. The HoverHeat is designed with practicality in mind.
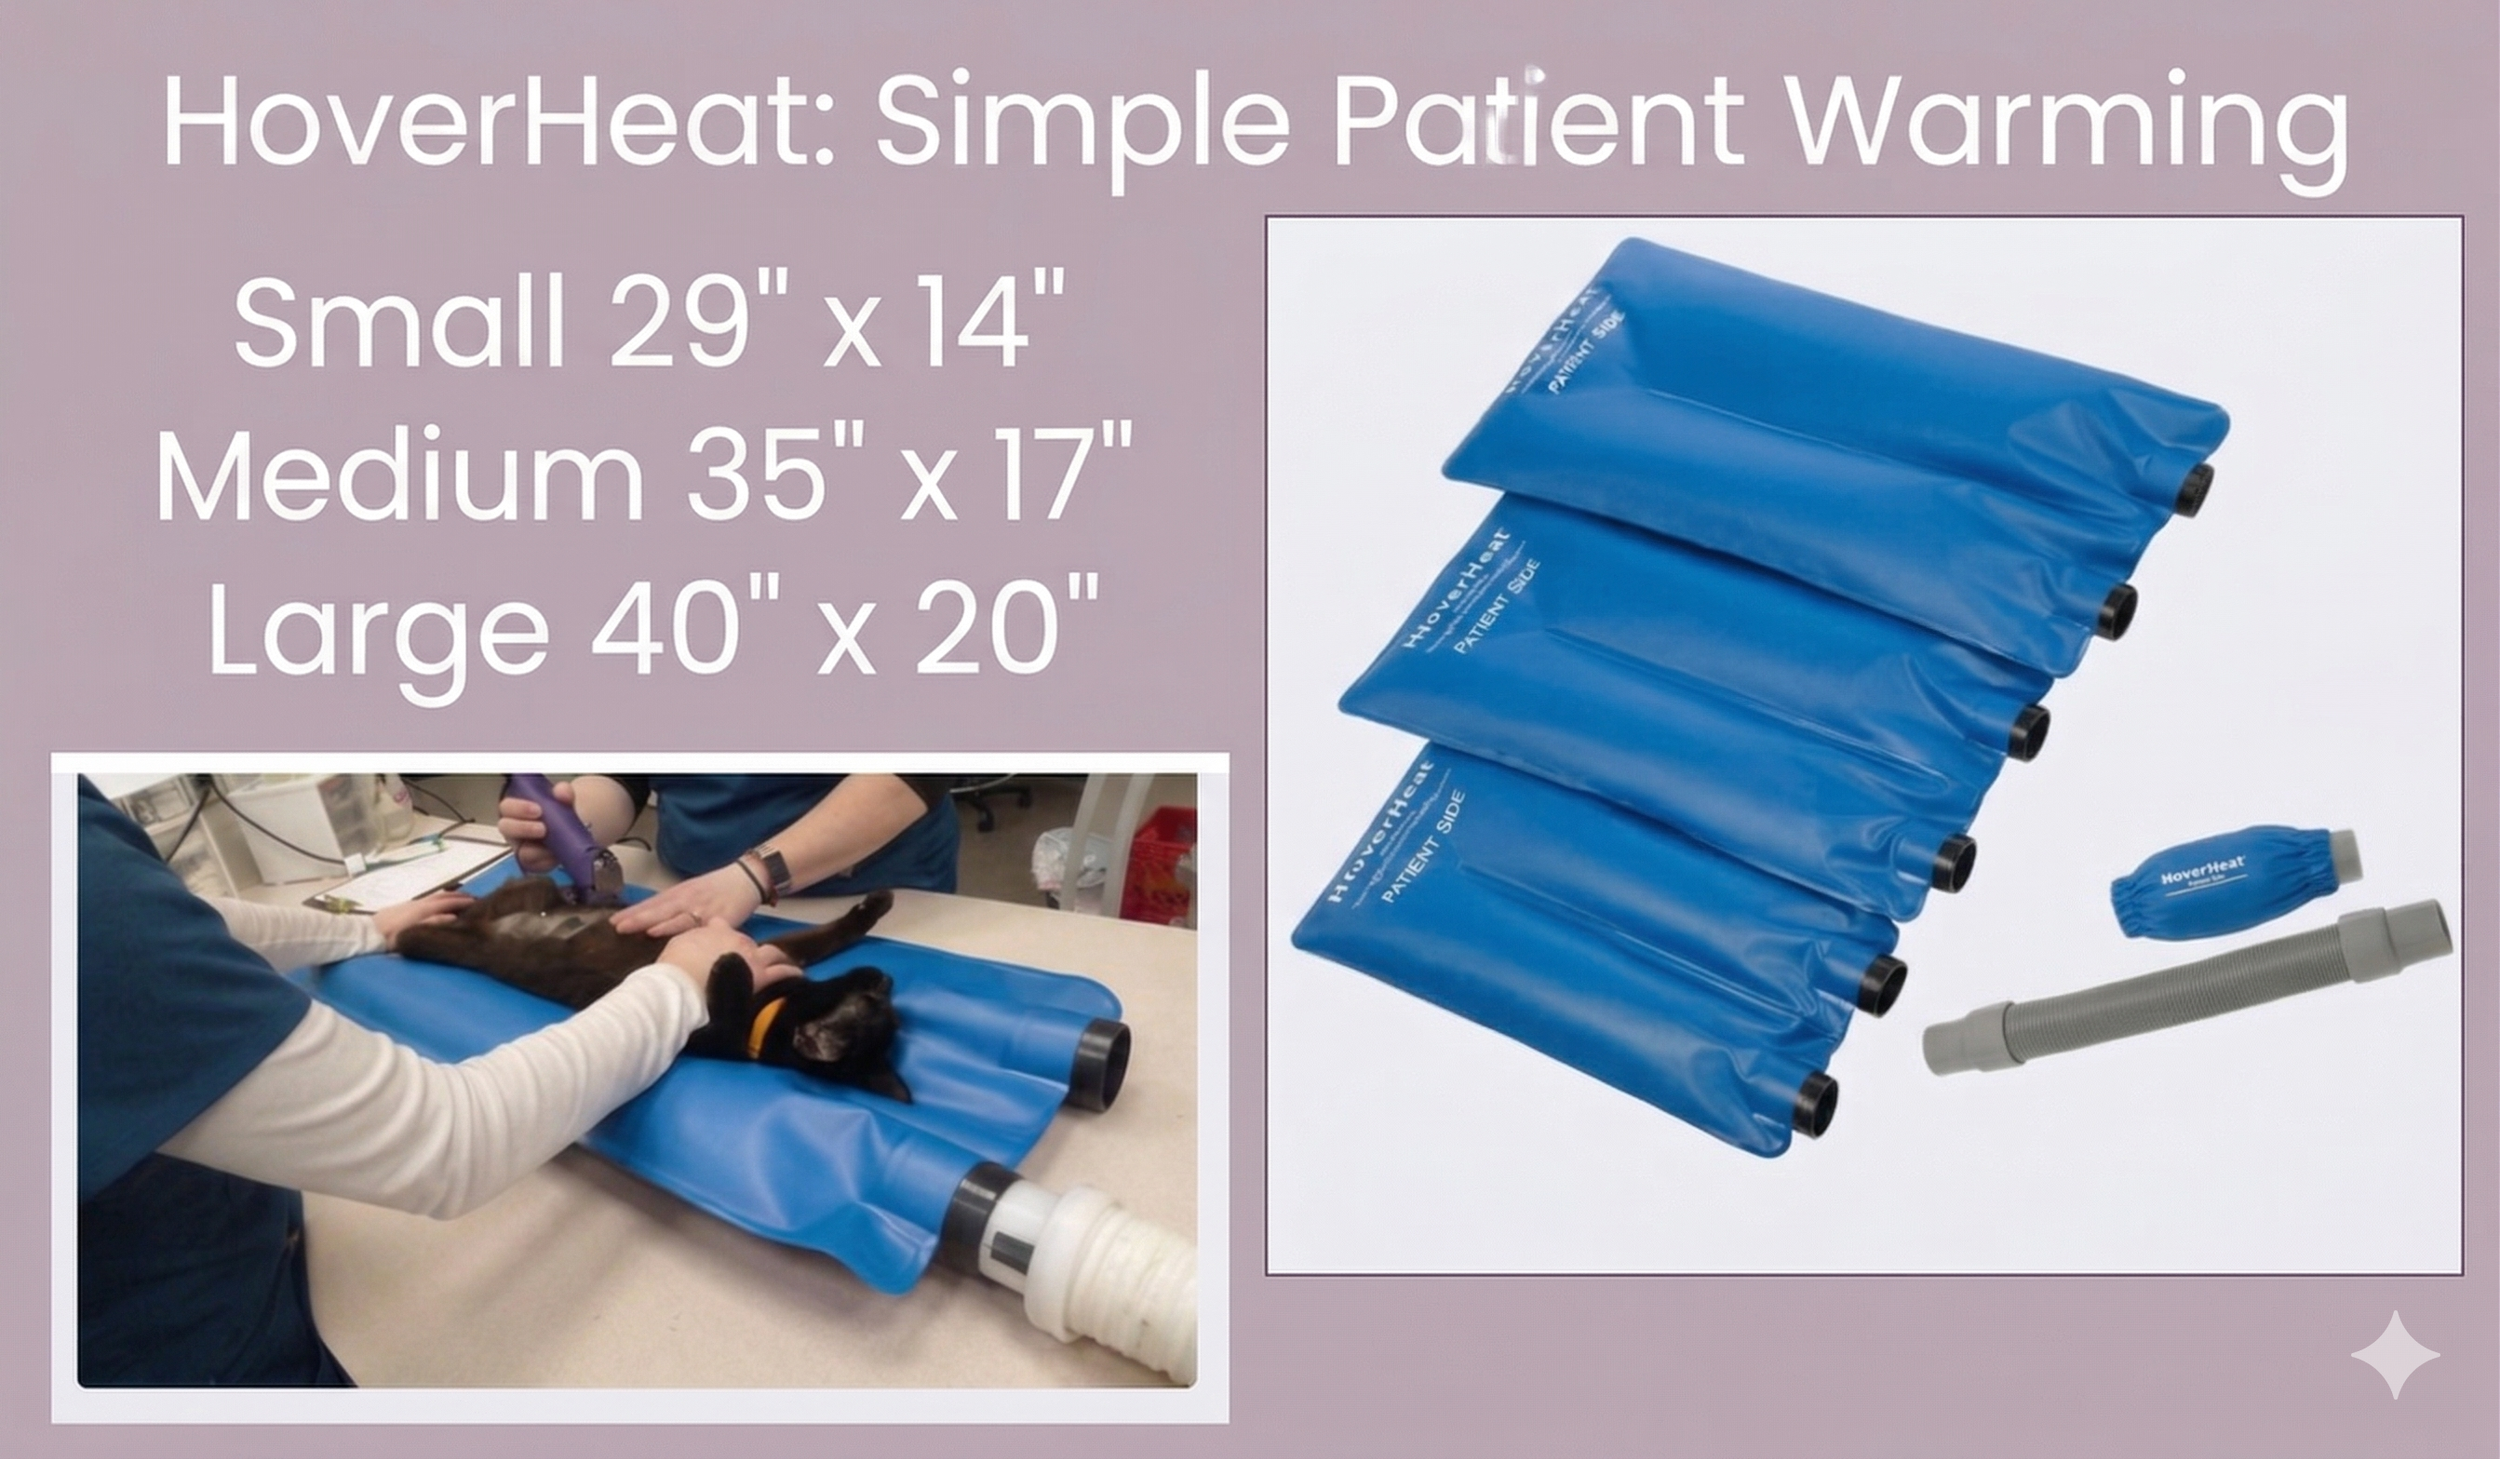
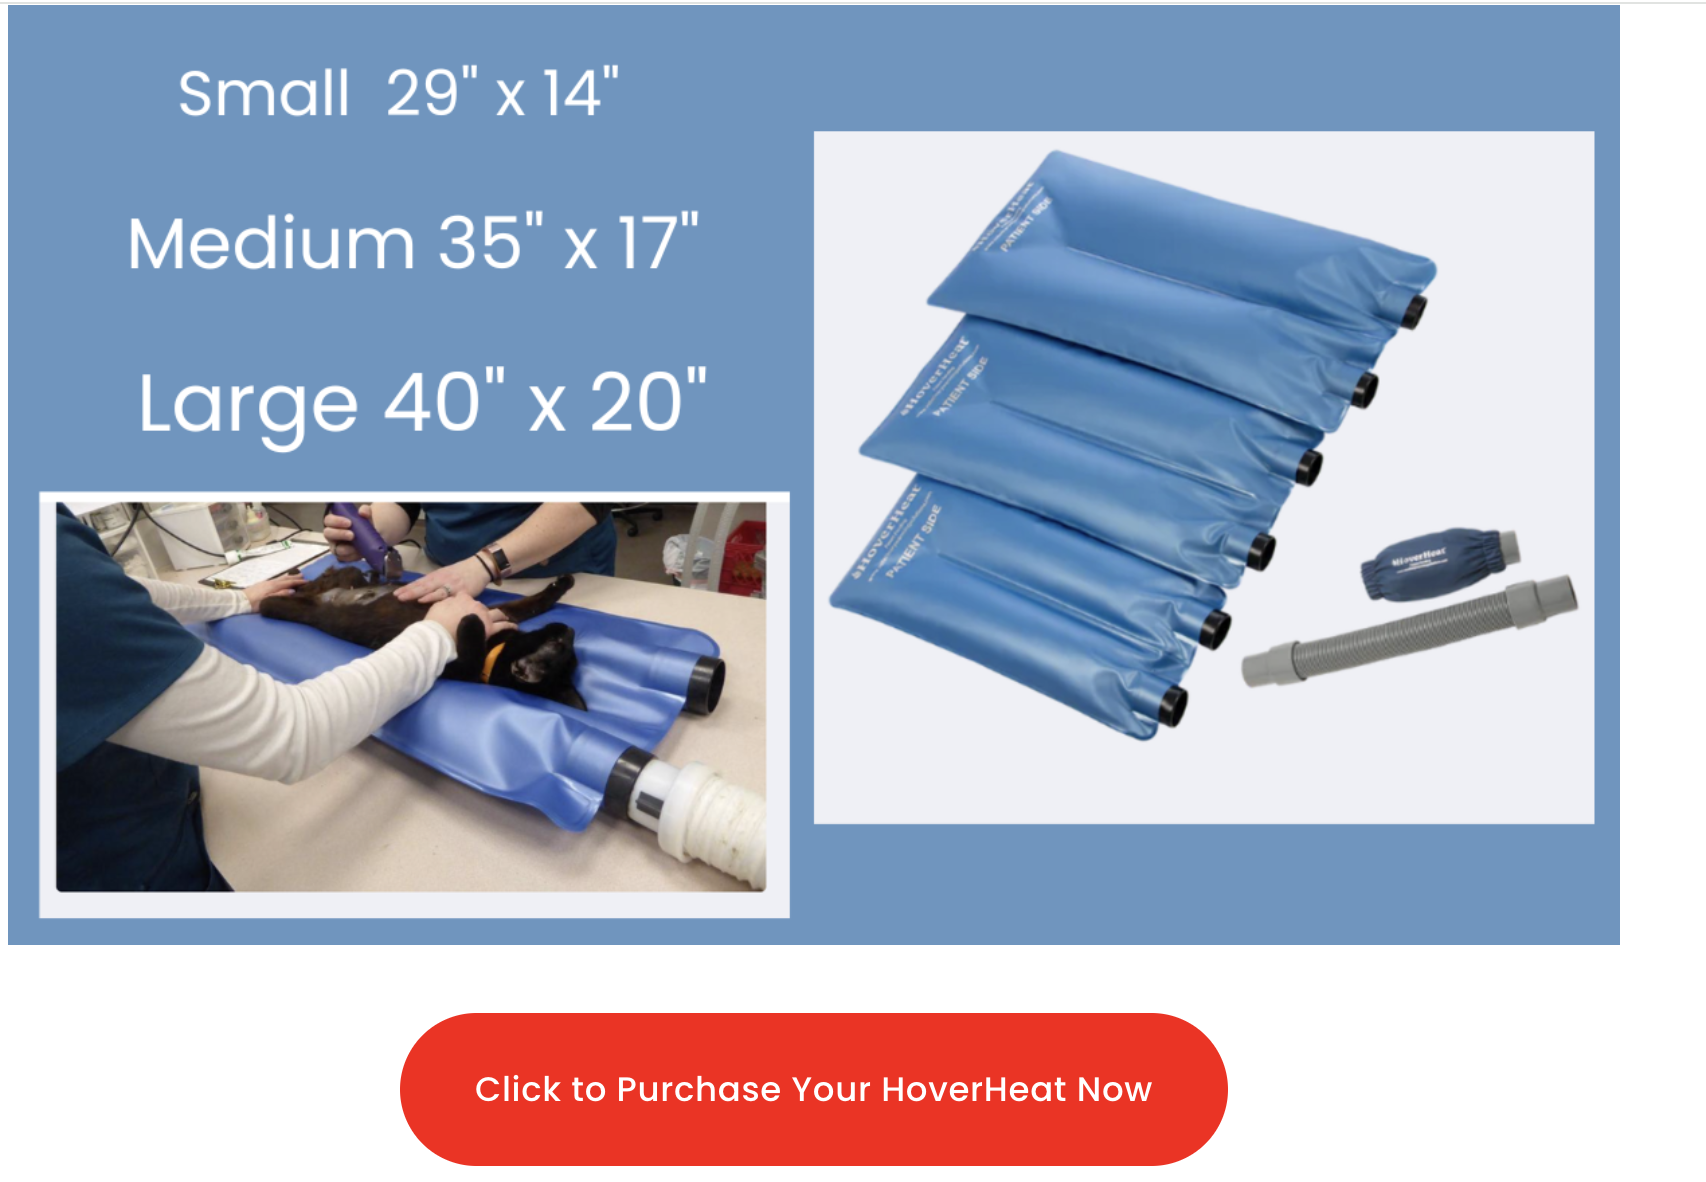
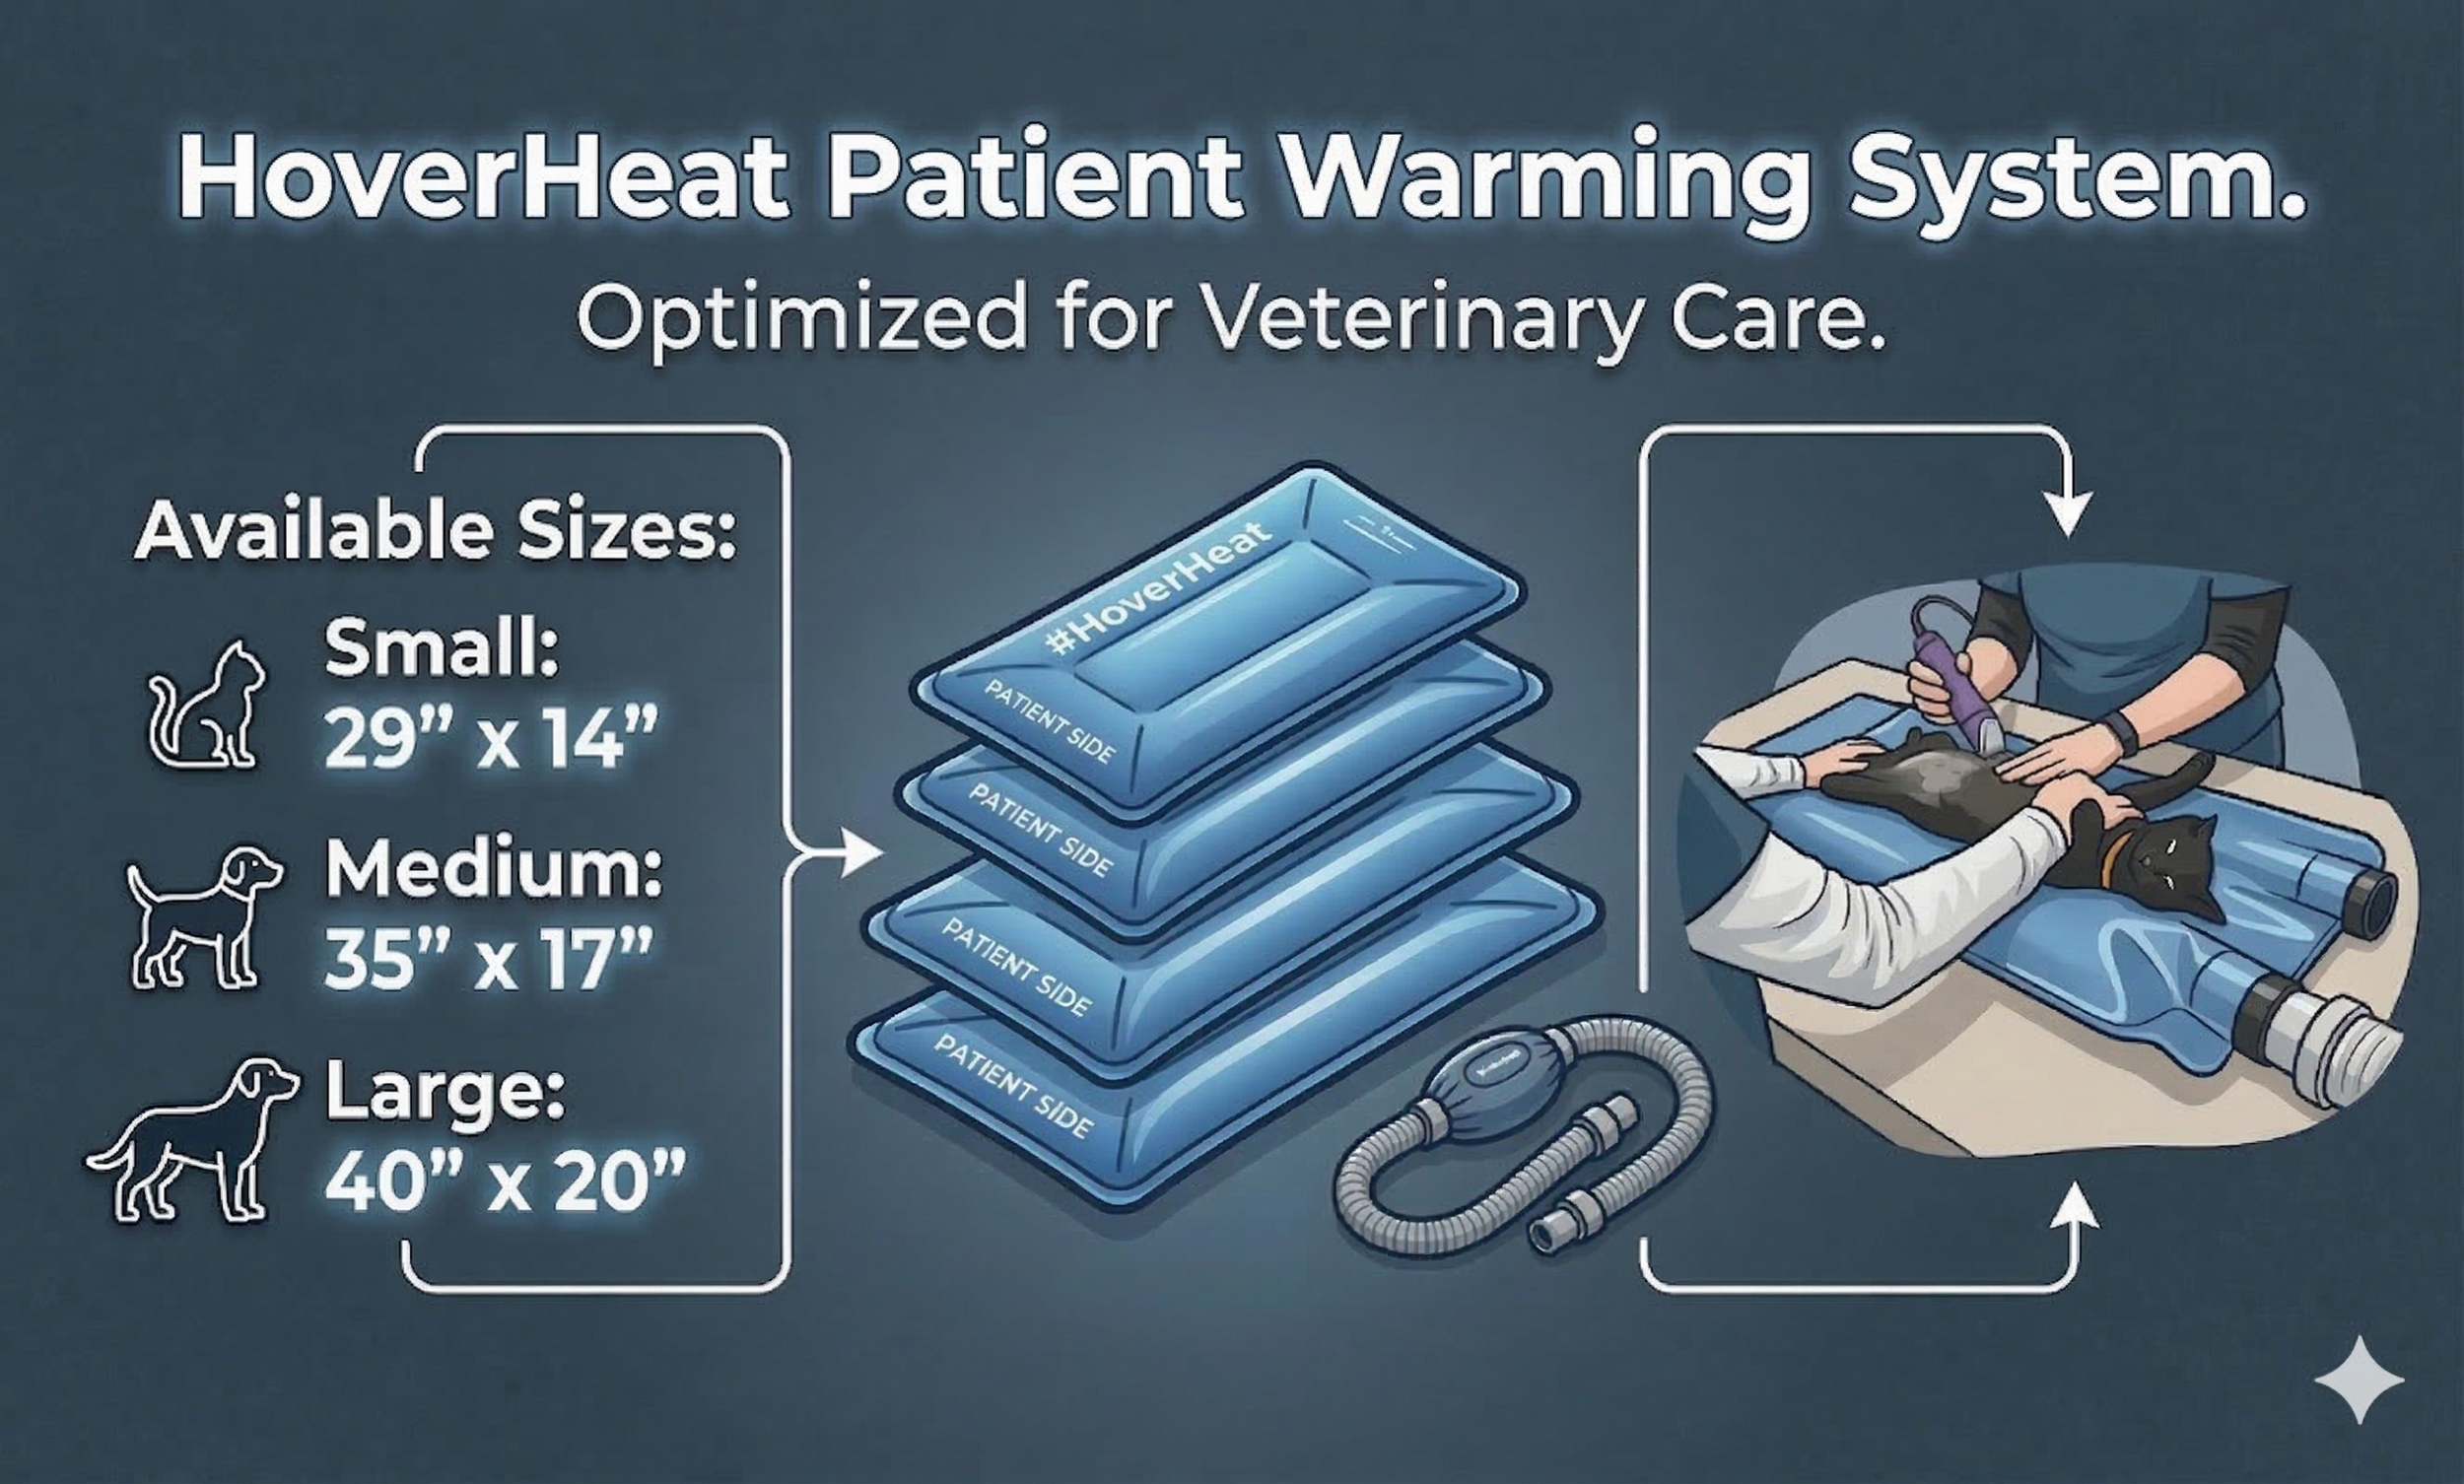
Key features include:
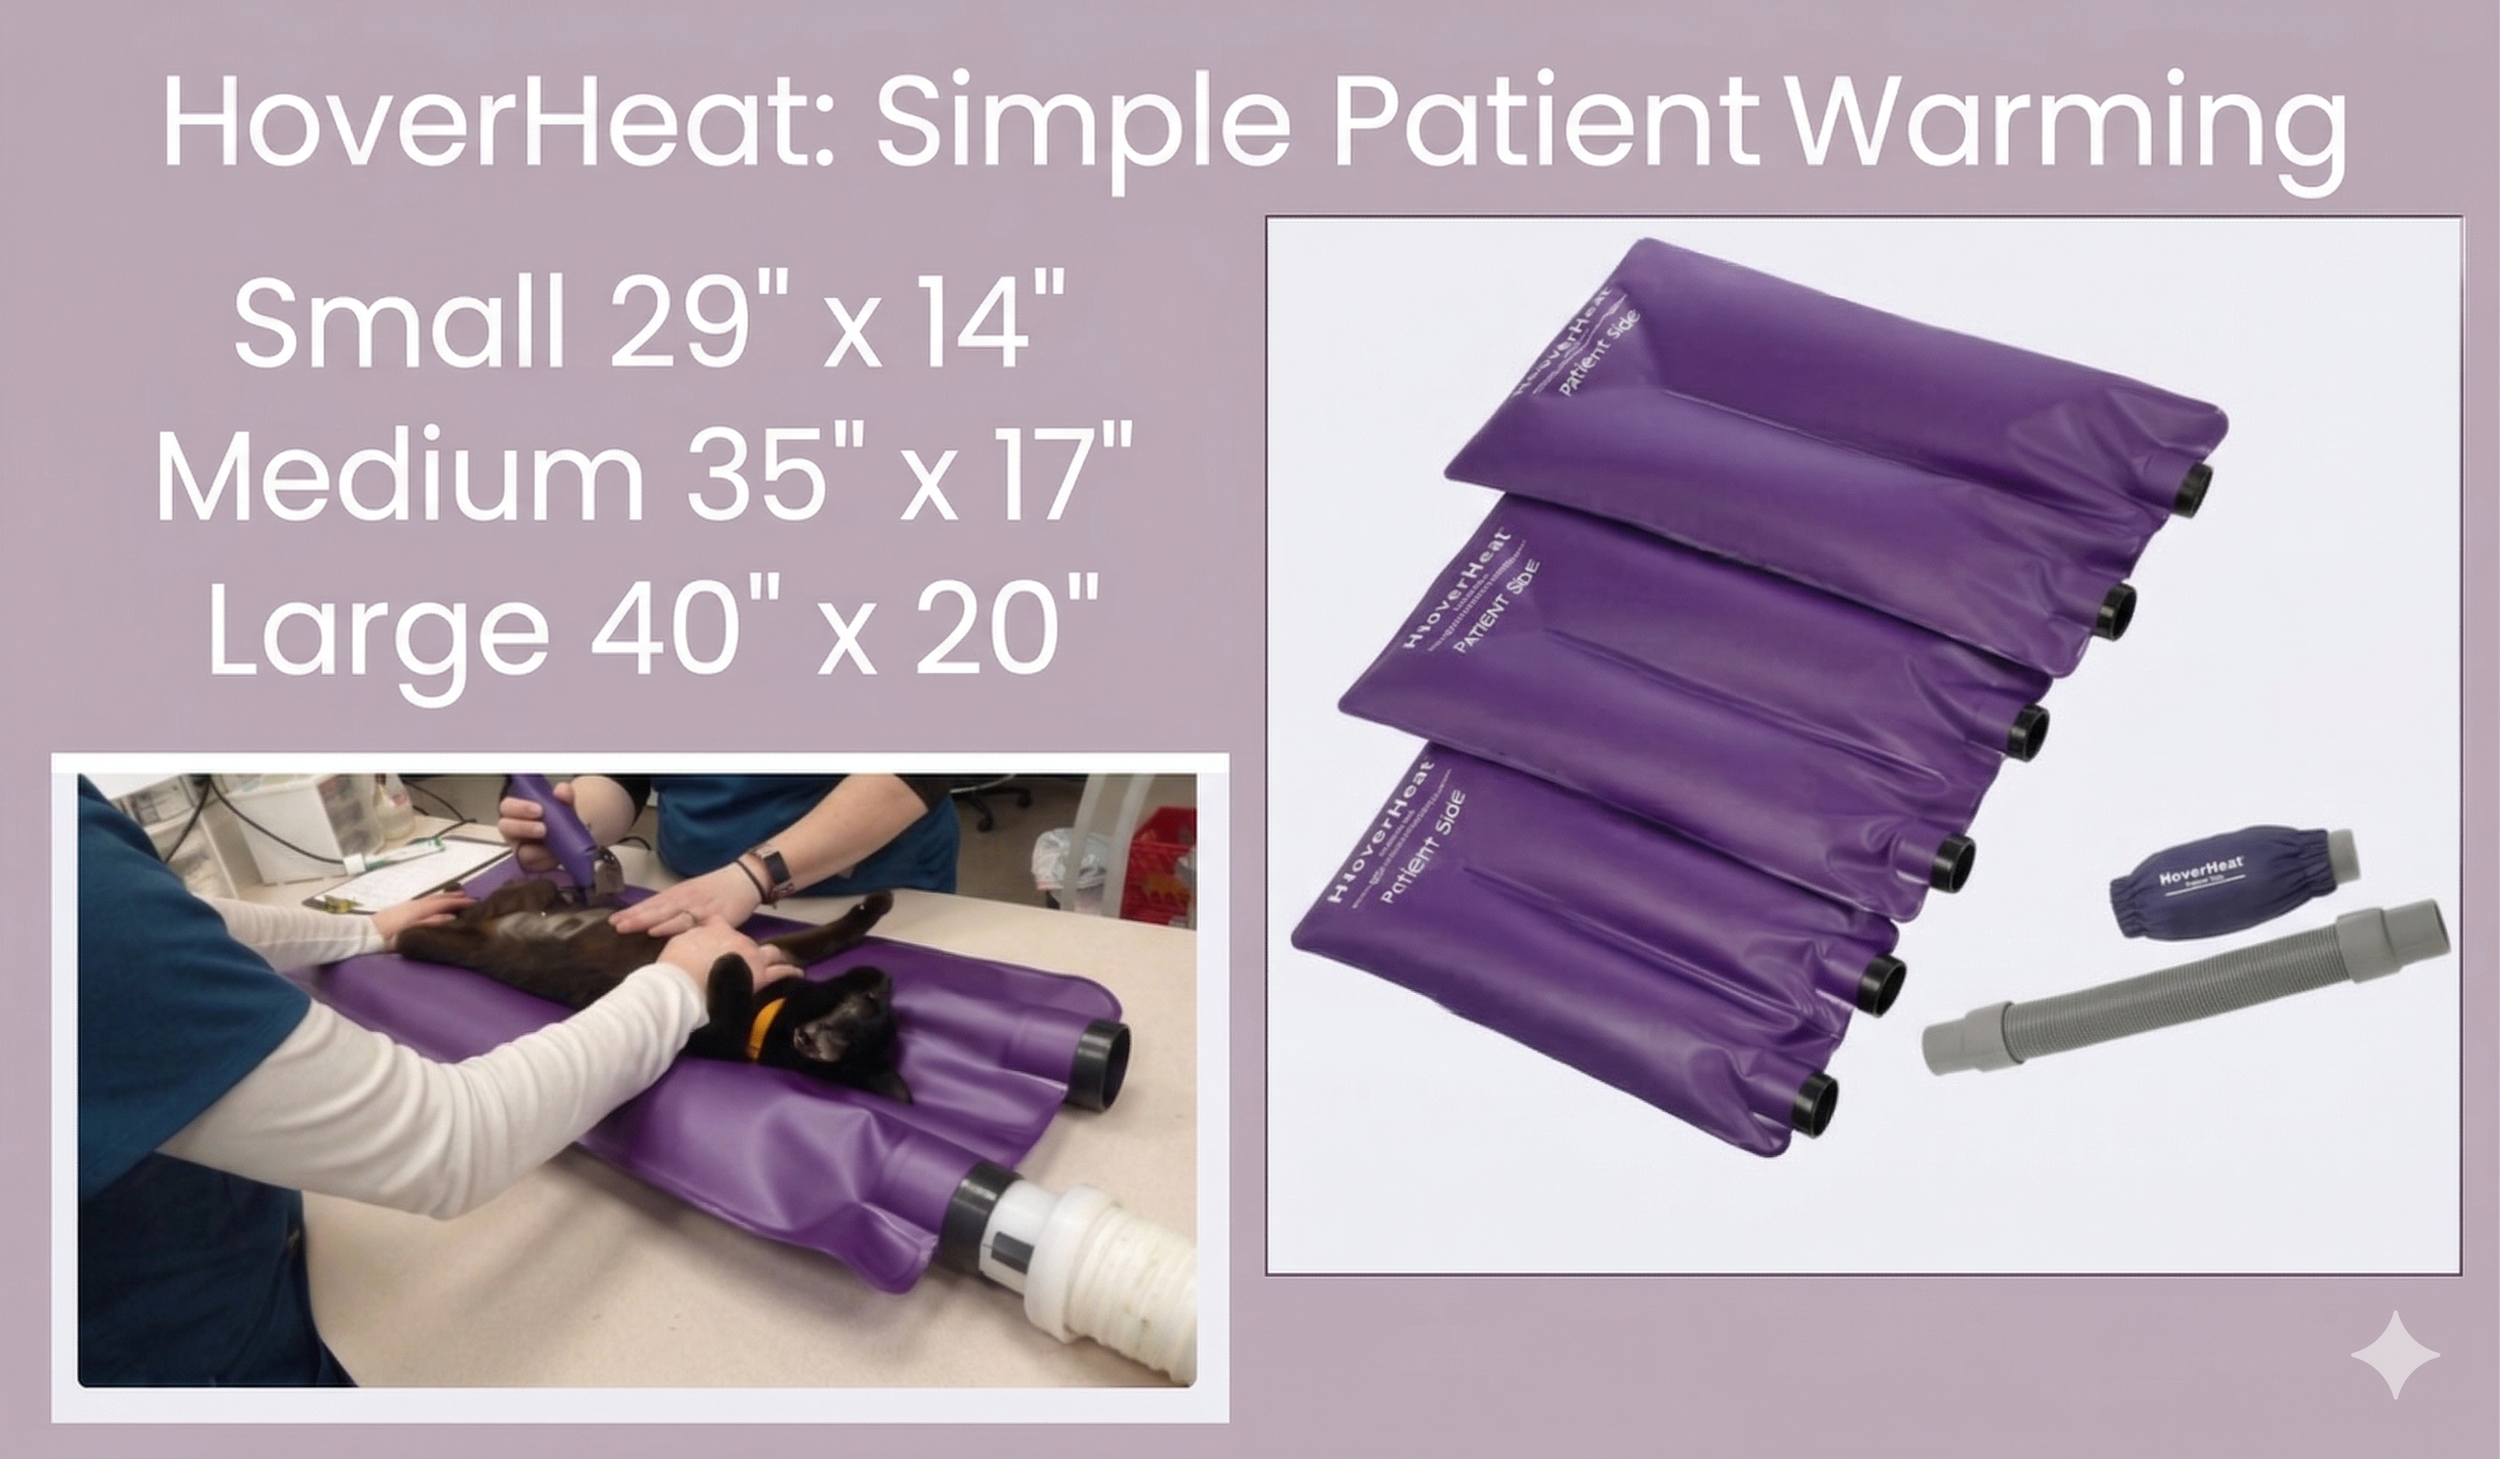
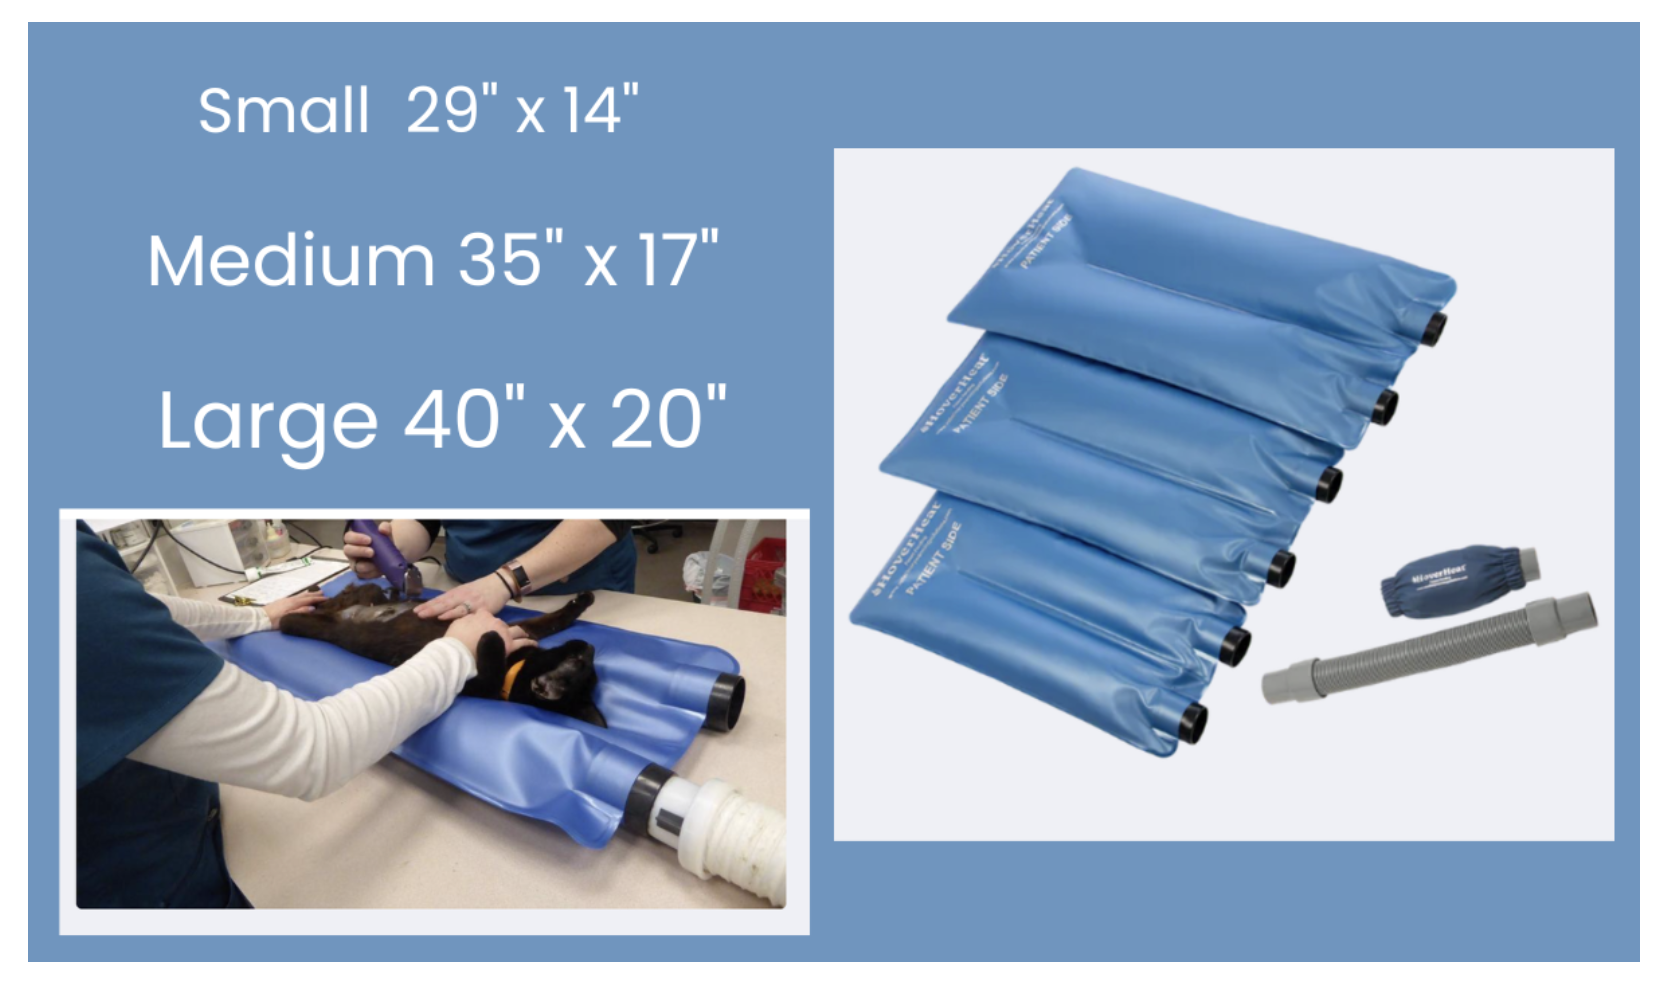
Multiple pad sizes to accommodate different patient sizes
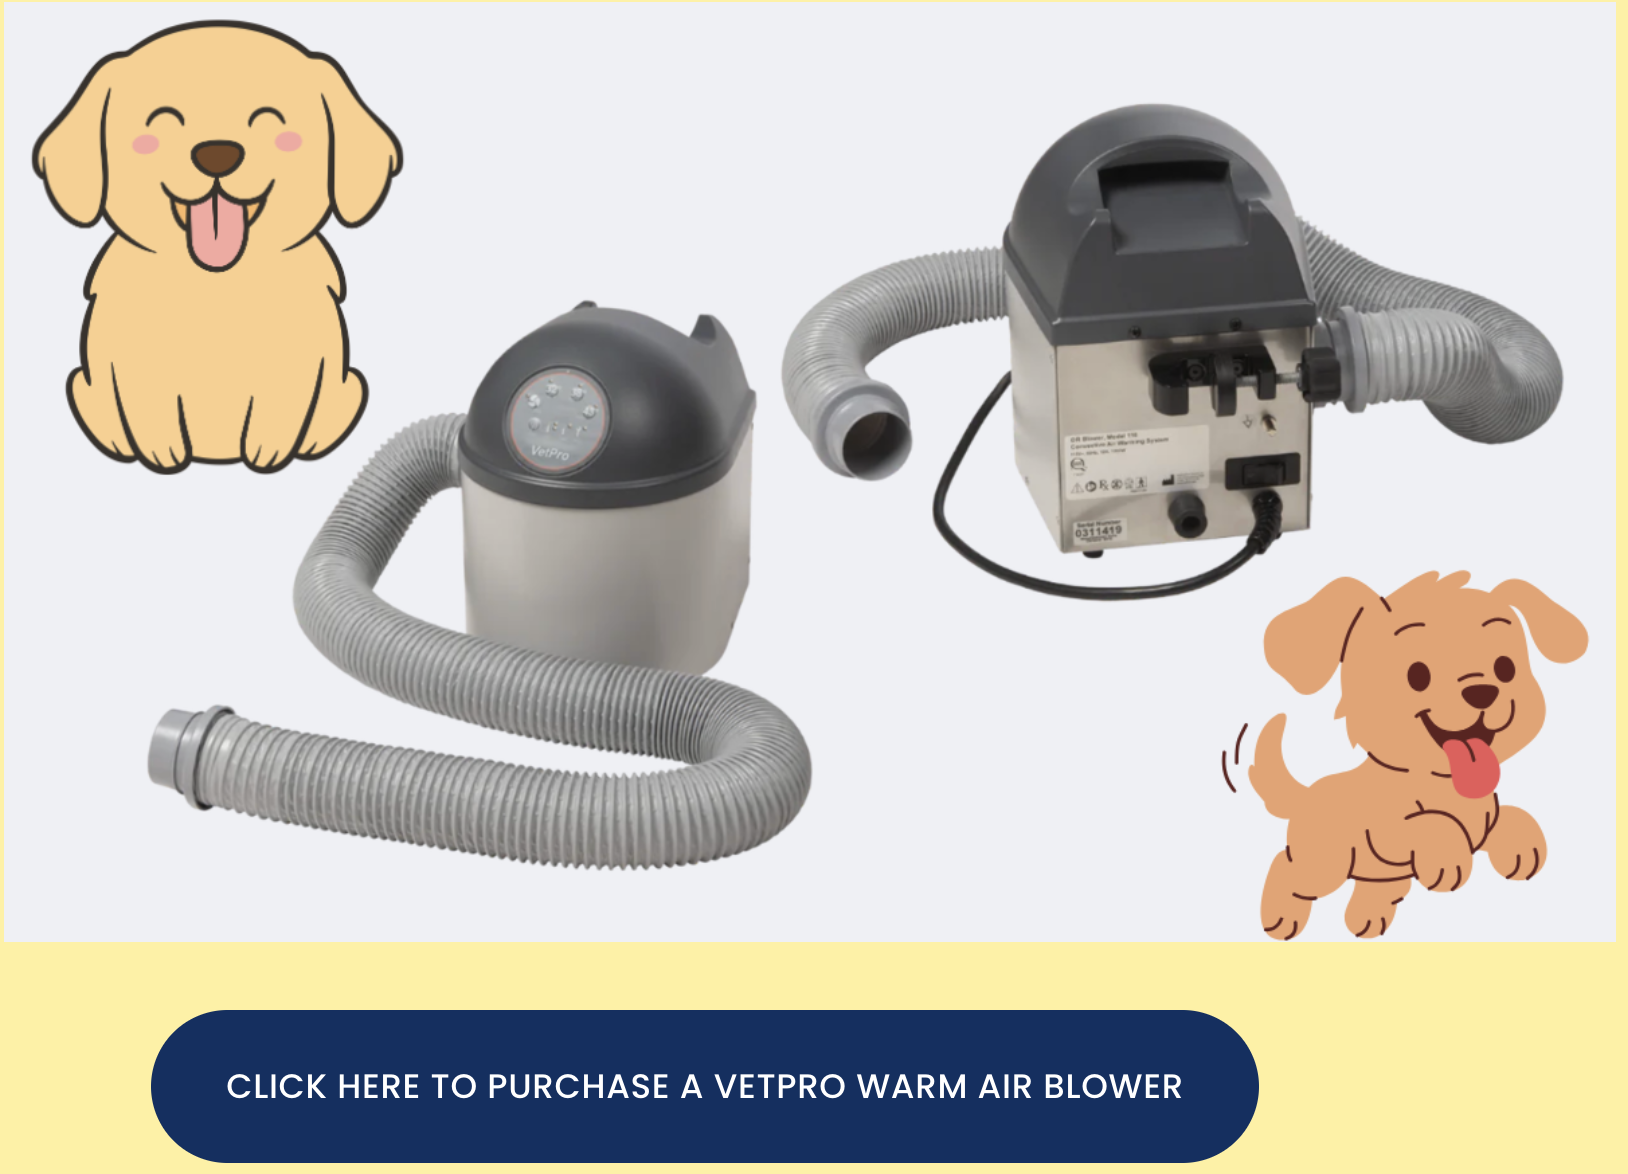
Compatibility with common warm air blowers already used in veterinary practices
Reusable design that reduces disposable blanket costs
Easy cleaning with standard hospital disinfectants
The ability to connect two units for additional warming coverage
For practices focused on improving veterinary surgical efficiency and patient safety, these small workflow improvements can make a big difference over time.
Supporting Better Surgical Outcomes
Veterinary medicine has advanced significantly in patient care standards, particularly in anesthesia monitoring and safety. Today, most hospitals routinely monitor:
ECG
Blood pressure
Oxygen saturation
End-tidal CO₂
Temperature
But monitoring temperature is only half the battle. Preventing hypothermia requires reliable warming tools that work throughout the entire procedure.
Using an active veterinary surgical warming system helps maintain stable patient temperatures from induction through recovery.
And when patients stay warm, everything tends to go more smoothly, from anesthesia recovery to overall patient comfort.
A Simple Upgrade That Makes a Big Difference
You’re always looking for ways to improve patient care while keeping procedures efficient and safe. Sometimes the biggest improvements come from solving everyday problems, like keeping anesthetized patients warm.
The HoverHeat warming blanket is a simple, reliable way to address one of the most common anesthesia challenges in veterinary medicine.
Because when patients stay warm, they recover better, and that’s something every veterinary team hopes for.

Keeping Veterinary Patients Warm with HoverHeat
With your experience in a veterinary surgery suite, you already know one thing for certain: anesthetized patients get cold, fast.
Whether you’re performing a routine spay, a dental cleaning, or an orthopedic procedure, maintaining normothermia isn’t just about comfort—it’s a critical part of patient safety and recovery. And yet, many veterinary hospitals still struggle to keep patients warm consistently throughout anesthesia and recovery.
That’s where patient-warming solutions like the HoverHeat are making a noticeable difference in veterinary practices.
Let’s take a closer look at why temperature management matters so much, and how systems like HoverHeat help veterinary teams stay ahead of the problem.
Why Veterinary Patients Get Cold During Procedures
Hypothermia during anesthesia is incredibly common in veterinary medicine. Even in short procedures like dentals, a patient’s body temperature can drop quickly.
There are several reasons for this:
Anesthesia suppresses thermoregulation. The body loses its ability to maintain temperature.
Hair clipping and surgical prep increase heat loss.
Exposure to cool surgical suites.
Contact with cold surgical tables.
Small body size, especially in cats and small dogs.
Most heat loss during surgery occurs at the point where the body contacts the table. That large surface area becomes a major pathway for conductive heat loss. When hypothermia sets in, it can lead to:
Slower anesthetic recovery
Increased anesthetic risk
Delayed drug metabolism
Longer hospitalization or recovery times
The Challenge With Traditional Warming Methods
Veterinary teams have historically relied on a mix of warming methods:
Circulating warm water blankets
Heated pads
Warmed IV fluids
Blankets and towels
Forced-air warming blankets
While these methods can help, many have limitations. Water blankets can leak. Heating pads can create hot spots. Disposable forced-air blankets can allow warm air to escape and require constant restocking. And most systems only warm one side of the patient.
That’s where the HoverHeat system takes a different approach.
How HoverHeat Works
The HoverHeat is a veterinary patient warming system designed to maximize heat transfer while minimizing the limitations of traditional warming tools.
Its design uses specialized internal components to create a cushion of warm air underneath the patient, effectively “levitating” the patient slightly while warm air flows beneath the body.
Why does this matter?
Instead of just heating the patient's top or small contact points, HoverHeat distributes warmth across a much larger area, helping maintain a more stable body temperature throughout the procedure.
Underbody and Overbody Warming
One of the most practical features for busy surgical suites is the ability to connect two HoverHeat units together.
With a simple connector, you can create simultaneous underbody and overbody warming with a single warm-air blower, increasing warming capacity by 50–75%. This means veterinary teams can:
Warm patients from below and above
Maintain temperature during longer procedures
Support smaller or high-risk patients more effectively
Importantly, the system is also designed so that airflow is directed away from the sterile surgical field, which helps maintain proper surgical protocol.
Warming Throughout the Entire Patient Journey
Another advantage is that it isn’t limited to the surgical table. It can be used during:
Pre-Operative Warming
Patients can be induced directly on the warming surface, allowing temperature management to begin immediately. Pre-operative warming has been shown to help maintain body temperature during surgery.
Intra-Operative Care
It works with most positioning devices and can be used during nearly any procedure, including surgery, dentistry, and endoscopy.
Post-Operative Recovery
Maintaining warmth during recovery can help decrease recovery times and improve patient comfort.
Imaging
Because of its design, the system can even be used during imaging procedures like X-ray and CT scans.
A Practical System for Veterinary Hospitals
For practice owners and managers, equipment decisions are always about balancing patient care, efficiency, and cost. HoverHeat addresses several practical concerns:
Compatible with existing warm air blowers: no need to purchase a new unit.
Reusable system: eliminates ongoing disposable blanket costs.
Easy to clean with standard germicidal sprays or soap and water.
Multiple sizes to accommodate patients from cats to large dogs.
The complete set includes small, medium, and large HoverHeat units plus connectors and adapters, allowing teams to warm nearly any patient that comes through the door.
Better Temperature Control, Better Patient Care
Every veterinary team member knows the feeling of watching a patient’s temperature drift downward during anesthesia. Preventing hypothermia can sometimes feel like a constant battle.
But with the right tools in place, maintaining normothermia becomes much easier and far more consistent. Because at the end of the day, a warm patient is a safer patient.

The Surgical Sidekick You Didn’t Know You Needed

Let’s be honest…running a veterinary practice is a bit like spinning plates while juggling.
The last thing you need in the middle of a busy OR is equipment that’s bulky, finicky, or slows you down. That’s precisely why the Sealigrate IS007 electrosurgical system is such a great fit.
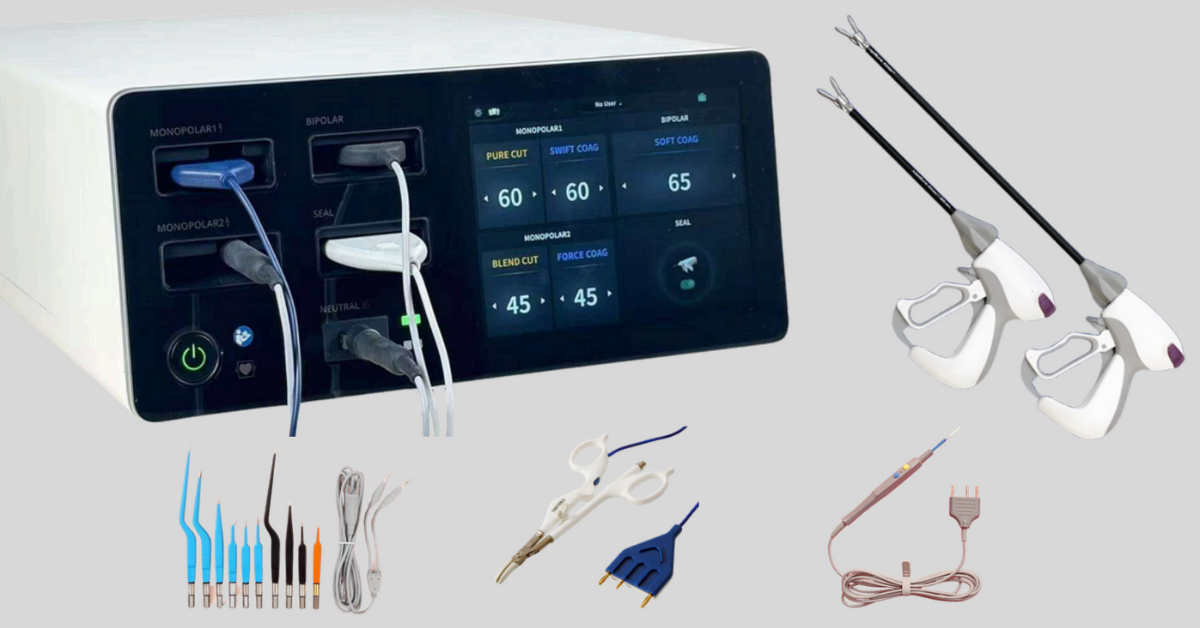
The Sealigrate IS007 is an all-in-one veterinary electrosurgical system designed to make surgeries faster, cleaner, and more efficient.
It combines advanced tissue-adaptive technology with powerful cutting, coagulation, and vessel-sealing capabilities — all in a compact, portable unit.
Compatible with both reusable and disposable LigaSure™ handpieces, it’s built to handle everything from routine procedures to complex surgeries, helping you deliver precise results while streamlining workflow.
Here are a few things that set it apart:
Tissue-Adaptive Technology
This system tweaks its energy output in real time, so whether you’re cutting, coagulating, or sealing, it adjusts automatically. No more fiddling with dials mid-procedure—just smooth transitions that follow your rhythm.
Massive Coagulation Power
At 350W, its coagulation power outpaces many human-market units by a significant margin, so your cuts are cleaner, your fields are dryer, and your focus stays where it should be—on your patient.
Reliable Vessel Sealing up to 7 mm
Spays, mass removals, and emergency cases all benefit from fast, consistent fusion cycles. That means less blood, shorter surgeries, and calmer staff (and pets) post-op.
LigaSure™ Compatibility
Want the flexibility to use either reusable or disposable handpieces? No problem. They’re compatible, so you can save money on consumables without compromising performance.
Compact, Portable, and Customizable
At just 13 kg, the IS007 fits comfortably into any surgery room or mobile unit. Plus, you can pre-load up to 80 presets tailored to the procedures you perform most—talk about workflow efficiency.
Built for Real-Life Veterinary Workflows
Every practice has its rhythm — and surgery days rarely go exactly as planned.
The Sealigrate IS007 fits right into that unpredictable flow, letting you move from a routine spay to a complex mass removal.
Its customizable presets mean you can have your go-to settings ready at the push of a button, saving you from constant adjustments and letting you focus on the patient in front of you.
It’s one less thing to think about when you’re juggling a busy surgical schedule.
Small Footprint, Big Impact
Space is always at a premium in veterinary practices, whether you’re in a fully equipped hospital or working out of a mobile unit. The Sealigrate IS007 is light enough to move wherever it’s needed — but don’t let its size fool you…
It’s compact design houses some serious power, capable of delivering unmatched coagulation performance and reliable vessel sealing.
It’s proof that a tool doesn’t have to be bulky to be a surgical game-changer.
Real-Life Wins You’ll Appreciate
Think about those frantic days with back-to-back spays, or the odd emergency that throws your schedule off mid-morning. The IS007 shines in those moments. It lets your team:
Stay organized with streamlined tools
Work faster with reliable vessel sealing
Keep eyes calm and surgical fields clear
Bounce back from interruptions with consistency
Getting off the ground with this unit is easy, too—it even comes with a complimentary one-hour Zoom training to help your team start confidently.
Final Takeaways
We all want the same thing: smoother surgeries, quicker recoveries, and a surgical suite that keeps pace with our care standards. The Sealigrate IS007 is a thoughtful upgrade - one that understands your routine, respects your space, and has your back when life’s surgical surprises arrive.
Would you be ready to feel the difference firsthand?

Surgeries That Get a Serious Upgrade With Advanced Electrosurgery
Veterinary surgery has come a long way — and new tools are helping us work faster, safer, and more efficiently than ever before.
If you’ve been relying on traditional cautery or older electrosurgical units, upgrading to a system with high-level precision can completely change how your procedures feel — both for you and your patients.
So, what kinds of procedures benefit the most from a cautery unit?
We’ll get to that in just a second.
First, let’s peek at some of the benefits that electrosurgery has on patient recovery:
1. Reduced Blood Loss
Electrocautery units like the Sealigrat IS007 provide superior hemostasis, sealing blood vessels as you cut. This minimizes intraoperative blood loss, meaning less stress on the patient’s body, particularly in smaller animals. With less blood loss, patients maintain better blood pressure and oxygenation, promoting smoother recoveries.
2. Shorter Anesthesia Times
Electrocautery tools allow you to move through procedures more efficiently. Fewer clamps and ligatures mean less time spent managing bleeders or switching tools. And the shorter the surgery, the less time the patient is under anesthesia.
3. Less Tissue Trauma
Unlike traditional scalpel blades, electrosurgery cauterizes as it cuts, which means less mechanical damage to surrounding tissues. That results in less inflammation, less swelling, and less post-op pain.
4. Lower Risk of Post-Op Complications
A cleaner surgical field and better hemostasis mean fewer opportunities for post-op issues like seromas, hematomas, or delayed wound healing. Electrosurgery helps promote neater incisions and stronger closure.
5. Better Experience for Shelter and High-Volume Clinics
In high-volume spay/neuter settings, efficiency is key — but so is patient safety. Electrocautery allows for fast, repeatable procedures with consistent outcomes. This helps ensure more animals can be treated in less time without compromising recovery quality.
So basically… faster surgeries, less trauma, and cleaner incisions all lead to smoother, more predictable recoveries. That means happier patients, less stress for pet parents, and fewer post-op concerns for your team.
Now, let’s dive into five of the most common surgeries that benefit from electrocautery.
1. Spays and Neuters
These routine procedures make up a big chunk of surgical appointments in many general practices — and they’re precisely the kind of case where advanced electrosurgery shines.
With vessel sealing up to 7mm and fast fusion cycles, you can minimize bleeding and reduce surgical time, all while keeping things clean and controlled.
It’s a simple switch that can make your most common procedures smoother from start to finish.
2. Mass Removals
Whether you’re dealing with a superficial lipoma or something more involved, mass removals can be unpredictable.
Electrosurgery gives you a cleaner field to work in. The Sealigrate IS007 delivers 350W COAG — which outperforms many human-market units — so you can cut and coagulate with confidence, even in more vascular areas.
3. Wound Management and Debridement
When managing wounds, especially those requiring surgical debridement, control is everything.
Electrosurgery lets you remove damaged tissue with minimal trauma to healthy areas. The adaptive energy delivery ensures consistent results, and with the right handpiece, you can move through even the trickiest wound cases.
4. Cystotomies and Abdominal Exploratories
Internal procedures can be time-consuming and delicate, especially when navigating around major vessels and organs.
The Sealigrate system’s ability to seal vessels up to 7mm means fewer clamps, fewer sutures, and less time under anesthesia. That kind of efficiency makes a big difference when you’re in the thick of a complex case.
5. Amputations and Orthopedic Procedures
Any surgery involving high vascularity or major vessels demands strong, reliable coagulation — and that’s where the Sealigrate flexes its power.
With high coag output and LigaSure™ compatibility, you get dependable hemostasis, fewer interruptions, and a smoother workflow overall.
For orthopedic teams looking to reduce blood loss and surgical fatigue, advanced electrosurgery is a must-have.
Equipping Your Team With The Right Tools
We all want our patients to recover smoothly and feel their best as quickly as possible — especially after something as ordinary (but necessary) as a spay or neuter.
Using electrocautery isn’t just about getting through surgery faster — it’s about creating a gentler, cleaner experience for the patient on the table.
When your tools help reduce trauma, bleeding, and complications, you’re giving your patients a better start to recovery so they can get back to the ball chasing, tail wagging, lip licking things they love most!

Smarter Surgery Starts Here: Inside the Sealigrate IS007 Electrosurgical System
If you’ve been relying on basic cautery tools or the old scalpel-and-sutures routine for soft tissue surgeries, you’re not alone. Many veterinary clinics are still working with limited surgical equipment — not because they’re behind, but because it’s hard to know which tools are worth the investment.
Veterinary surgery has seen some significant advancements in recent years—both in techniques and in the tools that make those techniques more effective and safer for patients.
The Sealigrate IS007 All-in-One Veterinary Electrosurgical System is one of the most comprehensive and versatile cautery systems— designed specifically for veterinary use. It combines multiple functions into a compact, easy-to-use unit that supports a wide range of procedures.
Let’s take a look at why more veterinarians are making the switch — and what it could mean for your workflow, your patients, and your surgical outcomes.
What Makes the Sealigrate IS007 Stand Out?
To start, its tissue-adaptive technology automatically fine-tunes energy levels as you work, giving you optimal cutting, coagulation, and vessel sealing without constantly stopping to adjust settings.
It delivers an impressive 350W of coagulation power — which is more than some of the human surgical units on the market — so you get quicker, cleaner results with less thermal spread.
It also reliably seals vessels up to 7mm, helping you reduce blood loss and shorten surgery times.
What’s more, it’s LigaSure compatible, meaning you can use both reusable and disposable handpieces and save big on consumables. With a compact, portable frame and up to 80 customizable presets, it’s built to fit into your workflow.
Here are a few more features that make the Sealigrate IS007 the ideal surgical suite companion:
All-in-One Capability
This system integrates cutting, coagulation, and advanced vessel sealing into a single compact device. By combining multiple surgical functions, it helps streamline your setup, save space, and minimize the need for additional equipment during procedures.
Versatile Electrosurgical Modes
It includes monopolar, bipolar, and vessel sealing modes, allowing veterinarians to adapt the system to various soft tissue procedures with ease, from spays and neuters to mass removals, biopsies, and more.
Multiple Activation Options
Surgeons can choose to use either hand or footswitch activation, depending on their preference and the nature of the procedure. This flexibility gives you ample surgical control.
Instrument Compatibility
It’s designed to work with most standard monopolar and bipolar instruments, so there’s no need to invest in proprietary handpieces or accessories—keeping long-term costs lower.
Clinical Benefits for Your Practice
This isn’t just fancy features- the Sealigrate IS007 was designed with busy veterinary teams in mind.
It’s quick to set up, simple to operate, and easy to maintain.
It’s durable, ready to handle day-to-day use without constant recalibration.
It helps free up time and energy so your team can focus on what matters.
And that’s just the basics. Let’s look a little closer…
Improved Hemostasis and Visibility: It reduces bleeding during procedures, allowing clearer surgical fields and more precise work (which is particularly helpful during tumor removals or delicate soft tissue work).
Reduced Surgical Time: Sealing and cutting tissue more efficiently can help shorten the time patients spend under anesthesia (leading to safer recoveries).
Minimized Tissue Trauma: Its vessel sealing technology allows for cleaner incisions, leading to less post-op discomfort and faster healing.
Built with the Veterinary Clinic in Mind
The Sealigrate IS007 is designed for the practical realities of a busy veterinary hospital:
Compact and Space-Efficient: With its small footprint, it fits easily into most surgery suites, making it ideal for both small practices and larger clinics with high case volume.
User-Friendly: Clear labeling, simple controls, and intuitive setup make the system easy for veterinary teams to learn and operate—even on a tight schedule.
Durability: Engineered for frequent use, it’s built to withstand the demands of daily surgery.
A Practical Upgrade for Your Veterinary Surgical Suite
Veterinarians are constantly balancing patient care, operational efficiency, and cost management. Investing in a high-quality electrosurgical unit can support all three.
Whether you’re replacing outdated cautery tools or upgrading your surgical capabilities for more advanced procedures, this unit offers functionality, reliability, and adaptability. Plus, it’s one of those tools that starts paying off the moment you plug it in.
If you’ve been thinking about upgrading your surgical setup, this might just be your sign!

Patient Injury & Complications In Veterinary Dentistry

The nature of anesthesia brings risk in general. In veterinary medicine, during dental procedures, pets are often placed in vulnerable positions which can lead to increased risk of injury and medical complications.
These risks can be minimized or entirely avoided with careful consideration, and proper training and continuing education of staff. Listed are a few of the more common injuries that can occur during a dental procedure.
Aspiration Pneumonia
Aspiration pneumonia in pet patients occurs when the patient inhales a foreign substance and develops lung inflammation and infection as a result.
The most common occurrence during dentistry is water and debris entering an unprotected airway, hence allowing fluid and debris to enter the lungs. This can occur from an underinflated tracheal tube, or repositioning during the procedure that allows fluid to enter the airway.
Aspiration pneumonia can also occur if the patient vomits or regurgitates during anesthetic recovery.. To reduce the incidence of dental-related aspiration pneumonia, maintaining the patient on their back during the procedure, and avoiding repositioning has proven to not only lessen the risk of aspiration but also lessens the amount of anesthesia needed during the procedure.
In addition, antiemetic medications given during the premedication phase can help reduce the incidence of post-anesthetic nausea and vomiting. Caution should be taken during the recovery phase to wait until the patient is alert and responsive enough to deflate the cuff and remove the tracheal tube.
Tracheal rupture
Tracheal rupture in dogs and cats are more frequent during dental procedures than any other medical procedure. Seventy-five percent of tracheal ruptures are thought to be associated with oral surgical procedures with the incidence more common in cats than dogs.
Tracheal injury can cause symptoms such as mild dyspnea, and even death. The most likely cause of tracheal rupture is thought to be due to an overinflated tracheal cuff, as well as failing to detach the tracheal tube from the anesthesia hose during repositioning, which can cause a torque on the inflated cuff resulting in a tear of the dorsal membrane of the trachea.
Another common cause of tracheal rupture is a patient that is not adequately anesthetized and coughs or lunges upward during intubation, tearing the trachea.
Pressure from an overinflated cuff can cause pressure necrosis of the trachea, showing delayed symptoms of inflammation and scarring.
Avoiding over-inflation of the cuff, using new tracheal tubes, testing the cuff to ensure proper inflation prior to use, avoiding repositioning as much as possible, and ensuring a level plane of anesthesia prior to intubation can help minimize the risk of tracheal rupture.
Artery Damage during Tooth Extractions

Arterial damage to arteries such as the palatine artery which runs the length of the mandible can accidentally occur during routine tooth extractions where the instrument can slip from the practitioner’s hand.
These injuries can be mild to more severe requiring surgical intervention.
The most effective way to avoid this type of injury is to implement extraction techniques involving gingival flaps where the roots are exposed, and more easily undermined, and extracted.
Written by: Dr. Tammy Powell, DVM

Mastering FORLs: X-Ray Insights for Better Dental Procedures

To extract or not to extract that tooth root?
Is a crown amputation all that’s needed?
When it comes to feline odontoclastic resorptive lesions (FORLs), these may be the questions you’re asking yourself.
FORLs can cause loss of the protective surfaces (enamel, cementum, and dentin) of both the crown and the root(s) of a tooth, resulting in pain.
These lesions come in two varieties:
Type 1: Where the root appears radiographically normal.
Type 2: Where the root is radiographically hard to distinguish from the surrounding bone, with loss of visibility of the periodontal ligament space.
As you know, the treatment for these lesions is different—full extraction of the root(s) for Type 1, versus just a crown amputation for Type 2.
Performing a crown amputation and leaving a root in place for Type 1 could result in problems or complications, not to mention continued pain for the patient.
On the other hand, trying to extract the root of a true Type 2 lesion could be a monumental task and a big headache.
So, it’s very important to determine what type of lesion you’re dealing with. Here’s how…
Diagnosing FORLs
Patient presentation:
A client brings their pet to you because of halitosis, food dropping, and occasional jaw chattering.
During the physical exam, you notice bright red, inflamed gums and gingival hyperplasia near one of the mandibular premolars.
You suspect a FORL—and given that FORLs are one of the most common dental problems in cats, you’re probably right.
You suggest a dental procedure, including dental radiographs, a full cleaning, oral exam, and possible extraction. The client agrees with the plan.
The day of the procedure
After the patient is anesthetized, your technician obtains radiographic images of the entire mouth, which takes just a few minutes to perform.
Then, you look at the radiographs in conjunction with your oral exam.
While probing the tooth in question, you feel a rough patch under the gingival hyperplasia, consistent with a resorptive lesion.
The x-ray confirms your diagnosis.
Determining the best treatment plan
In this case, the patient’s tooth is clearly Type 1, with a periodontal ligament space still visible. So, you perform a full extraction.
While evaluating the dental rads, you also notice the premolar on the opposite side is starting to show radiographic evidence of a lesion.
Even though it’s mild, you call the owner and inform them of the likelihood of progression.
To prevent a painful lesion from developing between dentals, the owner decides to go forward with a pre-emptive extraction of that tooth as well.
Documenting the extraction
In addition to being an integral part of your treatment plan decisions, dental radiographs can also help you document that extraction was performed successfully.
A post-procedure x-ray image is a great way to document that there are no root tips left behind.
And, in cases where a crown amputation was indicated, dental rads provide visual proof that this was an appropriate treatment course.
In this way, dental radiographs not only help you to plan and implement a very high quality of medicine—but they also give you peace of mind and are a valuable part of your medical records.
Talking to clients about dental radiographs
Maybe you already know the benefits of dental radiography—but you’re concerned about discussing the additional cost with clients.
Often, it helps to include the x-rays as part of the dental procedure package. List them on the estimate so the client understands the value they are receiving—just don’t itemize the cost of the radiographs separately.
Be sure to adjust the estimate of the dental package accordingly, to cover your costs. And remember, with a monthly payment plan for your dental radiography system, just a couple of dental procedures per month can cover your investment.

Client education also helps. Explain how the results of the radiographs allow you to provide the best possible treatment and reduce the likelihood of future complications.
With clients who want the best for their pets, it’s a win-win for both of you.
Written by: Dr. Tammy Powell, DVM

How to Explain Halitosis Risks to Concerned Pet Owners

Bad breath, or halitosis, is one of those health problems that’s easy for pet parents to overlook.
Sure, it’s inconvenient. Stinky breath can certainly put a damper on a pet owner’s cuddle time or other interactions with their dog or cat.
However, many pet owners don’t realize that halitosis can mean something much worse… such as periodontal disease, or even an internal problem.
As a veterinarian, you know this very well—but it can be a challenge to communicate the dangers lying “under the surface” when it comes to bad breath.
Explaining halitosis to pet parents
The first step is figuring out where the bad breath is coming from, and explaining the potential risks to clients.
Dental problems such as periodontal disease are the most common cause of bad breath in pets.
But sometimes, halitosis begins somewhere in the body other than the mouth.
Possible sources of halitosis include…
Periodontal disease and other dental issues.
A health condition such as kidney disease (an ammonia-like or unpleasant smell) or diabetic ketoacidosis (more of a sweet smell).
Respiratory diseases.
Digestive issues or dietary indiscretions.
Objects (like branches or chicken bones) stuck somewhere in the mouth.
Oral neoplasias.
Certain toxins.
Based on your patient’s history and physical exam, you’ll determine the most likely cause of the bad breath and decide if diagnostic testing is needed.
If the patient in front of you seems otherwise healthy but has apparent terrible dental disease, you can probably assume the smell (or at least, a large portion of the scent) is coming directly from their mouth.
If a dental procedure is indicated, you’ll likely do pre-op bloodwork, which will help confirm that the patient is otherwise healthy.
A recap of periodontal disease
It all starts with plaque, that thin film that forms on teeth due to food and saliva. We get plaque as humans, too, but fortunately, plaque can be removed by tooth brushing.
If not brushed away, plaque hardens into calculus (tartar) within as little as 24-36 hours. Then, it accumulates more and more over time and harbors bacteria. Calculus can’t be removed by toothbrushing alone.
Soon, this calculus (and its resident bacteria) become very irritating to the gums—and they like to grow below the gum line, where it’s harder to observe the process visually. This results in gingivitis, an early stage of periodontal disease (a disease process affecting the structures that hold teeth in place) where the gums become red and inflamed and may bleed.
From here, as the periodontal disease worsens, it creates pockets in the gumline, destruction of the periodontal ligament, and even bone loss in the maxilla and mandible. In severe cases, this bone loss can cause jaw fractures.
This all leads to pain and tooth loss. And, opportunistic bacteria may enter the bloodstream via inflamed gums, traveling to and causing problems in organs such as the heart or kidneys.
Reminding clients of the dangers of periodontal disease can help them understand their pet’s bad breath is true health and quality of life problem—not just an inconvenience.
Evaluating and treating dental and periodontal disease
Your initial pre-op exam will be done while the patient is awake—ideally with the owner present so you can show them what you’re seeing.
However, awake exams don’t allow for a full oral assessment. And, dogs or cats who are painful might not let you get a good look.
So you’ll make a dental cleaning estimate based on your initial exam but explain to the client that the full assessment will be done during the procedure.
This assessment should include dental radiographs. Since much of the disease process starts below the gumline, x-rays are the only way to see the full extent of damage from periodontal disease.

Some patients will just need routine cleaning, while others may need significant dental extractions. And, you can talk to your clients about continuing dental care at home through tooth brushing and dental treats.
By providing this valuable service, you’ll be not only keeping your canine and feline patients in great health—but also increasing the human-animal bond by preventing halitosis from interfering with the quality time between a pet and their owner.
Disclaimer: This article is for general informational purposes only, and not intended as a guide to the medical treatment of any specific animal.
Written by: Dr. Tammy Powell, DVM

Good Exam Room and Dental Lighting: Why It Matters

When it comes to upgrading your veterinary practice, maybe the first things that come to mind are new exam tables, high-tech anesthesia monitoring equipment, or an in-house chemistry analyzer.
Was a new LED exam room light also on your list? If not, it should be. Here’s why…
While lighting is often overlooked, just think about how many times per day a good, strong light could make your life easier.
Times, when a high-quality LED light could come in handy in your exam room, include the evaluation of…
Lesions and wounds.
Dental disease or oral lesions.
Ocular health (you’ll use your ophthalmoscope and other equipment for a more detailed exam, but good room lighting can help you pick up subtle lesions during a routine checkup).
Paw pads and the spaces between the paw pads.
External ear structures.
Dander, fleas, and other skin and coat issues.
These are a few good examples—but really, good lighting can help with much of the physical exam by making it easier for you to accurately document tissue colors, textures, lesions, and other notable abnormalities in your medical record.
Good lighting is essential for dental procedures and surgeries
In our last blog post, we gave some advice on how to pick a good surgical light.
And along those same lines, don’t forget about dental procedures!
The mouth is like a dark cave, making it difficult for you and your staff to see what you’re working on if you don’t have good lighting.
Some things a good light will help you visualize include…
Calculus that needs to be cleaned—and verifying that all calculus was removed.
Enamel defects and small chips or fractures.
Staining, or other color changes such as pulpitis.
Subtle bleeding or mild gingivitis.
Oral abnormalities such as masses or inflammation.
Pharyngeal or tonsillar abnormalities.
Extraction sites—before, during, and after the extraction.
Placement and manipulation of small sutures.
Not to mention, a good overhead light can aid your laryngoscope light during intubation.
How affordable are good LED lights?
In the past, LED lights were very expensive compared to halogen bulbs—so it’s understandable if you’ve not purchased one before.
However, some brands are now 30-40% less than previous LED prices.
So, LEDs don’t have to be expensive anymore. And considering their performance and efficiency, a good LED light can be a great addition to your practice.
Plus, many cities, counties, states, and even electric power companies offer rebates for upgrading to LED lights, due to the decrease in power used.
Specific requirements for rebates vary by location—so be sure to check with your local municipality and utility providers to see what’s available in your area. Because it’s always great to get a cash rebate that can help cover the cost of your upgrades!
How do you choose a good exam room or dental light?
When it comes to selecting the best lighting, there are many things to consider…
Affordability. LED lights are much more affordable now than they used to be, so shop around and be sure you’re getting a good deal (to be sure you’re comparing apples to apples, check for the other factors on this list, too).
Quality and dependability. Plus, a good-value warranty helps to back up your investment.
Lighting adjustability in terms of intensity and dimming options, as well as area of focus.
Precise positioning. The light head and arm should be easy to move and manipulate—but then, stay right where you put it without drifting.
Easy to clean.
User-friendly, with simple controls on or near the handle.
Shadow-free illumination—or at least a design that minimizes shadows as much as possible.
Mounting options that match the layout of your rooms.
Comfortable and safe for pets, with adjustable settings you can change as needed, and low heat output.
Here’s what we recommend…
We recommend the new Burton veterinary LED exam light because it checks all the boxes listed above.
Plus, it has a high-quality LED (virtually heat-free and with a 75% energy savings compared to halogen), is assembled in the USA, and is backed by an industry-leading 5-year warranty.
At a competitive price point that optimizes design, performance, and value, it’s pretty hard to pass up!
Why invest in new lighting?
As we said, lighting is often overlooked in terms of equipment upgrades…
But, just think of how many times per day you’ll use a good-quality light in your exam rooms or dental area.
In terms of cost per use, that can make new lighting a great investment—something you’ll benefit from using many times per day.
And if your new light makes your life easier in terms of visualizing the patient and making accurate medical notes… that’s an investment that could save you time and headaches, and be well worth it!

Vomiting in Cats: Common Causes and Diagnostic Steps

Cats are good at hiding illness and pain. So, for some feline patients, it’s hard to tell what’s behind a bout of vomiting.
A few of the many possible causes include:
Hairballs.
Food sensitivities.
Dietary indiscretion.
Infections or parasites.
Stress.
Pain.
GI foreign bodies.
Inflammatory conditions.
Internal issues such as kidney disease or hyperthyroidism.
Cancer.
Is it serious?
Often, it’s obvious whether the patient needs aggressive treatment right away or just needs a little bit of supportive care and observation at home.
However, other times it’s more difficult to know for sure. Those are the cases that may stay on your mind, making you wonder if the vomiting will continue or even become more severe.
It’s especially nerve-wracking if the patient went home for observation, but you’re concerned they may get worse overnight.
Reaching a diagnosis
Depending on the patient’s signalment, history, and physical exam findings, you’ll recommend the appropriate diagnostic tests.
Bloodwork
Bloodwork is a key factor in determining overall health status, and in establishing a baseline to monitor the patient for improvement or worsening of their condition.
These labs may be especially valuable in senior cats who have lost weight, when kidney disease, hyperthyroidism, or other internal medicine issues may be what comes to mind as the most likely diagnosis.
Imaging with x-rays and ultrasound
For some patients—especially if the vomiting is severe, or if you feel something abnormal on abdominal palpation—imaging may be needed right away. For patients with milder signs, you may decide to hold off on imaging at the first visit, but recommend the client bring their cat back if symptoms don’t improve.
And even if an obvious abnormality is noted on bloodwork (such as elevated thyroid hormone), imaging is still a good idea to rule out concurrent conditions, and to establish a baseline to compare any changes that show up on future imaging tests.
Either way, when it comes to imaging, radiographs are a good place to start.
Radiographs give you a good overview of what’s going on inside the abdomen. You can look for masses, abnormal-looking organs, constipation, bladder issues, pyometra, signs of a GI obstruction, and much more.
However, sometimes more information is needed. Often, x-rays and ultrasound work well together to give you the full picture.
Ultrasound gives you additional clues about soft tissue structures, including:
Differentiating a mass (size, what the borders look like, texture, thickness, etc.) from surrounding normal soft tissues. Silhouetting may make this interpretation challenging on x-ray images.
Viewing bladder stones that aren’t radiopaque.
Looking at small structures that are hard to see on x-rays, such as the adrenal glands.
Inflammation of the GI tract or other internal organs.
Finding evidence of a GI obstruction when it’s not obvious on radiographs (or, ruling out an obstruction—which may help you worry less if you decide to send the patient home for monitoring).
The list goes on, but the point is, x-rays and ultrasound can complement each other to give you the information you need, which can help you confidently diagnosis the mysterious vomiting cat.
Additional tests
Sometimes additional tests—for example, biopsies and infectious disease testing—may be needed to reach a diagnosis.
However, bloodwork, x-rays, and ultrasound are a great place to start. And often, these modalities will need to be completed prior to other modalities such as surgically obtained biopsies.
Lifestyle changes and monitoring
If the vomiting is due to a factor such as stress or hairballs, this may require a simple lifestyle change like providing Feliway diffusers and adding mental enrichment at home, or changing to a special diet.
But even in these cases, it’s good to rule out other, treatable medical causes—so a medical workup with diagnostic tests may still be recommended.
Keeping the vomiting at bay
If you have a patient with a chronic condition, you may recommend repeating the bloodwork, x-rays, and ultrasound at regular intervals.
A wellness checkup package that includes testing may be a good option for many patients—especially seniors. The wellness tests can be offered at checkups before the patient ever becomes ill, which gives you a great baseline for comparison with future test results.

Even though cats may not like to show symptoms of illness until a disease has progressed, wellness bloodwork and imaging (x-rays and ultrasound) can help to catch abnormalities early on, when the chances for treatment are better.
Disclaimer: This article is for general informational purposes only, and not intended as a guide to the medical treatment of any specific animal.
Written by: Dr. Tammy Powell, DVM

Autoclave Sterilization: A Necessity in Veterinary Medicine

In 2021, you’ve probably thought more about sterilization and disinfection than you ever have before.
Of course, you’ve always practiced safely and hygienically. But, this year’s pandemic brought the need for drastic measures like curbside service, face masks during everyday interactions, and washing your hands even more frequently…
… and, you and your staff probably feel like you’re cleaning, cleaning, cleaning all day long!
Best practices for cleaning surfaces and equipment
According to many experts, the best way to avoid viral exposure is the elimination of the risk.
This is where isolation and social distancing protocols come in. Your distancing measures of curbside service, telemedicine, and a limited number of people inside your hospital can all help.
Social distancing within the practice and avoiding the sharing of spaces and equipment as much as possible can also help.
Then, there’s PPE to help minimize any potential exposures—as well as your cleaning and disinfection protocols.
You wear gloves and face masks, you wash your hands and use hand sanitizers, and you clean the surfaces and equipment in your practice.
During your cleaning efforts, don’t forget about a powerful piece of sterilization equipment you probably use frequently…
Maximize your use of this key piece of veterinary equipment…
If your own or work at a veterinary practice, there’s a good chance you have at least one autoclave available for use.
Autoclaves use steam under pressure to kill microbes and are one of the most powerful disinfecting tools you have in your arsenal.
Surgical equipment—and beyond!
An autoclave is a tried and true method of sterilization for surgical packs, drapes, and tools.
But, maybe there are a few more items you don’t always think of that could be put into an autoclave for quick, thorough disinfection.
Things your autoclave can be used for include…
Gowns for surgery, isolation, or general use as an extra layer of protection.
Cloth caps.
Cloth face masks.
Surgery light handles.
Nitrile exam gloves or surgical gloves (ideally these would be single-use, but there are procedures described to maximize the lifespan of your PPE during shortages).
Dentistry tools.
Wound care items such as Penrose drains.
Cones/specula for otoscopes.
Pipette tips.
Certain muzzles.
Certain nail clippers.
Biological waste—in case you suspect viral contamination and want to sterilize waste prior to disposal.
There may be other items you can sterilize, too—so get creative!
Just be sure to check the manufacturer’s guidelines before you sterilize a new item—they’ll guide you on what’s safe or not safe to go in your autoclave.
But, once you get into the habit, this will save you time and do a more thorough job of eliminating microbes than most hand cleanings could ever do.
Why invest in a top-of-the-line autoclave?
In modern times, we can’t help but think of an autoclave as a potent killer of coronavirus!
But really, a good autoclave is useful to you all the time, pandemic or no pandemic. It ensures your equipment is properly sterilized from all microbes prior to use.
A good quality autoclave is dependable and makes your life easier via the simplicity of use. Here’s what we recommend you look for…
Several setting options including solid or liquid items, and wrapped or unwrapped items.
The option to choose a preset that suits your needs.
Large water reservoir so you don’t have to refill as often.
A tabletop model with a large chamber capacity so you can fit more items per cycle.
Locking mechanisms for safety.
A strong warranty and excellent customer service.
Our pick is this Full-Size Veterinary Autoclave because it meets all of these criteria, and has an industry-leading 3-year warranty (which includes a loaner autoclave if yours ever needs to be serviced).
How to keep your autoclave healthy
It’s always important to protect your investments by caring for your equipment—and that’s even more true during times when the business may be slower due to social distancing.
Here are a few tips to keep your autoclave in tip-top shape…
Use distilled water, not tap water.
Post guidelines for routine maintenance (otherwise, it’s easy to forget!).
Look for debris when the autoclave is cool, and clean it as needed.
Wipe the trays clean weekly.
Note any water or steam leaks.
Listen for any unusual sounds.
Observe the tape indicator each time, to ensure the autoclave is functioning as it should.
With a little attention and care, your autoclave will stay healthy—and in turn, it can help keep your equipment pathogen-free!

Now YOU Can Choose the Best Veterinary Lighting for Your Surgery Room

When it comes to surgeries, good lighting is crucial.
Without good quality light, it can be hard to see all the details of what you’re working on, whether that’s a spay, a wound repair, and abdominal exploratory, or anything else.
Dim or subpar lighting can make you strain your eyes while trying to place or tie your sutures. And, adequate lighting is important to accurately note the color, texture, and general appearance of tissues for your medical record—that way, nothing gets missed.
Not to mention, good visualization of your field of work keeps you from craning your neck to see better—which can be helpful for your posture and for preventing aches and pains from hunching over.
Maybe you already understand the importance of good surgical lighting—but did you realize how affordable it is?
In the past, LED lights have been very expensive compared to halogen bulbs—and maybe that seemed cost-prohibitive.
However, new lights are available at 30-40% less (and that includes a better warranty, too).
So, considering the energy efficiency and performance of LED lights, there’s really no competition—affordable, high-quality LEDs are a great investment for your practice.
Plus, many cities, counties, states, and even electric power companies offer rebates for upgrading to LED lights, due to the decrease in power used.
Specific requirements for rebates vary by location—so be sure to check with your local municipality and utility providers to see what’s available in your area. Because it’s always great to get a cash rebate that can help cover the cost of your upgrades!
So, how do you choose the right surgical light?
When it comes to selecting the best surgical light, there are many things to consider…
Affordability. LED lights are much more affordable now than they used to be, so shop around and be sure you’re getting a good deal (be sure to compare all the other factors on this list, too).
Quality. Look for dependability, durability, and a good-value warranty to back up your investment.
Range of lighting brightness, including high-intensity light, and dimming options to use as needed.
Adjustable. The light pattern can be adjusted from a smaller, focused pattern, to a larger area of coverage, depending on your needs.
Precision positioning. You should be able to adjust the entire head and arm of the light, and know it will stay precisely where you put it (we recommend limitless arm rotation and a drift-free design that moves easily when you adjust it, but then stays put where you want it).
Easy to clean (and sterilizable handles are a plus).
User-friendly, with dimming and focusing controls on or near the handle.
Shadow-free illumination—or at least a design that minimizes shadows as much as possible.
Mounting options that match the layout of your surgery room or suite.
What’s our recommendation?
We recommend the new Burton veterinary LED surgery light.
Why? Because this light checks all the criteria above. Plus, it has a dependable LED, is assembled in the USA, and is backed by an industry-leading 5-year warranty.
At a competitive price point that optimizes design, performance, and value, it’s pretty hard to pass up!
Is a Burton light right for you?
When it comes to investing in new equipment for your practice, maybe the lighting isn’t always the first thing on your mind…
However, surgical lighting is something you use many times every week—maybe even several times per day, depending on the nature of your practice.
That’s probably more often than you use some of the other equipment in your hospital.
So, be sure not to overlook this crucial piece of equipment. You may be surprised how better lighting can make your time in the surgery suite more comfortable and efficient.


Mastering Detection & Treatment of Urinary Bladder Stones

Unraveling the Diagnostic Challenge: Spotting Hidden Bladder Stones
Introduction:
Embarking on the quest to identify and address urinary bladder stones in our furry companions requires a nuanced approach. This comprehensive guide is designed to navigate the intricacies of detection and treatment, shedding light on the sometimes elusive nature of these mineral-rich intruders.
Recognizing the Telltale Signs: Is It Bladder Stones?"
Is your pet showing signs of distress like blood in their urine, increased urination, or accidents at home? These could be subtle indicators of urinary bladder stones. Explore this section to decipher the signals that may prompt a visit to your veterinary clinic.
The Power of Radiographs: Shedding Light on Uroliths
Radiographs serve as the cornerstone in this diagnostic journey. Learn about capturing essential views of the abdomen and unraveling the mystery of radiopaque stones. Delve into the nuances of stone size and distribution, from sand-like grains to larger formations.
Contrast Studies: Enhancing Visibility for the Elusive Stones
When radiographs fall short, a double-contrast study becomes essential. Discover the benefits of combining positive and negative contrast agents for optimal bladder stone visualization.
Understand the role of anesthesia or sedation in administering contrast agents through a urinary catheter, ensuring patient safety and comfort.
Ultrasound Magic: Illuminating Radiolucent Stones
Explore the wonders of ultrasound in uncovering radiolucent stones that elude traditional radiographs. Dive into the fluid-filled bladder's role in providing contrast for ultrasound waves, enabling the detection of stones and other bladder abnormalities. Delve into ultrasound's capabilities in assessing the upper urinary tract, identifying issues beyond bladder stones.
Tailoring Treatment: From Diet Changes to Cystotomies
Based on diagnostic findings, discover treatment options, from recommending dietary changes for dissolvable stones to performing cystotomies for stone removal. Understand the importance of follow-up imaging to track progress and determine the effectiveness of dissolution.
Post-Op Imaging: Ensuring Success in Stone Removal
Uncover the critical role of imaging on the day of surgery, utilizing pre-op radiographs to confirm stone presence and post-op views to document successful removal. Navigate the choice between standard radiographs and ultrasound for follow-ups, ensuring the long-term health monitoring of the urinary system.
Conclusion:
Armed with a combination of imaging modalities, veterinary professionals can empower clients to proactively address, monitor, and prevent urinary bladder stones in their cherished pets.
Stay ahead in the journey of pet healthcare with crystal-clear insights into the world of diagnosing and treating these pesky intruders.
Your commitment to comprehensive care ensures a happier and healthier life for our four-legged friends.

A Vet's Guide to Safe, Conscious X-Rays for cat Patients

1: Balancing Safety and Conscious Imaging
X-rays serve as invaluable tools in feline diagnostics, offering crucial insights when executed with precision. However, coaxing a cat into a state of stillness for the procedure without resorting to sedation presents a unique challenge. In this guide, we explore the delicate balance between achieving diagnostic-quality X-rays and ensuring the well-being of both feline patients and veterinary staff.
2: When Sedation Isn't an Option: Considerations and Scenarios
Before embarking on the journey of conscious cat X-rays, veterinary professionals must assess the necessity of avoiding sedation. Safety remains the top priority for patients and staff alike, as repeated attempts due to poor positioning or movement can elevate stress levels and radiation exposure.
While short-acting sedation options exist, there are scenarios where a conscious approach is preferable, such as with cats having advanced cardiac disease or previous adverse reactions to sedation.
3: Techniques for Conscious Radiographs: A Step-by-Step Approach
Ensuring a smooth and stress-free process for conscious X-rays involves meticulous preparation and execution. This section provides practical tips for veterinary professionals to enhance the welfare of feline patients and maintain a safe environment during the procedure.
4: Preparing for Success: The Importance of Readiness
To successfully execute conscious X-rays, meticulous preparation is non-negotiable. From predicting kV and mA settings to having restraint equipment readily available, the efficiency of the procedure relies on a well-thought-out plan. Implementing feline-centric protocols, including calming voices, quiet environments, and minimal handling, contributes to a low-stress atmosphere.
5: The Art of Positioning: Tools and Techniques
Positioning a cat for X-rays demands creativity and careful consideration.
This section introduces various tools, such as Perspex boxes, sandbags, troughs, and foam wedges, to aid in achieving optimal positioning without compromising patient comfort. Emphasizing that "less is more" in cat restraint, the guide outlines methods to stabilize cats with respiratory concerns while maintaining minimal restraint.
6: Taking the Shot: Executing the Radiographs
Executing conscious radiographs requires coordination and precision. This section guides veterinary professionals through the process, from staying with the cat until the machine is ready to providing reassurance during the 'beep' or 'click' of the X-ray machine.
Tips for allowing the cat to rest between shots and recognizing signs of distress ensure a humane approach throughout the procedure.
7: Pitfalls and Prudence: Navigating Challenges
While conscious radiographs offer a non-sedative alternative, potential pitfalls exist, such as poor positioning, movement blur, or sub-optimal exposure.
This section emphasizes the preference for sedation or anesthesia whenever possible to achieve radiographs safely, underlining the importance of adaptability and recognizing when chemical restraint may be necessary.
By mastering the art of stress-free cat X-rays, veterinary professionals can enhance the diagnostic process, ensuring the well-being of their feline patients and fostering a positive experience for both cats and their human companions.
Patient Injury & Complications In Veterinary Dentistry
The nature of anesthesia brings risk in general. In veterinary medicine, during dental procedures, pets are often placed in vulnerable positions which can lead to increased risk of injury and medical complications.
These risks can be minimized or entirely avoided with careful consideration, and proper training and continuing education of staff. Listed are a few of the more common injuries that can occur during a dental procedure.
Aspiration Pneumonia
Aspiration pneumonia in pet patients occurs when the patient inhales a foreign substance and develops lung inflammation and infection as a result.
The most common occurrence during dentistry is water and debris entering an unprotected airway, hence allowing fluid and debris to enter the lungs. This can occur from an underinflated tracheal tube, or repositioning during the procedure that allows fluid to enter the airway.
Aspiration pneumonia can also occur if the patient vomits or regurgitates during anesthetic recovery.. To reduce the incidence of dental-related aspiration pneumonia, maintaining the patient on their back during the procedure, and avoiding repositioning has proven to not only lessen the risk of aspiration but also lessens the amount of anesthesia needed during the procedure.
In addition, antiemetic medications given during the premedication phase can help reduce the incidence of post-anesthetic nausea and vomiting. Caution should be taken during the recovery phase to wait until the patient is alert and responsive enough to deflate the cuff and remove the tracheal tube.
Tracheal rupture
Tracheal rupture in dogs and cats are more frequent during dental procedures than any other medical procedure. Seventy-five percent of tracheal ruptures are thought to be associated with oral surgical procedures with the incidence more common in cats than dogs.
Tracheal injury can cause symptoms such as mild dyspnea, and even death. The most likely cause of tracheal rupture is thought to be due to an overinflated tracheal cuff, as well as failing to detach the tracheal tube from the anesthesia hose during repositioning, which can cause a torque on the inflated cuff resulting in a tear of the dorsal membrane of the trachea.
Another common cause of tracheal rupture is a patient that is not adequately anesthetized and coughs or lunges upward during intubation, tearing the trachea.
Pressure from an overinflated cuff can cause pressure necrosis of the trachea, showing delayed symptoms of inflammation and scarring.
Avoiding over-inflation of the cuff, using new tracheal tubes, testing the cuff to ensure proper inflation prior to use, avoiding repositioning as much as possible, and ensuring a level plane of anesthesia prior to intubation can help minimize the risk of tracheal rupture.
Artery Damage during Tooth Extractions
Arterial damage to arteries such as the palatine artery which runs the length of the mandible can accidentally occur during routine tooth extractions where the instrument can slip from the practitioner’s hand.
These injuries can be mild to more severe requiring surgical intervention.
The most effective way to avoid this type of injury is to implement extraction techniques involving gingival flaps where the roots are exposed, and more easily undermined, and extracted.
Written by: Dr. Tammy Powell, DVM
Donec id justo non metus auctor commodo ut quis enim. Mauris fringilla dolor vel condimentum imperdiet.