


What Does a Portable/Equine Veterinary X-Ray Machine Cost?
Portable x-ray equipment can be valuable to equine practitioners, mobile veterinarians, veterinary practices with limited space for equipment, or anyone else who could benefit from equipment that is compact and easy to transport.
Radiology equipment is an important investment. Here are some tips to make sure you get the best value and make a return on your portable X-ray system purchase.
How Much Do Portable Veterinary X-Ray Systems Cost?
Here, we’ll focus on digital x-ray equipment. An average price range is about $25,000-60,000. Of course, this depends on whether you are buying new or used, as well as on what’s included in the system.
For example, you’ll need a generator and a plate or sensor. Not all systems include a generator in the price, so be sure to check exactly what’s included. And if using CR rather than DR technology, a plate reader is needed.
Additionally, many systems include software and a laptop for capturing and storing images. Some software has extra perks that could come in handy, such as the ability to make measurements right on the images.
When deciding which x-ray equipment to purchase, consider how it will be used at your practice.
For example, if you have a mobile small animal practice, how much room do you have for equipment storage?
If you’re in a barn with limited electrical outlet access, would it be better to purchase a cordless unit? What about WiFi or Bluetooth access for wireless sensors or a protective cover for the equipment?
Consider getting opinions from other vets that use a portable system, to see what they recommend.
Could These Factors Help with the Purchase Price?
Some things to consider when it comes to finding the best deal include…
Ask around for different quotes once you know which system you are interested in. Ask vendors for any special deals they may offer, and see if they can beat an offer you already have.
Consider different financing options. Does it make sense to pay upfront or to do a monthly payment plan at a reasonable interest rate? And will you finance through the equipment seller, a bank, or another option?
What are the tax implications (and potential savings) on your equipment purchase? In some cases, tax savings could make up for the expense of buying new equipment.
Look at Long-term Expenses in Addition to the Purchase Price
Of course, the purchase price is important. But long-term costs are also crucial to consider since expensive maintenance could end up canceling out the initial savings on a cheaper but lower-quality equipment purchase.
So, look at the warranty for starters. When does it expire? What does it cover? Can the warranty be renewed, and how much will it cost to renew? Is there an expected charge for routine maintenance? And for older technology, are replacement parts still being manufactured?
And speaking of maintenance, how durable is the equipment? This could make a huge difference, depending on when and where you plan to use the equipment.
For example, if you do farm calls, can the generator and sensor stand up to the elements (dust, humidity, etc.)? Can it function well after being transported in the car during hot or cold weather? If equipment gets damaged easily, that could really add to long-term expenses, and that must be considered in your purchasing decision.
What about software? How often does it need to be upgraded, and are upgrades included in your costs?
Crunch the Numbers
All of the above factors will be part of your financial considerations. Additionally, it helps to plan ahead for how much income the new equipment is expected to bring in—to ensure the purchase makes financial sense for your practice.
For example, how much would the practice charge for various types of x-ray studies?
How many x-ray studies are expected per week or per month—and does this cover the monthly payment on the equipment while also bringing in a profit?
Before investing in new equipment for your practice, it’s helpful to consult a financial advisor or veterinary business consultant.
Make Sure Your Equipment Gets Used Safely and Efficiently
Radiation safety is always important. For mobile units, there may not be a dedicated x-ray suite available, so it’s necessary to ensure that everyone is present (the vet team operating the equipment, as well as any pet owners who are present during the visit) and follow all safety recommendations.
Additionally, training the vet team on the new equipment will ensure they can use the equipment quickly and effectively. This could potentially mean saving time and scheduling more procedures—which could help with the ROI on your equipment purchase.
The right portable veterinary x-ray system purchase will vary from practice to practice, depending on the circumstances under which the machine will be used (in a clinic or out in the field), how busy the practice is, finances, and other factors.

But by carefully considering all these things ahead of time, it will be easier to determine which system suits your practice’s needs and to find the best possible deal to ensure your investment pays off.
Written by: Dr. Tammy Powell, DVM

the Price of a Portable Veterinary Ultrasound Machine?

Ultrasound is a great imaging modality that can add value to a veterinary practice, allowing them to offer new services in-house. But for some practices, a mobile ultrasound may be the best choice.
This includes mobile small animal practitioners, equine and large animal vets, and even some veterinary practices that may want to move their equipment between rooms or cage sides.
If you’re looking to purchase a portable veterinary ultrasound machine, here are some things to consider…
Which Components and Features Do You Need?
Before comparing the purchase price of different manufacturers and vendors, it’s important to make sure you’re comparing apples to apples.
So, make a list of the things you must have with your ultrasound machine, as well as a list of ‘nice-to-haves’. Here are some possibilities…
Transducers. Which type of transducer(s) are included with the machine? Ultrasound probes or transducers come in different shapes and frequencies, which are used for different purposes and different species/sizes of patients. So, it’s important to make sure you’re getting the options you need, based on your practice type, the patients you see, and the services you plan to offer.
Functions and features. Does the machine offer all the operating functions that you need for your studies? And what about features like color Doppler, or the ability to make measurements and annotations on the screen? Doppler technology can be indispensable for certain types of ultrasound studies. Color Doppler provides a look at blood flow, which is crucial when evaluating the heart and helpful for identifying vascular landmarks for certain abdominal structures.
Durability. For vets who make farm calls, it’s important to purchase a unit that can handle being out in dust, humidity, and temperature fluctuations, as well as something that travels well.
Power and connectivity. Do you always have reliable power outlets available, or are there some cases when a battery-powered machine would be needed? And how will your images and videos be stored or added to your practice management software?
Support. Is there a technical support line available 24/7? And is the company stable—meaning, are support and replacement parts expected to be available in the next few years?
How Much Do Portable Veterinary Ultrasound Machines Cost?
Veterinary ultrasounds are highly variable in price, depending on the quality of the machine itself and what’s included. But the average price of a portable veterinary ultrasound is about $10,000 to $25,000.
Some units can cost significantly more, especially if they come with multiple probes and extended service plans, and warranties.
To the other extreme, there are some units that only cost between $1,000 to $5,000. Typically, these inexpensive units are handheld and compact, and they may be able to hook up to a smartphone. They typically don’t offer the capability of seeing everything in fine detail. But they may be a good option for vets who only plan to do things like ultrasound-guided cystocenteses or quick checks for free fluid in the chest or abdomen.
Financial Considerations
In addition to the purchase price, plan for long-term expenses. This could include routine service and maintenance costs, renewing a warranty, updating software, unexpected repairs, and anything else that could come up over time.
Also, investigate your financing options. Will you purchase the equipment outright using saved business funds? Or does it make more sense to do monthly payments via financing from the vendor or a bank?
Don’t forget to factor in tax savings, too.
Talking to a financial professional, especially one who is familiar with the veterinary industry, can help. This advisor or consultant can also help you determine how much to charge for the new ultrasound services your practice will offer.
Maximize the Return on Your Investment
Many veterinary patients can benefit from ultrasound studies. But in order to schedule a lot of studies and earn a profit with the new equipment, a vet must be able to perform an ultrasound study with confidence and in a timely manner.
Ultrasound is not covered in most veterinary schools to nearly the same extent as x-rays. And the use of the probe and interpretation of what’s on the screen are not always intuitive. Therefore, many vets require in-depth training and a lot of practice before becoming comfortable performing ultrasound studies.
For all these reasons, if a practice is investing in a new ultrasound machine, it also makes sense to invest in training. That way, the machine can be used with confidence and efficiency.
A vet doesn’t have to have these skills mastered at the time a machine is purchased. But at least one vet at the practice should have a commitment to learning how to use the ultrasound.

The right portable ultrasound purchase will vary from practice to practice, depending on the practice type, budget, and other factors.
But by carefully considering all these things ahead of time, it will be easier to determine which machine suits your practice’s needs and to ensure your equipment investment pays off.
Written by: Dr. Tammy Powell, DVM

Taking, Measuring, & Interpreting Rads of the Equine Foot

Subtle changes within a horse’s foot can be indicative of pathology that affects the horse’s performance and quality of life, so it’s important to know how to take and interpret radiographs of the equine foot.
While extensive study and experience are needed to accurately evaluate foot radiographs, this article will cover some of the main principles behind taking and interpreting x-rays of the equine foot.
When Are Radiographs of a Horse’s Foot Indicated?
Common indications include lameness localized to the foot, suspected laminitis, navicular disease, trauma, infection, conformation or balance problems, or any other issues of the foot.
Additionally, radiographs can serve a preventive and management function, to help prevent some issues before they arise. This can be done during a pre-purchase examination, as part of a consultation with a farrier, etc.
Setting Up for and Obtaining Diagnostic Quality Radiographs
Since some of the abnormalities that indicate/lead to pathology can be subtle, it’s important to set up an x-ray study very precisely. Otherwise, interpretation can be inaccurate.
For example, a horse that is not distributing its weight equally between its right and left sides may slightly hold up one of its feet. This can result in a false diagnosis of an abnormal angle of part of the hoof when measurements are made.
Here are some tips that can help a veterinarian obtain the best possible radiographs of a horse’s feet…
Be very familiar with the anatomical structures, and have a good reference image for comparison.
Radiograph all of the feet (or at least take bilateral views), even if not all are showing symptoms of a problem. This may help uncover pathology that is radiographically evident but not yet clinically evident. At the very least, if no abnormalities are detected in the other feet, the views of the unaffected feet can serve as a great reference for comparison to normal within that individual horse.
Ensure that equipment is good quality and well-maintained/undamaged.
Have a systematic approach each time, to ensure nothing is forgotten. Know which views need to be obtained and which technique should be used for each.
Do the study on level ground, so that the horse can stand in a normal position. Make sure the horse bears weight equally between the right and left foot and keeps its neck and head straight so that the foot being radiographed is at a standard, weight-bearing angle that can be effectively compared to reference images and measurements. Wooden blocks are typically used to align the beam to about the level of the bottom of the coffin bone.
Common Radiographic Views of the Equine Foot
Orthogonal lateromedial and dorsopalmar/plantar horizontal views are the most commonly obtained radiographic views of the foot, and a good starting point.
Depending on which pathology is suspected, additional views may include various oblique or angled shots.
Tips for success include cleaning the foot to remove any foreign material that could obstruct visualization of normal anatomy or create an artifact.
After cleaning, it is recommended to pack the sulci with a pliable material such as Play-Doh, to eliminate gas artifacts.
Many experts also recommend placing radiopaque markers (such as Barium paste) at certain positions on the hoof, to serve as a point of reference for measurements.
Describing the technique and positioning for all of these views is beyond the scope of this article, but more detailed instructions on setting up and taking views are described in reference texts.
Measurements of Radiographs of the Equine Foot
In addition to what can be seen with the eye qualitatively, there are standard measurements of various parts of the equine foot that can greatly aid in radiographic interpretation. Some of those measurements are covered here.
For example, asymmetry or deviation of the distal interphalangeal joint space on the DP view is considered abnormal in terms of the medial-lateral balance of the foot.

Also, dorsal hoof wall thickness measurements can help identify laminitis. Rotation of the distal phalanx (P3 or coffin bone) may be noted if the lines are drawn along the hoof wall and dorsal cortex of P3 are no longer parallel to one another.

Or, laminitis may be noted as “sinking” of P3, when the lines along the hoof wall and the dorsal cortex of P3 are still parallel to one another but are displaced lower than they should be (noted as an increased distance between the coronary band and the proximal edge of the extensor process of P3).

These measurements can be made by hand, but some digital systems and software allow for measurements made right on the images on-screen, with automatic calculations.
Either way, a good reference text should be used to be sure measurements are made comprehensively and accurately, and to compare the measurements to standard reference ranges.

Having a good understanding of the anatomy of a horse’s foot, a systematic process for obtaining diagnostic quality radiographs, and practice with measurements and interpretation of the radiographs will help a vet make the most of their x-ray studies of the equine foot.
Written by: Dr. Tammy Powell, DVM

Obtaining High Quality X-Ray Images of the Equine Stifle

Radiographs of the stifle in horses are a relatively common procedure. They are used to evaluate for developmental and acquired abnormalities of various structures of the knee joint.
Here are some tips for when to obtain these radiographs, and how to obtain great shots of the equine stifle…
When Are Stifle Radiographs Indicated?
Some of the most common indications for stifle radiographs in a horse include a pre-purchase examination or investigation of any swelling of the joints, lameness localized to the stifle, difficulty bending the joint, or traumatic injuries that could affect the knee.
Some of the conditions of the stifle that radiographs may be used to evaluate include osteochondrosis, osteochondritis dissecans (OCD lesions), subchondral bone cysts, trauma, osteoarthritis, joint effusion, infection, or any other suspected abnormalities.
Ultrasound may also prove useful in evaluating the equine stifle, especially for soft tissue structures such as the joint space, meniscus, and ligaments.
Additional diagnostics—such as joint fluid analysis, arthroscopy, or CT when available—may also provide valuable information. But radiographs are usually a good diagnostic to start with, as they are fairly routine and provide a lot of information.
Planning for Equine Stifle Radiographs
Prior to doing an x-ray study of the stifle, it’s important to thoroughly understand the anatomy of the stifle.
In addition to a working knowledge of stifle anatomy, it’s important to know how this anatomy can change over time. For example, knowing which ages the physes of the joint close can greatly aid in accurate radiographic interpretation.
A vet team should also know how to obtain standard views at appropriate angles, with correct exposure techniques for each view. Due to thick musculature, cranio-caudal views may require significantly longer exposure times than latero-medial views.
Additionally, having a differential diagnosis list will help a vet determine if any additional views are needed to see specific structures of the stifle joint in more detail.
Sedation can help to reduce motion artifact, which can produce x-ray images that are of higher diagnostic quality.
Bilateral views are recommended. This provides an easy basis for comparison in that individual horse, if lesions are unilateral. Also, some lesions (such as OCD) may be bilateral, even if the horse is only showing symptoms on one side at the moment.
Which Views of the Stifle Should be Obtained?
The most commonly obtained views of the stifle include the following…
Latero-medial. In this view, the x-ray generator is positioned laterally, facing the femorotibial joint, and slightly (10-20 degrees) in a caudo-cranial direction. The beam is directed horizontally, with the detector placed medially and perpendicular to the beam.
Caudo-cranial. For this shot, the generator is placed caudally to the joint—with the beam centered at the midline—and the detector cranially and perpendicular to the beam. The generator is raised at a 10 to 20-degree, proximo-distal angle.
Caudo-lateral to Cranio-medial Oblique. For this view, also known simply as a “lateral oblique,” the beam is centered over the lateral aspect of the femorotibial joint and then angled at a 30 to 60-degree caudo-lateral to cranio-medial orientation. It is directed horizontally across the joint, or at a slight proximo-distal angle. The detector is placed on the opposing side and perpendicular to the beam.
These three views make up the majority of routine x-ray studies of the stifle. But additional views may be included if more information is needed, such as the patellar skyline or flexed lateromedial views.
For additional information on obtaining views of the stifle in a horse—including detailed pictures of the anatomy in common x-ray views—this article is highly recommended: RadiographWilson.pdf (aaep.org)

Conclusion
As with any aspect of practicing medicine, having a good reference and proper equipment, and gaining practice/experience over time, will help a veterinarian develop confidence in taking and interpreting radiographs of the equine stifle.
Written by: Dr. Tammy Powell, DVM

When and How to Perform Equine Neck X-Rays

Radiographs of the cervical spine in horses can be challenging, but developing a system and becoming familiar with interpretation of these views can be very useful.
Here are some common guidelines to follow for cervical x-ray studies in horses…
When Are X-Rays of the Neck Indicated in Horses?
X-ray studies of the cervical spine are used to evaluate for a number of different conditions, such as cervical vertebral malformations, congenital malformations, trauma such as fractures, subluxations, osteoarthritis, or neoplasia.
Some of the symptoms that might lead a veterinarian to suspect an issue with a horse’s cervical spine include pain on palpation, stiffness or a reduced range of motion in the neck, neurological signs (ataxia, proprioceptive deficits), swellings or asymmetry of the neck, or even lameness or decreased competitive performance.
Advanced imaging, such as CT and nuclear scintigraphy, is becoming more common. A myelogram is sometimes indicated as well, for more information.
However, plain radiographs are usually the first line for diagnostic imaging. Plain radiographs can provide a lot of information, can be used to guide the next step of treatment or diagnostics, and may be performed with sedation, whereas other imaging modalities require general anesthesia.
An ultrasound study may also accompany neck radiographs, especially for evaluating the joints and soft tissues such as ligaments.
Performing Radiographs of the Cervical Spine in a Horse
Here are a few things that will help with smooth and efficient x-ray studies of the neck…
Make sure the generator is powerful enough for cervical radiographs, especially for the caudal cervical spine, which is a very thick region to shoot through due to surrounding musculature.
Know which views are needed (more on this below).
Carry all appropriate PPE, including cassette holders, lead aprons, gloves, etc.
Use appropriate technique for this region. This is typically a kVp of 70-90, while mAs can vary greatly between the cranial to caudal portions of the neck due to thickness.
The horse is typically sedated unless contraindicated and standing for the x-rays.
Markers should be used to clearly differentiate the different regions of the neck, so a vet knows which vertebrae they are looking at. Some vets find it’s easier to use tape on the cassette to mark the views.
Which Radiographic Views of the Equine Neck Should be Taken?
Lateral views are typically the first ones taken. The standard lateral-to-lateral view (which can be taken from either the right or the left side) can provide a good screening of the entire area.
The region is usually broken down into three overlapping shots: cranial, middle, and caudal. One disadvantage of a lateral-to-lateral view is that bilateral structures are superimposed.
Oblique views can help with the problem of superimposition and allow the vet to take a closer look at the side where a lesion is located. To provide a basis for comparison, both a right and a left oblique are taken for each region of the cervical spine (cranial, middle, and caudal).
Obliques are usually performed at an angle of 45-50 degrees from lateral—for example, dorsal-right-lateral to ventral-left-lateral oblique. A ventral to dorsal oblique technique has also been described. Either way, the direction of the shot should be clearly noted and compared to a reference of the same direction and angle, for accurate interpretation.
Additional views may be obtained if needed, especially if more focal shots are indicated to isolate an area in question.
VD views are typically not performed due to impracticality, because of the thickness of a horse’s neck, although it may be possible in smaller breeds or foals.
Interpreting Radiographs of the Equine Neck
Practice, good reference images for comparison, and familiarity with the anatomy of the region can all help with the interpretation of x-ray images.
A consultation with a radiologist can also be helpful.
Evaluate each radiograph in its entirety. Asymmetry, variations of normal anatomy, changes associated with degenerative joint disease, lytic lesions, stair-stepping between vertebrae, compression of the vertebral canal, or any other abnormalities should be noted.
Measurements of the vertebral canal can also be made and compared with standards, which can help with diagnosing more subtle compressive lesions.

By having a system for neck radiographs, knowing which views to take, and becoming familiar with the interpretation of these x-ray studies, a vet can determine the next step for a horse showing symptoms of a problem localized to the cervical spine.
Written by: Dr. Tammy Powell, DVM

When and How to Perform Equine Skull X-Ray
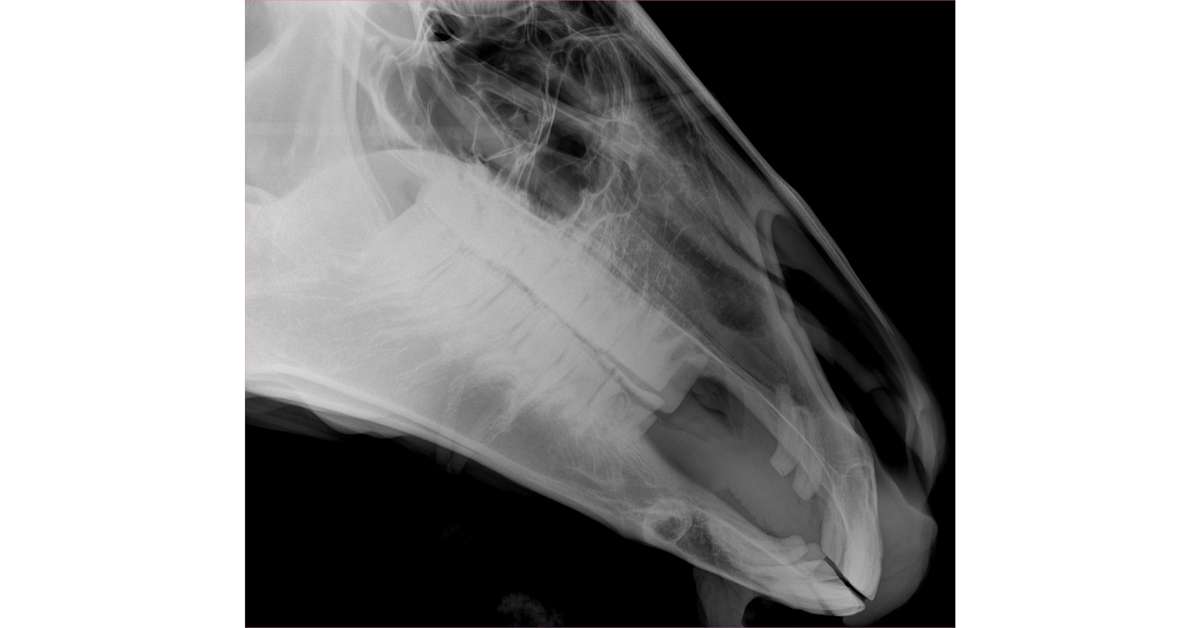
Radiographs of the head are useful when evaluating for injuries or disease processes of the skull, jaws, teeth, nasal cavity, and paranasal sinuses in horses.
Examples include, but are not limited to, dental or periodontal disease of the cheek teeth, head trauma, sinusitis, and neoplasia.
Common clinical signs for which skull radiographs may be indicated include nasal discharge or epistaxis (especially unilateral), swellings of the face, odor or draining tracts, bony changes, or difficulty eating.
When skull radiographs are indicated, here are some common guidelines to follow for procedures, views, and interpretation.
Performing Radiographs of the Head in a Horse
A systemic approach to an x-ray study can help improve efficiency and ensure nothing is missed. This should include…
All necessary equipment, including a generator with enough power for skull radiographs, a large sensor (while intraoral plates are available for dental evaluation, here we’ll discuss extraoral views), and any props that may be needed to aid with views or positioning.
Knowing which views are needed (more on this below).
Having a technique chart or reference for settings. While the numbers can vary depending on the machine/equipment, commonly kVp is set between 70-100 and mA between 3-20.
Sedation is generally recommended unless there is a medical contraindication.
If possible, remove the horse’s halter or anything else on the head that could create an artifact or cover-up details in the x-ray image.
In some cases, it may be worthwhile for radiographs to be accompanied by (or followed up with) additional diagnostic tests, such as ultrasound or endoscopy.
Which Radiographic Views of the Equine Skull Should be Taken?
These are the most common views that are typically used for an equine skull study…
Lateral: This is a good screening shot to look for abnormalities (such as fluid or opacity) in the nasal cavity and paranasal sinuses. Bony and dental structures will be superimposed, but obvious abnormalities (such as tooth root abnormalities) might also be noted here. The cassette is centered over the 4th upper cheek tooth or rostral aspect of the facial crest, and a horizontal beam is used.
Ventrodorsal (or Dorsoventral) Oblique: Oblique views are valuable for reducing superimposition. A VD or DV technique can be used.
A VD oblique aids in evaluating mandibular structures, as well as in viewing the maxillary sinuses with less superimposition. The cassette is centered at about the same location as the lateral shot, but more dorsally to create obliquity. The x-ray tube is placed ventrolateral to the mandible so that the beam is at approximately a 45-degree angle on the opposite side of the face.
A DV oblique is helpful for evaluating sinus structures and maxillary cheek teeth. This view is basically the reverse of the VD, with the cassette positioned below the jaw and the x-ray beam pointing down at approximately a 45-to-60-degree angle on the opposite side of the face.
Dorsoventral: This view provides a lot of information about the sinuses, nasal passages, and nasal septum, especially for comparing right to left. Teeth and bony structures may also be evaluated, although overlap of these structures is to be expected. For this shot, position the cassette ventral to the head, centered under the mandibles. Then position the beam perpendicular to the cassette.
Additional views may be obtained as needed, especially more focal shots and additional angles to isolate an area in question.
For more detailed guidance on views for evaluating specific areas of the skull, this article is highly recommended: 101-eve-v25-i12-fm-toc.indd (aaep.org)
Interpreting Radiographs of the Equine Skull
Fortunately, the contrast between air (the nasal passages and paranasal sinuses) and bone creates good radiographic contrast. On the other hand, the complex structures of the skull, combined with superimposition of those structures, can make radiographic interpretation challenging.
For the best results, always use markers to identify which side of the head is being evaluated in the shot and differentiate between right and left, especially in oblique views (for example, RDLV—right dorsal to left ventral oblique).
Also, obtaining bilateral views is helpful for lateral and oblique shots, since it allows for comparison between sides.
Always evaluate the entire radiograph, and be on the lookout for asymmetry.
As with any x-ray study, clinical experience and good radiography reference images can help a vet identify what is normal versus abnormal.
Consultation with a radiologist can be helpful as well.

By having a system for skull radiographs, knowing which views to take, and becoming familiar with the interpretation of these x-ray studies, a vet can determine the next step for a horse showing symptoms of a problem with the head or teeth.
Written by: Dr. Tammy Powell, DVM

Pre-Purchase Examinations and X-Rays in Horses
Since purchasing a horse can be a large financial investment—both the purchase price itself, as well as any medical bills that arise later due to health or lameness issues—it makes sense for horse owners to do their research prior to buying a new horse.
As such, a pre-purchase examination with a veterinarian is typically performed prior to the sale going through, which includes a physical evaluation and possibly radiographs.
What Is Included In a Pre-Purchase Examination of a Horse?
At the very least, a pre-purchase check includes the horse’s history (ownership, work, and medical history) and a full physical evaluation.
A horse’s identification should be verified. A vet may also make notes about the horse’s temperament or other non-medical factors.
The horse’s history is important when considering expectations of future performance.
For example, what is the horse being purchased for, i.e., what will their job be? And how does this level of activity compare to their current level of activity?
Then there’s a standard full physical examination, which looks for abnormalities of the skin, eyes, mouth, cardiovascular, gut, and other body systems.
This includes evaluating the horse before and after physical exertion and seeing how long it takes them to recover.
The musculoskeletal part of the exam may include more detail while evaluating for lameness. Examples of this part of the exam include (but are not limited to)...
Observing the horse’s gait at walk, trot, canter, or other tasks, both saddled and unsaddled.
Palpation of the limbs, neck, and back.
Hoof evaluation and hoof testers.
Flexion testing.
Range of motion.
In addition to the physical examination and lameness evaluation, diagnostic testing may be performed. This might include…
Bloodwork or labs for general health.
Drug testing.
Diagnostic imaging, including radiographs of the joints or ultrasound of tendons.
Any additional tests (breeding soundness, tests required for interstate travel, endoscopy for respiratory issues, etc.) as needed.
Which Radiographic Views Should Be Included In a Horse Pre-Purchase Exam?
That being said, there is some debate over which/how many views should be included.
When in doubt, it’s probably best to err on the side of caution and obtain more views rather than less, since these views may potentially be used in litigation if the buyer ends up encountering a problem with the horse.
For this reason, the images also need to be of excellent quality, and it is recommended to use standard views/angles.
Radiographs of the limbs may include views of joints and bones that are more likely to encounter issues, especially the…
Stifles (craniocaudal, lateral, +/- obliques).
Hocks (DP, lateral, +/- obliques).
Fetlocks (DP, lateral, +/- obliques)
Foot/navicular series.
Additional views could be added depending on the needs of the situation. This may include additional joints, additional angles or flexed/stressed shots, or even vertebral studies of the neck and back.
A veterinarian would be looking for any abnormalities, such as previous or current injuries, arthritis, or OCD lesions. Of course, all of these findings should be correlated with the horse’s history and clinical evaluation.
Getting a radiologist consultation on pre-purchase radiographs is never a bad idea either.
Conclusions from a Pre-Purchase Examination
The purpose of a pre-purpose examination, including the radiographs, is to uncover any abnormalities which may potentially lead to a problem later, so a buyer has more information about what to expect from that particular horse.
However, it’s important to remember that there aren’t a lot of “perfect” horses out there. Most horses will have some type of lesion or abnormality uncovered.

While some abnormalities may predict a severe issue and lead to cancellation of the sale, other potential issues are not so clearcut. A pre-purchase examination isn’t a guarantee that a horse will never have a problem. And a mild abnormality may be perfectly acceptable to the buyer for the purpose for which they are purchasing the horse.
The goal is to provide information, and to convey that information to the buyer so they can make an informed decision and get the horse that’s right for them.
Written by: Dr. Tammy Powell, DVM

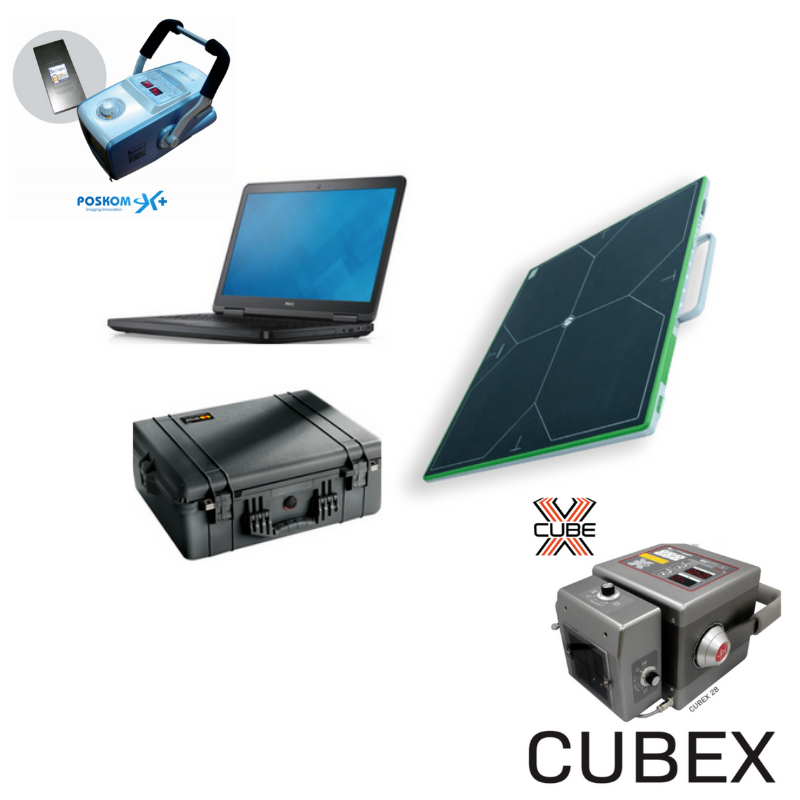
Equine & Mobile Veterinary DR X-Ray with Wireless Panels
The Benefits Of A Mobile Veterinary X-Ray Service
When you work as a mobile vet, you are often faced with many challenging situations. Having instant access to X-ray technology helps a great deal when you are working in the field.
It does not matter if you are working with small or large animals, all vets find a mobile veterinary X-ray facility a useful tool.
For many mobile vets, veterinary digital X-ray technology has been out of reach both from a portability and cost point of view.
Thanks to advances in mobile X-ray technology, there is now a new player on the market. ExamVue offers mobile vets an opportunity to invest in mobile equine X-ray technology suitable for both field and clinic work.
What Is Included In The Package?
This easy to transport X-ray solution certainly has a lot to offer. The Wireless Portable DR system features a whole host of functions. It is suitable for both equine and other veterinary work.
The kit comes complete with a hardshell case specially made for the laptop and plate.
List of components:
Wireless laptop-based capture station
High-quality Cesium flat panel plate
A choice of plates - 14 x 17 or 10 x 12
Dedicated ExamVue Software
No cable is required between the plate and the laptop
The unique ExamVue PACS makes it easy to evaluate a case quickly. As a client, you will also benefit from a 5-year warranty along with 5-year dedicated phone support. Set up guidance and training as well as shipping and installation are included as part of the package.
Who Is This X-Ray Set up Suitable For?
This X-ray setup is suitable for both large and small animals. When you work with large barn animals, using X-ray technology as a diagnostic tool is often difficult. It often means transporting the animal to another location. Now you no longer need to do so.
The system does not need an electricity source. In other words, it works completely independently from the main supply of electricity. The focus is very much on self-sufficiency.
One of the main benefits of the system is that you don't have any cables to worry about when performing an X-ray. That makes entanglement and other hassle factors normally associated with portable X-ray equipment a thing of the past.
You can review your X-rays on site making an immediate clinical decision possible.
What Are The Benefits Of Csl Direct Technology?
As you will know, resolution plays an important part when making a diagnosis. This system offers excellent resolution thanks to its isotropic lateral scattering. You will also benefit from low photon coupling loss which means better quantum efficiency and detector quantum efficiency.
The Wireless Flat Panel
The wireless flat panel offers you the latest in mobile veterinary X-ray tech including minimal exposure time. High sensitivity and resolution are important for reliable diagnosis and image quality.
Thanks to the excellent image quality, patients will receive a lower dose of radiation without the need for several X-rays.
The plates are structured in such a way that they are protected from degradation due to moisture. Good durability thanks to the Csi:TI screen. Your choice of panel is delivered in a flat panel case for easy storage and handling.
Software Performance
The ExamVue DR software is both easy to learn and use. It is one of the few equine X-ray software programs that feature processing, storage, acquisition capture, and the viewing of digital images.
To date, ExamVue has been used in a range of X-ray disciplines including orthopaedic and podiatry. The interface makes the software easy to learn for both experienced and novice vets.
Other software functions include printing, CD - DVD burn, image stitching, and procedure mapping. You also have a facility that allows you to create worklists.
Above all, ExamVue offers excellent value both in terms of functionality and cost-effectiveness.
Other Software Features That Will Impress You
Looking at the software in more detail, you will find that it also offers many other features.
This is a guide to other features you will find useful:
Console Acquisition Software
Patient registration facility using a manual function of Dicom worklist.
Complete processing parameters from small to large.
Edge enhancement function, histogram and contrast.
You can review images by horizontal and vertical flips.
The software lets you rotate images both clockwise and counter clockwise.
Complete zoom and pan along with a magnifying and crop facility.
The software has a field for annotations and measurements for free text and arrow markers.
Backed up by Cobb's and Norberg Angle Measurement.
Image preview facility
The emergency mode allows an examination without patient data input.
Facility for sending Dicom print to a Dicom printer
Dicom storage along with hard disk capacity notification function.
Exportable image facility which includes PNG, JPG, BMP, and Dicom to other forms of media. No viewer is required.
Database function that allows side by side images and a list of other functions including repeat, delete, and reject.
Gridline removal function and stitching software
Comes complete with AED mode ( Automatic Exposure Detection) which does not require connection to the X-ray generator.
Laptop Details
The laptop that comes as part of the package is a Dell Wireless 1506. It benefits from a 15.6" HD screen with wide-view anti-glare capability. The operating system is Windows 10 and it features 8 GB of RAM.
The package is backed up by Intel Integrated HD graphics 4400 featuring a 500 GB hard drive. The ExamVue Software is preloaded on delivery of the laptop to you.
That is good to know when you are thinking about investing in a mobile veterinary X-ray facility. For more information, you can contact the company and further familiarize yourself with their range of other veterinary product lines.
https://newvetequipment.com/dr-wireless-system
Written by: Annie Wall