


How to Choose the Best Veterinary Ultrasound System

Investing in an ultrasound machine is a big decision for any veterinary practice, impacting diagnostic capabilities and patient care.
Choosing the right ultrasound requires careful consideration, Whether you focus on companion animals, large animals, or a combination.
Why Invest in a Veterinary Ultrasound System?
Veterinary ultrasounds offer advanced imaging capabilities for both routine diagnostics and complex cases. There’s a range of reasons why they’re ideal:
Non-invasive: often reducing the need for exploratory surgery in many cases
Real-time imaging: allows for immediate evaluation of organs
Guided procedures: enable precise guidance for fine-needle aspirates and biopsies.
These invaluable tools help diagnose various diseases and abnormalities in veterinary patients. Most commonly:
Abdominal disorders: detecting changes in liver, spleen, and kidney size and the presence of masses or cysts - helping to diagnose hepatitis, liver tumors, bladder stones, and renal cysts.
Cardiac Conditions: evaluating congenital heart defects, cardiomyopathy, and fluid accumulation around the heart.
Reproductive health: early detection of pregnancy, uterine abnormalities, and ovarian conditions.
Fluid accumulation: identify abnormal fluid buildup causing pleural effusion.
Oncology: detection of benign and malignant masses and lymph node enlargement
Let’s move on to unpack some key factors to consider when upgrading or adding an ultrasound to your diagnostic portfolio.
1. Image Quality
First and foremost, high-resolution imaging is essential for accurate diagnoses. Look for systems that offer advanced imaging technologies that provide clear images for superficial and deep tissue examinations.
For instance, the Vetus 9 Ultrasound System by Mindray utilizes ZONE Sonography Technology+ (ZST+), delivering exceptional image clarity across various applications.
Avoid older systems that offer beam-forming technology. You’ll often find this compromises the quality of the image and can decrease your confidence in an accurate diagnosis.
2. Versatility and Application Range
Your ultrasound machine should accommodate the diverse needs of your practice, from small companion animals to large livestock.
Look for ultrasound systems that are designed with this versatility in mind, offering specialized transducers and settings suitable for a wide range of species and medical scenarios.
3. Ease of Use
Technology should enhance your practice’s ways of working, not contribute to bottlenecks.
An intuitive interface and user-friendly controls can impact an efficient workflow, especially in busy practices. Be sure the prospective system is easy to navigate through imaging options and patient data.
4. Portability and Ergonomics
Depending on your practice's needs, portability may be a significant factor. Look for systems that are relatively light weight and provide a slim design.
Ultrasounds like the Vetus 9 have an added bonus: the ability to fold to a height of one meter making it convenient for mobile services and easy storage, without compromising on performance.
5. Advanced Diagnostic Features
Consider those that offer advanced diagnostic tools such as elastography, doppler imaging, and specialized cardiac assessment capabilities.
Doppler ultrasound systems are particularly useful in evaluating blood flow patterns and detecting abnormal heart function.
6. Support and Training
Comprehensive training and reliable technical support will maximize your investment.
Be sure your ultrasound provider offers extensive training sessions, ensuring your team can fully leverage the system's capabilities.
7. Budget and Return on Investment
While high-end ultrasound systems represent a significant investment, their advanced features can lead to improved diagnostic accuracy and increased revenue through enhanced service offerings.
Selecting the right one can feel overwhelming, but this checklist should give you a good place to start in choosing the one that’s best for you and your team!


How Much Is a DR Digital X-Ray System for a Veterinary Hospital?

When choosing equipment such as an X-ray system for your veterinary practice, how do you know how much to spend?
Radiographs are used often—even daily—in many veterinary practices. Also, equipment is one of the largest investments a veterinary practice owner will make.
So, maybe a practice owner feels some pressure when trying to select the best equipment for their hospital but also stay within their budget.
Whether you’re opening a new practice or looking to update your current X-ray system, here are some things that may help with the decisions of what to purchase and how much to spend…
How Much Does a Veterinary X-Ray Machine Cost?
See our price here
The equipment itself can be a big investment, but it doesn’t paint the whole picture. When calculating the total investment, here are some things to consider…
Which equipment do you actually need? For x-rays, do you require an entirely new system, or do you already have a table and generator that could be retrofitted for DR technology?
How will images be acquired? While physical film is used less commonly in recent years if you do use film be sure to calculate the costs of purchasing and disposing of films and supplies for the processor. On the other hand, when calculating how much a digital X-ray machine costs, you’ll need to factor in the software and acquisition computer for viewing and storing images.
Are there shipping and installation costs?
Is a warranty included, and for how long? If it’s possible to renew a warranty, how much does that cost? Or, is there a maintenance plan available after the warranty expires? What is and isn’t covered under these plans (i.e. drops and accidents, loaner equipment if repairs are needed, etc.)?
What’s the expected lifespan of the equipment? Get input from colleagues if you can. Decide if it’s worth paying more upfront for something that will last longer, and which has an affordable warranty or maintenance plan.
How Much Can a Practice Afford to Spend?
Even experienced, savvy business owners can benefit from consulting a CPA or other financial professional when it comes to working out the budget and figuring out the best way to invest in a large equipment purchase.
When deciding how much your practice can spend on new equipment, it’s important to think about the return on investment, or ROI. Basically, this means using the equipment often enough (and charging enough for these services) to pay off the equipment AND earn a profit.
Calculations and questions to ask may include…
Should you rent or buy the equipment? Many experts recommend buying if at all possible, although the recommendation may vary from practice to practice.
If buying the equipment, will you pay everything up front, or use monthly payments over time? Monthly payments may be offered directly from the seller, or via bank financing. If using monthly payments, what is the interest rate?
How often do you expect to use the equipment? Speak to your veterinarians, vet techs, and other team members to get input on the expected demand for the service—as well as what’s involved with communicating the value of this new service to pet owners.
How much will you charge? Multiply your profit on each procedure (i.e. each x-ray study) by how often you expect to use your new equipment, to see if this fee covers the equipment cost and provides you with additional income.
What sort of staff training is involved, to get everyone up to speed on how to use the new equipment? And is the software, equipment, etc. user friendly? This is important, because these factors may impact how easy it is to integrate the new equipment into your daily practice flow, and whether or not the equipment will actually be used the way you planned.
Are there any tax benefits, such as a Section 179 deduction? These tax savings may help to offset some of your equipment costs.

All in all, a large equipment purchase is a big decision for any practice owner. But by analyzing each factor in the decision process one at a time, knowing your practice style and budget, and consulting with a financial professional, you can make the best decision for your hospital—and hopefully see a great return on investment, all while improving patient care!
Written by: Dr. Tammy Powell, DVM

How InnoVet X-Ray Enhances Veterinary Diagnostics

InnoVet Summit X-Ray Table and Generator
Whether you’re starting a new practice or looking to upgrade your x-ray equipment, an InnoVet Summit (powered by Americomp) X-ray table and generator offer convenience, dependability, and excellent value for your investment.
Here are some of the things that make this x-ray table/generator a favorite among veterinarians…
Why Choose a High-Frequency Generator?
The InnoVet Summit is high frequency. Frequency refers to the speed of the waveform/x-ray beam production, and higher frequency means it’s faster with a higher penetration power.
This results in consistency and efficiency—with excellent precision, tissue penetration, and image quality.
There is also a narrowing of the x-ray beam spectrum, which means a lower dose of radiation to your patients.
Efficient Operation
Since high-frequency generators are more efficient, they only require a standard mains electrical supply (unlike older units that required a three-phase electrical supply).
Plus, efficient operation means a generator is more compact in size and not as heavy.
Preprogrammed Settings for Fewer Retakes
Instead of physical dials, the high-frequency generator offers preprogrammed settings.
This means rather than doing calculations, your staff can simply choose the type of study being performed (for example, thorax or hips) and use the patient’s measurements. The machine does the rest.
With less room for confusion, your x-ray studies are less likely to need a lot of retakes.
Minimal Motion Blur
Since a more powerful x-ray beam is produced in less time, motion blur artifacts will be minimized as much as possible.
This is especially important in veterinary medicine, where motion blur is a common challenge in pets who are nervous and moving around. Even sedated pets may take deep breaths as you try to obtain thoracic and abdominal views, so shorter exposure times are to your advantage.
Flexibility and Adaptability
The unit works with all film and any CR or DR digital system, including 8” x 10”, 10” x 12”, and 14” x 17” cassettes in either long or cross direction.
This gives you the ultimate flexibility with your preferred method (and adaptability if you are looking to update from film to digital down the line).
And since the table and generator only require a 35” x 56” floor space, you have choices as to where to place your new x-ray system within your practice, especially if you have limited space.
Excellent Safety Standards
A powerful and efficient x-ray beam may allow you to lower the kV setting compared to lower frequency generators. This reduces scatter radiation—which is great for your images, and also for safety.
The collimator exceeds federal standards for radiation leakage protection. And a 20-foot cord for the footswitch allows staff to be out of the room during exposures.
An Ideal, Easy-to-Use Collimator
The collimator features high-intensity lighting for accuracy and ease of use, as well as “soft start” bulb power circuits that double bulb life. A selectable “on” time for the light allows you to set the collimator timing to your liking at 30, 60, 90, or 120 seconds.
A convenient swivel mechanism facilitates table-top procedures.
And the unit is designed for use with clunky lead gloves, along with a rubber edge to help prevent head injuries while resetting and repositioning.
What to Look For When Purchasing the Innovet Summit powered by Americomp X-ray table and generator…
The brand name. InnoVet products were started by veterinarians, for veterinarians. And Americomp has offered high-quality standards since 1987. It’s best to go with a brand you know and trust.
Shipping and installation. Find out if these costs are included.
Monthly payments if you prefer a plan that will help you earn a return on your investment right away by simply using the equipment a couple of times per month.
A good warranty to protect your investment.
High-frequency technology, for all the reasons listed above.
New or used units, depending on your needs. High quality used veterinary equipment is available at usedvetequipment.com (https://www.usedvetequipment.com/). If you don’t see what you need today, check back frequently for updated and added listings.
Optional features such as tabletop extensions, tie-down brackets for restraint, and an out-of-room exposure switch.
A Special Deal on the InnoVet Veterinary X-ray table and generator…
We are offering the Innovet Summit, powered by Americomp, X-ray table, and generator at an amazing price (with convenient outright or monthly payment options), including free shipping and installation, as well as a 5-year warranty, free Simplex cassette tray, and several optional features, to suit your practice’s needs.
And contact us any time with questions 877-545-1202

How to Decide Between Cesium and Gadox Panels for Digital X-ray

Comparing Sound and Idexx digital x-ray.
Equipment purchases are a large but important investment for patient care and for the financial success of a veterinary practice.
While diagnostic imaging purchases may seem daunting, it helps to take the process step by step to figure out what’s best for your clinical needs and budget.
As a starting point, here are a few things to consider…
Sound and Idexx Veterinary Equipment Companies
Sound and Idexx are two widely used sources of digital radiography systems in veterinary medicine.
This includes options such as an entire x-ray system (equipment, software, and support), or having flat panel detectors retrofitted into your current equipment.
Sound claims their advantages are:
Being the #1 provider of veterinary digital radiography, and supporting vets since 1996.
Their software, MUSICA, which is highly regarded for excellent quality image processing, optimization, and consistency (across different species, users, and techniques), and includes features such as a 3D position assistant for readily available positioning guides for less common views.
Excellent quality images and equipment.
A strong focus on education and training so you can easily use your equipment and get the most out of it. Courses are available through the Sound Academy of Veterinary Imaging via board-certified instructors.
Long-term relationships with panel manufacturers—which is a good thing when it comes to long-term product support.
24/7 live phone support.
Headquartered in the US (Carlsbad, CA) with in-house production and repairs.
According to Idexx, their advantages include…
Sharp, high-resolution images obtained in less than 5 seconds.
Availability of their patented Irradiated Side Sampling on Cesium panels, which raises the detection layer near the top of the scintillator crystals. This means the x-rays have less distance to travel, creating a sharp image at the lowest radiation dose on the market (see below for more information on scintillator layers).
Idexx Web PACS advanced viewer, powered by AI for faster viewing and easy sharing, and with a reference image library to help clients see abnormal findings compared to a normal image.
Integration with practice management software.
24/7 support.
Idexx telemedicine consultants.
An online learning center.
While Idexx and Sound and two major players, there are other companies out there, too.
And of course, each company offers a variety of products, so you can find the technology and a price point that’s a good fit for your needs.
When making a purchase decision, do your research and ask plenty of questions to figure out what’s best for your practice.
The technology and terminology can be a little confusing for new and experienced practitioners alike, especially if this is your first big radiology purchase.
We can’t cover everything in the scope of one article, but here’s some information about common types of DR flat panel detectors…
Cesium, Gadox—What Does It All Mean?
Cesium and Gadox refer to two possible substances that could be used in the scintillator layer of an indirect flat-panel detector.
Now, that’s a mouthful, so here’s what it all means…
A flat panel detector is a panel or plate you use to capture digital images with your x-ray machine.
There are two types of flat-panel detectors: direct and indirect. In a nutshell, direct panels convert x-ray photons into an electric charge, while indirect panels first convert x-rays into light and then into an electric charge. Either way, the final image is read out by a detector layer that contains millions of pixels.
Within an indirect flat panel detector, the scintillator layer is the one that absorbs x-rays and converts them into visible light.
This scintillator layer is most commonly made of either cesium iodide (Cesium) or gadolinium oxysulfide (Gadox).
Gadox is produced by formulating a liquid that hardens into thin sheets.
Cesium, on the other hand, is a bit more complicated to produce in a uniform way because it is “grown.” Cesium is composed of crystals that grow upward (acting as “tubes” for light to pass through) after being formulated and heated.
That means sometimes the composition and quality of Cesium can vary, although reliable manufacturers generally have good quality flat panels whether they use Cesium or Gadox.
What’s Better—Cesium or Gadox?
Each substance is useful and can produce good quality x-ray images.
A major advantage of Cesium is its high sensitivity to the x-ray signal. In addition to producing a clear, detailed image, this also means that images can be produced at a lower x-ray exposure.
Gadox can also produce clear, detailed images—but it requires a slightly higher exposure (within 10% difference) dose.
It’s worth noting that the higher sensitivity of Cesium can also lead to higher noise in the image, but Cesium is generally considered to deliver excellent quality images.
Also important is the fact that the price varies between Cesium and Gadox. Because the process of producing Cesium is more complicated and less consistent than with Gadox (as described above), good quality Cesium flat panels cost more than standard Gadox.
Finally, there is a consideration of how and where the panel will be used. Some veterinarians state that Cesium is less reliable in temperature extremes, and thus they prefer Gadox for their large/equine practices and other mobile practice needs. But this preference may vary between individual veterinarians.
Additional Questions to Ask
As many veterinarians will tell you, your equipment and the initial investment is only part of the story.
It’s also important to calculate ongoing costs, such as renewing warranties, service costs, software updates, and support, and storage fees for digital images. And, is loaner equipment available if a repair is needed?
Another consideration is the expected lifespan of the equipment, and whether support may eventually be discontinued on older models or parts (asking about where the company obtains their equipment is one way to learn more, so you can research the manufacturer).
Before you buy, it’s also a good idea to look at a variety of images from the equipment you’d like to purchase—at the very least, compare a large dog abdomen and a small cat paw, to view details over a range of sizes.
You can ask for a demo from the equipment company or distributor, or ask for the names of colleagues in your area who have purchased the same equipment who could tell you about their experience.

Keeping all these things in mind will help you choose the best option for your veterinary practice, whether you’re considering Idexx or Sound, Gadox or Cesium panels, or even CR or anything in between.
Written by: Dr. Tammy Powell, DVM

Choosing the Right Location for Your Vet Hospital or Clinic

When starting your own veterinary practice, location is one of the most important decisions you make.
Here are some considerations to help you pick the perfect place…
Where Do You Want to Be?
If you’re firmly rooted in your current location—due to family or a strong tie to the community—then go ahead and explore the options in your town or nearby within a reasonable driving distance.
But, if you’re more flexible, looking outside your city may present more options to choose from.
If you’re staying close to home, remember to look at the non-compete clauses of all the practices you’ve worked for recently.
What Do You Need to Consider About Your Desired Location?
So, you have an idea of where you’d like your future practice to be. But, how do you know that location will be sustainable for your new business?
Evaluate your potential location(s) for…
Visibility/prime location in the community.
A high-traffic area may help new clients find you. But, a prime location can also be more expensive.
Ease of access.
Is it convenient to reach your practice from the road? Is there plenty of parking? Is there a spot for dogs to go to the bathroom?
Is there enough space?
Consider anything you might want to add in the future (such as a boarding facility)—will there be enough room on the property for this?
What’s the veterinary community like?
Is the area already saturated with the competition? Or, is there room for one more?
What will differentiate your new practice from other veterinary businesses in the area?
What’s the clientele like?
Is the average income in the area consistent with the prices you’re planning to charge for your services?
Which businesses are your neighbors?
A dog grooming salon could be a perfect neighbor to form a mutually beneficial relationship with. On the other hand, sharing a wall with a club that plays loud music might not be good for keeping pets calm.
Is the population growing or declining?
For many of these considerations, it’s best to work with a veterinary or start-up consultant.
Do You Want an Existing Practice, Or Something Totally New?
Many experts report that existing practice is favored by lenders since there will already be an existing, provable business structure and cash flow.
But, the disadvantage of this option is that it may be harder to make changes and create a practice that’s truly your own. Existing staff and clientele may be expecting things to be done the same way they’ve always been done.
Here are some important questions if you’re thinking about buying an existing practice…
How was the asking price calculated?
You’ll also have the chance to get your own valuation with a consultant, to be sure the price is appropriate.
What’s included with the sale, and what isn’t?
Don’t assume the x-ray machine and other equipment are included (and in good working order), only to find out they’re not.
Why is the current owner selling? What are their plans for their own career after the sale?
Are there any special terms or conditions?
Other buying options include:
an existing non-veterinary structure
or building your own practice from the ground up.
Each of these options has its own pros and cons.
When purchasing an existing non-veterinary building or unit, look into what sorts of renovations are needed to create space for major equipment, a surgery suite, exam rooms, etc.
This may be a good in-between option that allows you to build your own practice culture, and that’s less expensive than starting from scratch with a new structure—assuming the renovations aren’t price prohibitive.
If you decide to build your own practice, you’ll have the most freedom in terms of seeing your own dream practice come to life.
But, this option can be very expensive, and it will take time to build a clientele. You’ll need a solid business growth plan to show lenders they can take a chance on you.
Should You Rent Or Buy?
Here are some things to consider about renting…
A leased space may be less expensive than buying (according to some consultants, your loan will be half or even just a quarter as much as buying a practice).
You may be limited in renovations and expansion potential.
How and when will the rent go up?
Are repairs (such as a plumbing leak) covered by you or the landlord?
When buying, think about these factors…
Is the higher loan amount realistic for your immediate income needs?
Will the current owner cover repairs that are needed right away? You certainly don’t want to buy a practice only to discover an expensive foundation or roof repair is needed!
How Do You Figure All of This Out?
If you’re working and have your hands full with a packed appointment schedule, you may be wondering how you’ll find the time to do all this research and make an informed decision.
That’s where the right consultant (or team of consultants) comes in. Experts you work with may include a: veterinary consultant, start-up consultant, veterinary practice appraiser/valuator, accountant, banker, architect, real estate agent, attorney.
Every situation is unique, so your list of consultants may look different than this. In general, try to find professionals who have experience with veterinary practices and understand the nuances of your industry.

All of this may take time, but it’s important to have patience. Rather than rushing into something that isn’t quite what you wanted, you’ll be excited the day you open the doors to your dream practice!
Written by: Dr. Tammy Powell, DVM

Top Features of the Mindray Vetus 9 for Veterinarians

Transforming Veterinary Diagnostics with the Mindray Vetus 9 Ultrasound System
In the growing field of veterinary medicine, staying at the forefront of diagnostic technology is key to providing exceptional care to patients.
Adding or upgrading to an advanced ultrasound system not only benefits your practice, but your staff, and your patients.
More notably, it’s a way to uphold our ongoing promise to our clients and community to provide the best possible patient care.
The Mindray Vetus 9 Ultrasound System is a transformative tool that can significantly enhance your practice's in-house diagnostic capabilities. It delivers advanced imaging and user-friendly features, positioning it as a leader in the market.
Let’s take a moment to unpack some features that make this a dynamic and innovative diagnostic resource.
Unparalleled Imaging Quality
Many veterinary ultrasound systems on the market still rely on older beam-forming technologies, which may compromise clarity and consistency, especially in deeper or more complex imaging.
The Vetus 9 is powered by the innovative ZONE Sonography Technology+ (ZST+), which shifts from traditional beamforming to advanced channel-based processing.
This evolution enables real-time imaging with remarkable clarity, ensuring that superficial and deep anatomical structures are displayed precisely.
Features like Zone Imaging and Dynamic Pixel Focusing maintain consistent focus across the entire field of view, helping to enhance our confidence in discoveries and diagnoses.
Versatility Across Veterinary Specialties
While other systems might excel in specific niches, the Vetus 9 provides a well-rounded solution that caters to needs ranging from routine diagnostics to specialized cases.
Designed to meet the needs of veterinary practices, the Vetus 9 ultrasound offers specialized solutions for both abdominal and cardiac assessments. Let’s look a little closer:
Abdominal Imaging: Enhanced Contrast Imaging (UWN+) utilizes second harmonic and non-linear fundamental signals. This means you can expect improved sensitivity to subtle lesions and discrete abnormalities.
Cardiac Imaging: The Tissue Doppler Imaging Quantitative Analysis (TDI QA) feature allows for detailed myocardial movement and synchronization assessment. This feature offers insights into cardiac functions crucial for diagnosing and managing cardiovascular conditions in veterinary patients.
While some systems may include elastography (an ultrasound technique used to measure elasticity or stiffness of tissue) or Doppler imaging, they often lack the same level of veterinary-specific customization found in the Vetus 9.
Its Sound Touch Elastography (STE) provides real-time analysis of tissue stiffness, helping to evaluate conditions like tumors or liver fibrosis.
Enhanced Workflow and User Experience
The Vetus 9 is designed with user-friendly features that streamline workflow, including:
Advanced Display: A 23.8-inch full-screen display provides crisp, large images, while a 15.6-inch full-HD touch screen offers intuitive interaction, making it easier to navigate through imaging options and patient data.
Portability: Many high-end ultrasound systems are bulky, limiting mobility and convenience. This system's compact design, folding down to a height of just one meter, makes for easy transport for mobile veterinary services. Its slim 55 cm body width allows smooth navigation through doorways and clinical settings.
Other systems may offer smaller displays or lack the combination of a high-definition touchscreen and a large viewing screen, which can affect the overall ease of evaluation.
Comprehensive Support and Training
Investing in the Vetus 9 comes with the assurance of comprehensive support in the form of:
Training: Your team will receive 16 one-hour remote training sessions, allowing time for practice and questions and ensuring proficiency in using the system's full capabilities.
Warranty: A five-year warranty provides peace of mind, reflecting the system's quality and a commitment to customer satisfaction.
Elevate Your Practice
Incorporating the Mindray Vetus 9 Ultrasound System into your practice enhances diagnostic accuracy and elevates the standard of care you provide to your patients.
Its advanced imaging capabilities, versatility across specialties, and user-friendly design make it a valuable addition to any veterinary practice committed to upholding its promise of exceptional patient care.
For more information or to learn more about how the Vetus 9 can meet your practice's specific needs, check out the Mindray Vetus 9 Ultrasound System page on our website.

Equipment Options for Your New Veterinary Practice: New-Used
If you’re ready to take the leap and open the veterinary practice of your dreams—or if you’re still exploring options and seeing if practice ownership is right for you—finding the veterinary equipment you need is an important part of the process.
After all, it’s difficult to diagnose and treat patients without the proper tools.
Depending on the type of practice you open, your equipment wish list may include…
X-ray and ultrasound machines.
In-house bloodwork analyzers.
Surgical lights, an autoclave, and anesthesia monitoring equipment.
IV pumps.
Exam room tables.
Kennels.
A scale to weigh patients.
A tonometer for measuring intra-ocular pressures.
A dental cleaning unit.
Computers, and veterinary clinic software.
Credit card processors for payments.
A washer and dryer.
Separate refrigerators for medications and for your staff to keep their lunches in, and a freezer for cadavers.
Specialty equipment, such as a vehicle for a mobile practice, and pneumatic drills, and an MRI for a neurology practice.
Plus, there are smaller items to consider, like otoscopes, blood pressure cuffs, staff uniforms, and all your daily supplies like needles, syringes, and gloves.
With all this in mind, it’s not surprising that your equipment costs could add up to tens of thousands of dollars—or more—making your equipment a vital consideration when opening and financing a veterinary practice.
Not to worry, though, because you do have options.
Considerations for Purchasing Veterinary Equipment
Purchasing new equipment is certainly an option many practice owners pursue. It’s exciting to get the latest technology delivered to your practice’s door, and—depending on the type of equipment—installed by experts. And, the equipment should be in excellent condition because it’s brand new.
When buying new, it’s important to do your research, though. Be sure you’re getting good quality and the best value for your dollar.
Also, check the manufacturer’s or seller’s warranty—because there would be nothing worse than investing your money only to have a malfunction (less likely with new equipment, but possible) or have something get dropped or broken during the grind of daily practice.
And finally, ask about support and training. For example, who do you call when you have a question about the machine? And, does the company offer training to your staff, to ensure the equipment is used to its maximum potential?
Purchasing used veterinary equipment can also be an excellent option. Many machines are designed to last for years, and your colleagues may want to sell relatively new equipment in order to upgrade. This can be a great benefit to you because you can catch a real bargain.
For used equipment, we recommend usedvetequipment.com, a site exclusive to veterinary professionals looking to buy or sell veterinary equipment, with guidance on shipping and a moderator for payments. But, you may find quality used equipment through other online sellers or medical equipment specialist resellers, too.
With used equipment, inquire about the condition. Also, ask if there is a warranty still in place—you don’t want to miss out if it is still in place and transferrable.
Finally, consider maintenance costs with any equipment you buy. Maintenance is crucial for keeping your equipment running for as many years as possible, potentially saving you lots of money in the long run if you can avoid replacing your machines sooner than necessary. So, these maintenance costs should be factored into your budget.
Financing for Veterinary Equipment
If you have some cash saved up, you may be able to purchase some of your equipment outright. But, chances are you’ll need to finance at least some of your purchases.
For financing new equipment, check with the manufacturer to see if they allow payments over time. Some may have monthly payment plans. These plans take away some of your initial financial pressure since the money you bring in with the equipment can fund the monthly payment (for example, your x-ray fees can support your monthly payments for a good quality x-ray machine).
Alternatively, you could seek financing from a bank or other lender. The bank you’re working with on practice financing may include equipment costs as part of your loan, or as a separate negotiation. Or, you may reach out to another lender.
Typically, lenders refer to these loans for equipment as “capital leases,” and they may offer monthly payment plans.
The lender would own your equipment until the loan is paid in full, but there’s usually an affordable (as low as $1 for some institutions) purchase option for you once you finish all the loan payments.
When evaluating a lender or other equipment payment plan, here are some things to look for…
What’s the interest rate?
What fees are associated with the loan?
What is the loan’s term, or how long will you be paying?
Is there a purchase option once the loan is paid in full, and how much it will cost?
What penalties exist for late payments, paying off the loan early, or if you would like to get out of the lease?
The reputability of your lender (if it’s not the lender you’re already working with, do they have recommendations from the equipment sales representative or other veterinarians? Do they routinely work with veterinarians?).
Also, talk to a tax professional to find out if the depreciation and interest payments on your veterinary equipment are tax-deductible.
Your Overall Financial Picture
Before purchasing any equipment, it’s important to think through what the equipment will do for your patients, and what sort of return on investment you can expect.
For example, will you use the equipment often, or will it only be on rare occasions?
What training is required to learn how to use this equipment? What about client education on the benefit of the service? How many years is the equipment expected to perform?

A veterinary consultant, or financial professional who’s familiar with veterinary businesses, can guide you through these analyses and include these considerations in your business plan so your new practice can find the right balance of initial equipment purchases, then grow and thrive over time.
Written by: Dr. Tammy Powell, DVM

Top Features of Poskom X-ray for Mobile Veterinarians

Call: 877-545-1202
If you want to take an X-ray anywhere, a battery-powered generator is an excellent option.
The Poskom-powered portable X-ray generator offers the ultimate portability, making it a popular choice among mobile practitioners.
Capture X-ray Images Anywhere
Since the Poskom VET-20BT is cordless with long battery life, you’re not limited to an external power source during the course of your daily practice or on-call shifts.
That means that as an equine practitioner, you can conveniently use the machine in a barn or out in the field, without a power outlet nearby.
And as a small animal veterinarian, you can easily port your x-ray equipment with you—which is perfect for mobile practitioners.
No Cord, No Fuss
The Poskom battery-powered portable X-ray generator is cordless, which means it takes less time for you to set up for a procedure and then pack everything up again.
No cord also means no chance of anyone tripping over the cord or of patients becoming entangled.
Wireless Technology
In addition to the power supply without a cord, the Poskom VET-20BT also uses wireless communication between the generator and the plate.
Radio-frequency (RF) communication enables images to be captured without a wire between the generator and the DR interface.
Lightweight and Compact
The generator is only 36 x 20 x 17 cm (approximately 14 x 8 x 7 inches), and weighs merely 6.8 kg (15 pounds). This makes it the lightest, most compact battery-powered generator on the market.
If you’re short on storage space or need to carry your equipment all day, a compact, lightweight unit can really make your life easier.
Long Battery Life
With one full charge of the high-capacity lithium-ion battery, you get up to 300 exposures—which means you shouldn’t have to deal with a battery running low right when you need it!
For easy battery monitoring, the Poskom x-ray generator also features an energy balance indicator (so you know when to charge the battery) and an LED indicator for when the battery is fully charged (which usually takes just 2-3 hours).
And should you need to replace the battery (its lifecycle is over 5 years, with no maintenance required), you’ll find the process simple and easy.
High-Frequency Technology Means Good Quality
The compact Poskom VET-20BT features advanced high-frequency technology with 20 mA and 90kV capabilities.
High frequency means a strong power output, with stable/repeatable settings for consistent, high-quality images.
So you receive excellent images with fewer retakes.
Easy to Use
In addition to being lightweight, compact, and cordless, the Poskom battery-powered portable X-ray generator is simple to use, with the option of programming your favorite settings so you don’t have to adjust the settings every time.
The collimator features a dual laser alignment system and a push-button light with a 30-second timer.
The Poskom portable X-ray generator is cordless, lightweight, and easy to use. Capture clear images fast with wireless tech and long-lasting battery life

If taking an X-ray anywhere, without the need for electricity or an external power source, sounds good to you, click here to learn more. - https://newvetequipment.com/generators/tables/poskom-generator-x-ray
The Poskom VET-20BT is available for affordable monthly payments (so it can pay for itself and earn a profit right away with use each month), as well as a 3-year warranty.
Written by: Dr. Tammy Powell, DVM

10 Strategies to Boost Your Vet Practice Online & Offline

Even in the beginning stages of planning your veterinary practice, it helps to think about marketing alongside all the practical considerations like financing, equipment, and staffing.
Marketing is how you let potential clients know who you are, and what sets you apart from the competition. It’s what helps you bring in more and more clients as your practice grows.
With that in mind, today we have a list of marketing ideas for veterinary practices.
We’ll have in-depth articles on some of these topics down the line, so you can learn more. But for now, here are 10 ideas to inspire your plan for your very own practice…
1. Make Sure Your Website is Mobile-Friendly
Today, the largest pet-owning population in the US is Millennials. As you may have guessed, Millennials spend a lot of time online, especially on devices like smartphones.
So, it’s important to make sure your website shows up clearly and quickly not just on a computer screen, but also on a small, vertical smartphone screen. If you’re not sure whether or not your practice’s website is optimized for mobile, talk to your website host or manager.
2. Claim Your “Google My Business” Listing
This online listing is connected to Google Maps, and optimizing it can improve your rankings in online search results.
3. Content Marketing
This broad category includes things such as…
Blog posts and articles.
Email newsletters.
Client handouts and educational materials.
Testimonials or case studies (success stories of some of your patients, published with their owner’s permission).
Content marketing works like this…
Clients read informative content from you. Then, when the time comes for their pet to receive care, they won’t even look anywhere else… They’ll want to bring their pet to you, because they already feel like they’ve gotten to know you—and that they can trust you—after reading your blog posts or newsletter.
So, this is a long-term strategy. The good news is, the work you put in can help to develop long-term client relationships and promote client retention.
Plus, this is a convenient way to update current clients on new services you’ve added to your practice, as well as any specials or promotions.
If you’re not sure where to start—or, if you don’t enjoy writing—consider working with a professional veterinary copywriter, who can guide you and help you create content.
4. Online Reviews
Don’t leave your online reviews to chance, or in the hands of difficult-to-please clients (who are often the only ones who remember to take the time to leave a review).
We’ll have a more in-depth article later, but some simple strategies to encourage good reviews are simply asking happy clients if they would mind leaving a review (but don’t place pressure, or tell them what to say), and making it easy with a “Review us now” button on your website or in a post-visit email.
5. Use Social Media
Your social media platforms can be great places to engage with your clients (and thus reinforce their bond to your practice). It’s also great for announcing updates to your practice, and sharing specials and promotions.
The occasional fun contest or giveaway (such as having a small prize for captioning a cute pet photo) can also encourage clients to interact with you, and strengthen your client relationships.
6. Create Videos
Next to Google, YouTube is the most used search engine.
So, creating useful or cute videos for pet owners can help your practice show up higher in online search results and nurture a client’s bond to your practice.
Fortunately, nowadays you don’t have to be a tech whiz or own an expensive camera to produce a reasonable quality video. Most modern smartphones have a great camera that can be used for this purpose.
Video ideas include a tour of your facilities, introductions to staff members, short educational content for pet owners, and “how-to” videos such as a demonstration on how to properly clean a pet’s ears or give a pet medicine.
Post the videos on your website and social media, and ideally on YouTube, too.
7. Start a Rewards Program
Consider punch cards for products such as parasite prevention or pet food, to encourage pet owners to return to you for purchasing these supplies.
8. Start a Referral Program
Create an incentive—such as a small discount on the next visit—for current clients to refer friends to you.
9. Build Relationships With Other Community Businesses
For example, offer a first free exam to pets adopted from the local shelter or rescue organization, so that these businesses will refer new clients to you.
Or, develop a relationship with a local grooming or boarding facility. They can refer to you, and vice versa.
10. Hold Classes at Your Practice
This could mean puppy or kitten, socialization classes.
Or, it could mean an educational evening for pet parents on nutrition, first aid, or other topics of interest.
Consider holding these classes a couple of times per month to create a positive perception of your clinic, and to find new clients who are interested in providing a high level of care to their pets.

There are many other marketing techniques out there, but this should give you a great place to start—and hopefully, it’s sparked some ideas for seeing your veterinary practice grow and thrive!
Written by: Dr. Tammy Powell, DVM

Dental X-Rays: Tips for Accurate Vet Imaging Success

When it comes to evaluating a pet’s teeth, dental x-rays are the best way to see what’s happening “under the surface.” That is, under the gumline.
Dental radiographs help you obtain a full picture of tooth roots, evaluate for periodontal disease and damage, differentiate between different types of FORLs, and look for any other defects that may not be visible with your eyes alone.
Even though the value of dental radiographs (to both your patients and your practice) is hard to deny, there can be a learning curve when your team first begins to use them.
This is important, because in order for your x-ray images to be diagnostic, they need to be good quality.
Fortunately, with practice, dental x-rays become simple and routine—a process your team can quickly replicate for each patient.
Establishing a Dental X-Ray Routine
To make the dental radiograph process easy for you and your team—and as quick as possible for your patients—it’s best to establish a repeatable routine.
This means taking the same shots, in the same order, each time.
You may need a larger number of views depending on the patient’s size and the angle of their mouth, but in general you can start in the same place each time and move through your views systematically until images of all teeth and their roots are captured.
Use your digital software to set up the views in the order you prefer.
Once you establish a routine, it will only take a few minutes to shoot all views for a small patient. And large dogs should take a maximum of 15-20 minutes.
Positioning the Patient
Your patients will be under general anesthesia for their dental procedure, including dental x-rays.
After intubation, leave the patient in sternal recumbency, and simply place a towel under their chin to keep their maxilla parallel to the table. Then obtain your views of the maxillary teeth.
When you finish the views of the maxilla, move the patient to dorsal recumbency, this time using a towel or other prop under their neck to keep the mandible parallel to the table as you obtain your views of the mandibular teeth.
You can use a trough or sandbags to stabilize the patient and keep them from tilting to the side, if needed.
Adjust this plan if you find that another method better suits your needs. For example, you may find that lateral recumbency works best for you for some views.
Whatever system you choose, we recommend repeating the same steps each time and using a method that minimizes the number of times you need to move the patient.
Sensor or Film Placement
Select the right size sensor or film for your patient. For most veterinary patients, this would be either a size 2 (for small dogs and cats, or views focusing on a single tooth) or a size 4 (for large dogs, or for full-mouth/whole quadrant radiographic views).
Whether you’re using a sensor for digital x-rays, or regular dental film, placement is important to ensure you can see all of each tooth root. Remember the roots are much longer than the crowns (twice as long with canine teeth), so position your sensor accordingly.
Finally, determine which side of the sensor or film should be positioned toward the x-ray beam. This may be indicated by a small dot or “dimple” on films. If you have a digital sensor, the cord side should face away from the tube and the cord should exit the front of the patient’s mouth.
Beam Placement
A parallel angle is used for the mandibular premolar and molar teeth. For many pets, this part of the mouth allows the sensor to be placed parallel to the teeth, and the beam to be shot straight forward (perpendicular) into the sensor.
The rest of the mouth, however, prevents this placement (the palate and mandibular symphysis get in the way). So, you’ll need to use a bisecting angle for the rest of your shots (and possibly for the rostral mandibular premolars).
A bisecting angle might seem complicated, but it’s important—choosing the correct angle prevents distortion (lengthening or shortening of the tooth root in your image).
Here is how to determine the bisecting angle:
Position the sensor within the mouth behind the teeth you want to x-ray, as if the patient is biting on it (use gauze or other aids to hold the mouth open so there is no pressure from the teeth that could damage the sensor).
Estimate the angle between the tooth root and the plate.
Divide this angle in half, and draw an imaginary line with your mind.
Position the x-ray beam perpendicular (at a right angle, or 90 degrees) to this line you’ve just imagined.
If the tooth root is too long on your image, raise the angle of the tube relative to the sensor. If the root is too short, lower the angle of the beam (move it more parallel toward the sensor).
Developing a Simplified Technique
Using a simplified technique can allow you to skip the bisecting angle measurement. For example, one described technique uses just three angles for all oral views…
90 degrees for mandibular molars/premolars.
70 degrees for maxillary molars/premolars.
45 degrees for canines and incisors.
Since you can position these angles on your tube head without measuring (many units have predetermined angles marked by the tube head), this makes positioning much easier and faster for you and your staff.
Exceptions, Views of Specific Teeth, and Further Training
These guidelines are a good starting point for many patients. But, you may find you need to adjust your views to accommodate certain dogs and cats, depending on the shape of their mouth and tooth roots.
Cats in particular may need steeper angles than dogs to minimize interference from the zygomatic arch. And some patients will have tooth roots that curve significantly.
For all of these reasons, and for the benefit of hands-on experience, it helps to schedule a demo of your equipment, or to find an in-person training opportunity for your staff. That way, you can maximize your return on investment by using your dental radiography unit to its fullest potential.

Any time spent developing the proper technique for positioning will be well worth it, as you’ll be able to quickly take views that aid your treatment decisions and deliver value to your clients.
Disclaimer: This article is for general informational purposes only, and not intended as a guide to the medical treatment of any specific animal.
Written by: Dr. Tammy Powell, DVM

Midmark vs Dentalaire: Best Dental X-Ray Options for Vets

Midmark Dental X-Ray and Dentalaire Dental X-Ray for Veterinarians
Dental radiography is generally considered part of the standard of care for veterinarians who perform dental cleanings, extractions, and other procedures in their practice.
There are many reasons why dental x-rays are important. Just a few examples include: identifying different types of FORLs to determine the best course of treatment, confirming full removal of all root tips during a difficult extraction, discovering and documenting pathology such as the full extent of damage from periodontal disease and whether the location of a missing tooth is hiding a dentigerous cyst under the gumline.
If you’re new to dental x-rays or looking to replace or upgrade your equipment, here are some important considerations, as well as information on two major equipment providers: Midmark dental x-rays and Dentalaire dental x-rays.
Considerations for Purchasing a Dental X-Ray Unit
Here are a few questions to ask yourself (and discuss with sales reps and colleagues) prior to your purchase…
What equipment do you need? Do you need to purchase EVERYTHING? Or, do you just need a new sensor… a new generator or processer… or new software? If you don’t need an entirely new unit as a whole, purchasing just the pieces you need can save significant money. Just check for compatibility issues if you are purchasing components from a different manufacturer or newer components to pair with older models.
What’s your dental x-ray space like? Do you need a wall-mounted unit or something on a stand? Or even something handheld?
What type of service contract or warranty is provided? What are the ongoing and renewal costs? Is bite damage for sensors covered? And is loaner equipment provided while your equipment is being repaired?
How is the software? Is it user-friendly? Does it provide all the functions you need?
What type of sensor(s) do you need? Are you interested in film, CR (phosphor plates), or DR?
Some practitioners like DR for its speed, but dislike the limited size options and rigidity of the sensors. DR is also more expensive to replace. Film and CR, on the other hand, are generally available in sizes ranging from 0-4, to cover small, medium, and large patients. And CR can still be pretty fast. Opinions and preferences vary, so you’ll need to see what works best for you.
Does your staff know how to take dental x-rays? There’s a learning curve, so ask about training provided by the seller, if available.
Comparing Midmark Dental X-Ray and Dentalaire Dental X-Ray
Midmark and Dentalaire and both excellent providers that offer a wide array of dentistry equipment, including anything you’d need to start doing dental x-rays or update/replace your current equipment.
Here are some of the main selling points advertised by each company:
Generator settings and usability: Both Midmark and Dentalaire note their dental x-ray generators are user-friendly and simple to operate, with intuitive, easy-to-read displays and veterinary-specific options. Both have options to input your own settings or to use pre-programmed techniques. Additionally, Dentalaire notes that exotics and extremity settings are included.
Positioning arm: Both providers claim a well-constructed positioning arm that’s easy to move, with precision braking for preventing drift.
Image quality: Both Midmark and Dentalaire dental x-ray systems are generally well regarded by veterinarians for image quality. Additionally, they each advertise a focal point of 0.4mm for high-resolution images with sharp, clear details.
CR equipment: Midmark and Dentalaire both offer CR sensor plates in all sizes, as well as readers.
DR equipment: DR technology is continuing to evolve!
In fact, Midmark notes that they have the world’s first bite-resistant sensor, and they stand behind it with a 5-year warranty (including one free sensor replacement in case of catastrophic damage).
Dentalaire advertises a sensor that is also resistant to bite damage, especially when paired with their protective boot covering, and they offer a 3-year warranty for upgrades.
For both companies, DR sensors come in both size 1 and size 2.
Software: Both Dentalaire and Midmark have comprehensive and user-friendly software with DICOM capabilities and compatibility with PACS. Midmark advertises that their software integrates with leading practice management systems and offers the ability to enhance images. Dentalaire notes they have customizable patient reports and advanced image comparison available on-screen.
Training: Dentalaire offers four hours of on-site training in dental x-ray positioning. Midmark also offers in-clinic training, and their training is RACE approved for CE credits for both veterinarians and technicians.
Support: Each company offers technical support.
Conclusion
There are several excellent providers of veterinary dental x-ray equipment. Midmark and Dentalaire and two major contenders, and both have great offerings. The one you choose may come down to personal preference.
Consider asking your sales reps or providers for demos, and for references of other veterinarians who have the equipment and can give you the pros and cons they’ve experienced.

Also, ask about any ongoing or additional costs. By having as much information as possible, you can find the equipment that’s the best fit for your individual practice.
Written by: Dr. Tammy Powell, DVM

A Beginner’s Guide to Pathology Using Ultrasound

Sometimes, radiographs just don’t show the whole picture…
That’s especially true for analyzing the details of soft tissue structures—especially in the abdomen, but in other parts of the body as well.
Limitations of radiographs
One problem you may run into with radiographs is a “silhouette sign,” which basically means that two areas with a similar opacity border one another in your x-ray views. This makes it difficult to tell where one structure begins and the other ends.
A good example of a silhouette that could cause confusion is when the abdomen is full of fluid. Since fluid is approximately the same opacity as the abdominal organs, they may blend together, making it difficult to evaluate the abdominal structures.
In cases like this, an ultrasound can provide additional information. And, ultrasound has many other uses…
What an ultrasound is especially useful for
Radiographs can provide a lot of valuable information. But, they can’t always provide fine detail about texture, small defects, or other abnormalities of soft tissue structures. That’s especially true if the abnormalities don’t result in a big change in opacity or in organ size.
Therefore, ultrasound is often superior for detecting changes within an organ, especially if the change is small, in the early stages of a disease, or otherwise difficult to view on radiographs.
This may include conditions such as…
Nodules or masses within an organ such as the liver, which aren’t large enough to change the radiographic silhouette/size of the organ.
Pancreatitis or certain other disorders of the pancreas.
Calculi of the urinary bladder that are radiolucent.
Details of the gallbladder, an organ that is often difficult to see on radiographs since it is overshadowed by the liver.
Abnormal blood vessels, such as a portosystemic shunt.
Detailed cardiac evaluation, including diagnosing enlargements, congenital abnormalities, neoplasia, and more.
These are just a few examples—an ultrasound has many uses clinically!
Of course, there are some lesions that are better diagnosed using radiographs rather than ultrasound, especially in areas of the body that don’t transmit sound waves well (such as the lungs).
And, by looking at your x-ray views and ultrasound study together, you’ll get more information than you would with either technique by itself.
So, it’s not a matter of choosing between radiographs and ultrasound—instead, they work very well when used together to see the whole clinical picture.
How to use an ultrasound
It takes some experience to get the hang of directing your ultrasound probe and interpreting the images. Taking a course is often the best and fastest way to become proficient.
However, even though the process of performing an ultrasound study is different from obtaining radiographic views, some of the basic principles of interpretation remain the same for both.
Rely on the same good practices you do when reading a radiograph, such as…
Have a system and evaluate each organ (and spaces between the organs) in an order that works for you. Do it the same way each time, to be sure you don’t miss anything.
Examine cross-sectional images together—meaning views that are 90-degrees apart—of each area of study. An ultrasound, like an x-ray, produces a two-dimensional image. So, you’ll want to move the probe to look at each area at different angles (just like orthogonal views provide a complete picture when taking radiographs).
When in doubt, seek a consultation with a radiologist who can help you interpret your images.
Just like any other part of your clinical skills, ultrasound technique, and interpretation will come with time.
After all, they call it clinical “practice” for a reason—practice makes perfect.
But with a little time, you’ll likely see a good ROI on your investment since you can diagnose in-house rather than referring—and may find your ultrasound very useful if you need more diagnostic information in a pinch.

Ask for a free demo at your hospital to learn more.
Written by: Dr. Tammy Powell, DVM

Nomad Pro 2 Dental X-Ray Generator Benefits Your Practice
Dental radiographs are an important part of your patients’ dental care. These images allow you to diagnose dental or periodontal pathology, form the best treatment plan, and confirm the successful removal of any extracted teeth.
When it comes to dental x-rays, you have a lot of options in terms of finding a unit that suits your needs and your practice style.
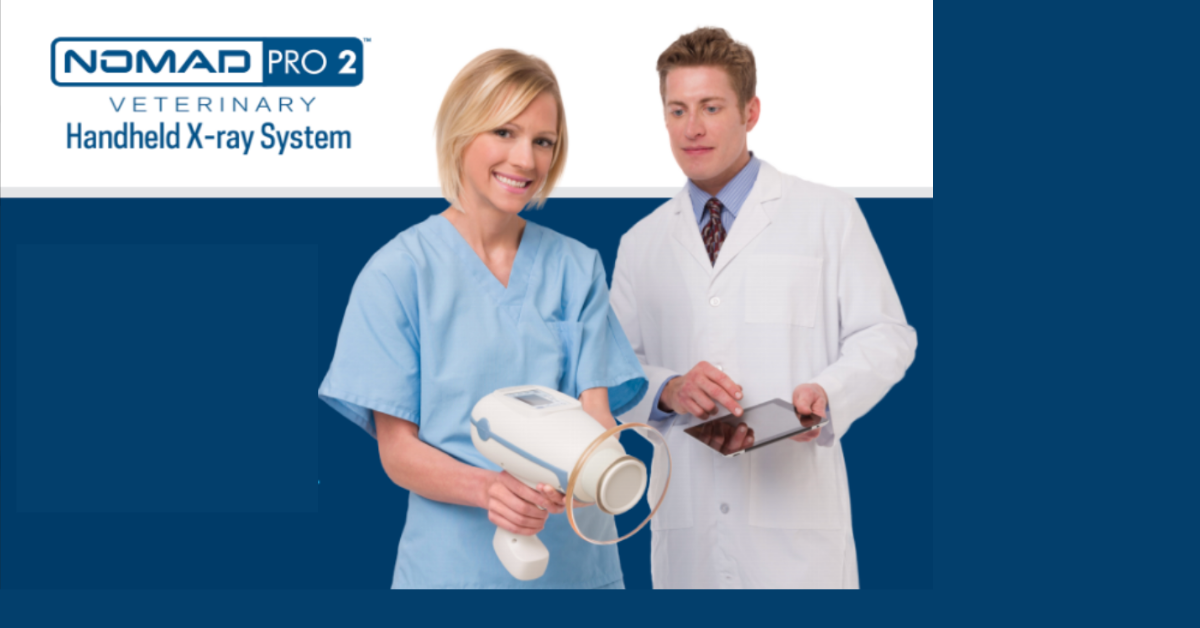
If you’re looking for flexible use and high quality—especially if you’re a mobile practitioner, a practice where space is at a premium, or just like the convenience of a handheld unit—a Nomad Pro 2 dental x-ray generator from Aribex may be right for you.
How Can a Nomad Pro 2 Dental X-ray Generator Help Your Practice?
Every practice has different needs. For example, maybe your practice space or setup dictates the type of equipment that’s best for you. Or maybe the right payment plan, equipment capabilities, or required training for use may help you make your decision.
The following benefits of the Nomad Pro 2 Veterinary dental x-ray generator can meet the needs of many different practice styles and setups…
Simple and convenient operation. The generator is light to hold and easy to operate. Rather than being attached to a cart, a wall, or any other fixed structure, the generator is handheld, weighing merely 5 ½ pounds (2.5kg).
An ergonomic grip and an intuitive, simple display for the settings also allow for ease of use.
Easy setup. There’s no installation or re-wiring required—and no need to renovate your clinic to set up for dental radiographs. With a small, portable unit, you can make any table or space into an effective x-ray station.
Move the unit, not the patient. You can capture images from any angle, even difficult or oblique angles, without excessive repositioning of the patient.
Flexibility for your practice. Capture images anywhere! The cordless, battery-operated unit is suitable for dental, small animal, exotic, and equine use, and for use with film, phosphor plates, and digital sensors.
Location independence. Choose the best spot in your clinic for dental radiographs, without being limited by tight spaces. Handheld units are also ideal for mobile practitioner needs, and the generator may be used outdoors.
Safety for staff and patients. The unit operates with low radiation exposure.
Compare the annual, whole-body radiation exposure between the Nomad Pro 2 dental x-ray generator and other common exposure scenarios:
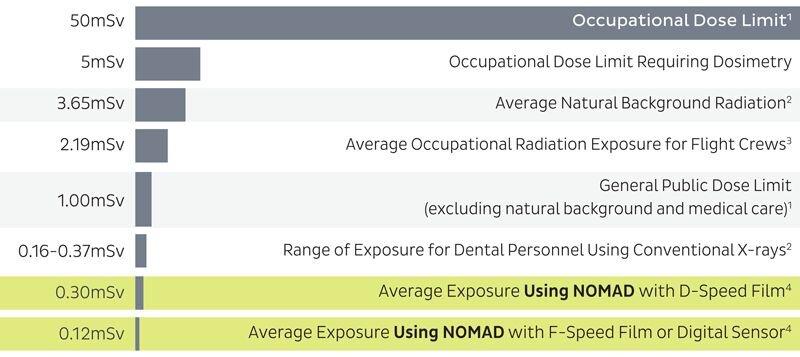
Internal shielding (which prevents leakage from the x-ray source) and external shielding (to block backscatter radiation) also contribute to safety, protecting your team from unnecessary radiation exposure.
This also means your team member can stay with the patient while taking x-rays.
Consistently sharp, clear images. Specifications include a 0.4mm focal spot, 60kV DC x-ray generation, and an mA of 2.5. The generator allows your team to quickly capture high-quality images.
Affordability. The easy setup, without major installation, makes it easy to get started. And simple monthly payments mean the generator can pay for itself each month—so you can start making a profit and return on investment right away.
Tips for Getting Started
Use the best financing option for your practice. Low monthly payments mean you can make a profit right away just by using your new generator a couple of times per month.
And if you need an intraoral sensor and software to go with your generator, ask us about an affordable bundle that includes all three.
Protect your investment. Ask about a warranty for your machine.
Invest time informal training. You probably know that new equipment is best utilized if your team feels comfortable using it. By training your team to take all the dental views you need, they’ll be able to comfortably and effectively capture images in a matter of minutes.
Work the cost of dental x-rays into your estimates. Client education can help your clients understand why dental x-rays are so important with any dental procedure. And by including the cost together with your dental procedures (rather than as an “add-on” service), it helps convey that dental radiographs are a necessary part of your patient care plan.

Envision what it would be like to have a quick and easy dental x-ray system in your practice, to help improve patient care and improve your bottom line.
Any questions about how a Nomad Pro 2 dental x-ray generator from Aribex can fit into your practice space, workflow, or budget? Just give us a call or contact us here!

Ultrasound Techniques: Visualizing the Adrenal Glands

The adrenal glands, those tiny but very important glands, can be tricky to find and evaluate during an ultrasound exam.
However, having a system and knowing where to look can make your job much easier.
There are many reasons you want to visualize the adrenal glands on every scan, including checking for neoplasia and other masses and looking for any changes that could be associated with Cushing’s or Addison’s disease.
Here are some tips to help save you time and allow for a clearer view of these small glands…
Have a repeatable system
When you perform an abdominal ultrasound, it’s important to have a systematic approach to look at everything. And that includes keeping small structures like the adrenal glands and abdominal lymph nodes on your list, so they don’t get overlooked.
Do your scan in the same order every time—whether that’s cranial to caudal, clockwise, or some other system that works for you—and it’s much less likely that anything will be missed or any abnormalities overlooked.
Adrenal gland landmarks
The right and left adrenal glands are respectively located near the right and left kidneys. However, the kidneys are relatively large, whereas the adrenal glands are small. So, the kidneys can overshadow these small glands.
The kidneys are the first things you’ll locate because they’ll point you in the right general direction. After that…
Vascular landmarks are most helpful when it comes to locating the adrenals.
Specifically, the aorta, caudal vena cava, renal vessels, and mesenteric artery are what you’re going to be looking for.
Color Doppler can help you visualize the vessels.
Also note, if the patient allows you to apply gradual pressure, it helps to minimize the distance between your probe and the glands as much as possible.
Finding the LEFT adrenal gland
The left adrenal gland is located ventrolateral to the aorta and cranial to the left renal artery.
Start by scanning the left dorsal mid-abdomen and visualizing the aorta in a long view.
Find the spot where the left renal artery branches off from the aorta, and just cranial to that you’ll see the left adrenal gland.
Finding the RIGHT adrenal gland
The right adrenal gland is dorsolateral to the caudal vena cava, and just cranial to the cranial mesenteric artery. It’s also more cranial and dorsal compared to the left adrenal gland.
Scan the right cranial abdomen, with the caudal vena cava in long view.
Apply some pressure with the transducer which will cause compression of the caudal vena cava and help you visualize the right adrenal gland. The gland is right next to the vessel, slightly oblique to it.
Are the adrenal glands normal?
Evaluate the qualitative properties of the gland, and then measure the glands from their cranial pole to caudal pole. Also, measure the thickness of each pole.
Normal adrenal glands are hypoechoic to surrounding fat, and have a characteristic “peanut” shape (although the right adrenal may have more of an “arrowhead” appearance). Typically, adrenals are 4-7mm thick in dogs and 3-4mm thick in cats.
Abnormalities may include…
Evidence of hyperadrenocorticism.
If pituitary-dependent, the adrenal glands may be normal in appearance, or they may be “plump” (symmetrically enlarged). An ultrasound exam alone is not enough to diagnose Cushing’s, but may be helpful in context with additional diagnostic tests.
If adrenal-tumor related, you may be able to visualize a mass.
Evidence of Addison’s disease or hypoadrenocorticism.
You may notice smaller or thinner adrenal glands. As with Cushing’s, you’ll want to use this information in conjunction with clinical symptoms and other diagnostic tests.
Adrenal masses.
Many are incidental findings only.
Pheochromocytoma is a possibility.
Malignancies are possible and may lead to invasion of adjacent tissues, especially blood vessels.
You’ll use your clinical judgment and the patient’s clinical signs to help you determine whether more diagnostics are needed, or to start by monitoring the growth with repeat ultrasound exams over time.
Age-related changes.
Nodular changes and remodeling may be normal in old adrenal glands. Practice will help to develop clinical judgment of what’s normal and what’s not.

The ability to find the adrenal glands quickly will come with experience, and knowing the right tips and techniques will make it easier to get the information you need even when you’re first learning.
Written by: Dr. Tammy Powell, DVM

Autoclave Sterilization: A Necessity in Veterinary Medicine

In 2021, you’ve probably thought more about sterilization and disinfection than you ever have before.
Of course, you’ve always practiced safely and hygienically. But, this year’s pandemic brought the need for drastic measures like curbside service, face masks during everyday interactions, and washing your hands even more frequently…
… and, you and your staff probably feel like you’re cleaning, cleaning, cleaning all day long!
Best practices for cleaning surfaces and equipment
According to many experts, the best way to avoid viral exposure is the elimination of the risk.
This is where isolation and social distancing protocols come in. Your distancing measures of curbside service, telemedicine, and a limited number of people inside your hospital can all help.
Social distancing within the practice and avoiding the sharing of spaces and equipment as much as possible can also help.
Then, there’s PPE to help minimize any potential exposures—as well as your cleaning and disinfection protocols.
You wear gloves and face masks, you wash your hands and use hand sanitizers, and you clean the surfaces and equipment in your practice.
During your cleaning efforts, don’t forget about a powerful piece of sterilization equipment you probably use frequently…
Maximize your use of this key piece of veterinary equipment…
If your own or work at a veterinary practice, there’s a good chance you have at least one autoclave available for use.
Autoclaves use steam under pressure to kill microbes and are one of the most powerful disinfecting tools you have in your arsenal.
Surgical equipment—and beyond!
An autoclave is a tried and true method of sterilization for surgical packs, drapes, and tools.
But, maybe there are a few more items you don’t always think of that could be put into an autoclave for quick, thorough disinfection.
Things your autoclave can be used for include…
Gowns for surgery, isolation, or general use as an extra layer of protection.
Cloth caps.
Cloth face masks.
Surgery light handles.
Nitrile exam gloves or surgical gloves (ideally these would be single-use, but there are procedures described to maximize the lifespan of your PPE during shortages).
Dentistry tools.
Wound care items such as Penrose drains.
Cones/specula for otoscopes.
Pipette tips.
Certain muzzles.
Certain nail clippers.
Biological waste—in case you suspect viral contamination and want to sterilize waste prior to disposal.
There may be other items you can sterilize, too—so get creative!
Just be sure to check the manufacturer’s guidelines before you sterilize a new item—they’ll guide you on what’s safe or not safe to go in your autoclave.
But, once you get into the habit, this will save you time and do a more thorough job of eliminating microbes than most hand cleanings could ever do.
Why invest in a top-of-the-line autoclave?
In modern times, we can’t help but think of an autoclave as a potent killer of coronavirus!
But really, a good autoclave is useful to you all the time, pandemic or no pandemic. It ensures your equipment is properly sterilized from all microbes prior to use.
A good quality autoclave is dependable and makes your life easier via the simplicity of use. Here’s what we recommend you look for…
Several setting options including solid or liquid items, and wrapped or unwrapped items.
The option to choose a preset that suits your needs.
Large water reservoir so you don’t have to refill as often.
A tabletop model with a large chamber capacity so you can fit more items per cycle.
Locking mechanisms for safety.
A strong warranty and excellent customer service.
Our pick is this Full-Size Veterinary Autoclave because it meets all of these criteria, and has an industry-leading 3-year warranty (which includes a loaner autoclave if yours ever needs to be serviced).
How to keep your autoclave healthy
It’s always important to protect your investments by caring for your equipment—and that’s even more true during times when the business may be slower due to social distancing.
Here are a few tips to keep your autoclave in tip-top shape…
Use distilled water, not tap water.
Post guidelines for routine maintenance (otherwise, it’s easy to forget!).
Look for debris when the autoclave is cool, and clean it as needed.
Wipe the trays clean weekly.
Note any water or steam leaks.
Listen for any unusual sounds.
Observe the tape indicator each time, to ensure the autoclave is functioning as it should.
With a little attention and care, your autoclave will stay healthy—and in turn, it can help keep your equipment pathogen-free!

Mental Health and Work-Life Balance for Veterinary Practice Owners

Veterinary medicine can mean a busy schedule and emotional ups and downs.
Unfortunately, recent data suggest that this, along with other factors of daily practice, can take a toll mentally and emotionally.
Plus, as a practice owner, there’s the additional pressure of running a business.
You got into this profession because you love pets and want to help them—and that can make for a very rewarding career.
The trick is finding ways to care for yourself.
This may look a little different for everyone, but here are some popular suggestions that have helped many veterinarians find more energy, wellbeing, and balance…
Set Boundaries
When you love animals, it’s natural to want to help every pet who needs care. But failing to set boundaries can lead to burnout.
In addition to the turmoil it causes in a person’s life, burnout can also interfere with the ability to help pets over the long-term.
Setting boundaries can mean a number of different things, depending on your personal preferences and what your work rules allow. Here are a few suggestions…
Put breaks into your schedule
Giving yourself 5-20 minutes to recharge in the morning and afternoon (in addition to your lunch break) can be immensely helpful during a busy day.
Have clear cut rules for scheduling
For example, is double booking allowed? Can you go to lunch rather than seeing the patient that walks in at lunchtime (assuming it’s not a life-threatening emergency)?
To accommodate these and other scheduling surprises, it helps to leave a few appointment slots open each day—that way, you have enough time for all patients rather than running yourself to exhaustion trying to fit everyone in.
Set boundaries with clients
For example, if you give your phone number out to pet owners, be sure they know when and under what circumstances they can call you.
Or if a client is acting really outrageous and causing stress for all employees, it may be in your team’s best interest to “fire” that client to protect everyone’s time, energy, and morale.
Say “no” sometimes
This might mean coordinating with another doctor at your practice to take over care of your patients on your day off, so that your team isn’t calling you at home unless absolutely necessary.
You deserve to enjoy some days off!
Focus On the Positive
Despite your intelligence, knowledge, and passion, some things are out of your control.
Even with your best efforts, sometimes pets don’t get better—due to the nature of their medical condition, or due to owners not agreeing to the type of care you’d like to provide.
This happens to everyone. And while it’s hard to accept, it may help to focus on all the good memories—all the times you’ve helped pets, all the thank you cards from clients, etc.
Sometimes negative thoughts—whether it’s a client who said something rude or the loss of a patient you care about—dominate our minds. It’s human nature.
But usually, the good days outweigh the bad. It’s just a matter of training our brains to refocus on the positive.
Figure Out What Brings You the Most Fulfillment
Find ways to make your daily work life as enjoyable as possible.
This could mean cultivating relationships with clients.
It could also mean community involvement, such as charity efforts, puppy/kitten classes, or informational talks on pet nutrition or other topics.
Fulfillment may also mean specializing, or being the “go-to” doctor in your practice for specific procedures or medical conditions that you enjoy working with.
Cultivate Joy
In addition to professional fulfillment, it’s important to cultivate joy in your personal life.
This means some type of human connection—whether that’s a partner, friends, or family.
If you’re working long hours, it’s easy to feel isolated. By doing your best to schedule time with people you care about—even just a quick phone call—you may find that your mood lifts.
Additionally, physical activities, hobbies, learning new things, and other pursuits outside of work can remind you that “there’s more to life.”
This makes it easier to reframe a bad day as something that, while hurtful, is probably small in the scheme of things.
Schedule Time to Slow Down
If you need to sleep or binge-watch a show after a tiring week, go for it!
Or find time to read a book, take a bath, or meditate.
In addition to activities that bring you joy, scheduling “slow time” may help you feel centered, recharged, and in control of your schedule.
Seek Out Support
It’s helpful to find caring people who can listen.
Depending on your needs and circumstances, this may include…
Friends and family.
Colleagues you trust.
Veterinary support groups such as…
Vets4Vets®
A confidential support group for veterinarians associated with the VIN Foundation, which includes everything from weekly group discussions to one-on-one support.
Not One More Vet
An online support network of over 20,000 veterinarians with additional resources, including support in finding temporary relief workers for vets who need a few days off.
A therapist or counselor. Nowadays, there are convenient and reasonably priced online services such as Talkspace and BetterHelp.
Sometimes, just venting to someone in a safe, confidential setting can really lift the weight off of a person’s shoulders.
The National Suicide Prevention Lifeline: 1-800-273-TALK (8255), or text 741 741 to speak to a trained crisis counselor.
The Truth About Balance…
The thing about balance is, it’s dynamic, not static.
That means that as you go through different stages of life, your schedule, priorities, and tricks for recharging yourself may change. The key is to be aware and to adjust as needed.

The better you care for yourself, the better you’ll be able to care for pets—and the more joy you’ll get out of your daily work and personal life.
Resources:
Not One More Vet: https://www.nomv.org/
Talkspace: https://www.talkspace.com/
BetterHelp: https://www.betterhelp.com/
The National Suicide Prevention Lifeline: 1-800-273-TALK (8255), or text 741 741 to speak to a trained crisis counselor.
Written by: Dr. Tammy Powell, DVM

Five Simple Questions for Financing Your Veterinary Practice

How to Budget for Your First Year as a New Veterinary Practice Owner
Starting your veterinary practice can be an exciting journey, but securing financing is often one of the process's most significant (and intimidating) steps. Many new practice owners don’t have large cash reserves or private investors, so financing is usually necessary. Working with financial experts and veterinary consultants can help you make informed decisions that support your long-term success.
Here are five essential questions to consider as you plan your financing journey.
1. What Will I Need Financing For?
Before diving in, assess strictly what expenses will require financing. Here are some major categories:
Practice Space: Your first decision will be where you’ll practice. This could mean purchasing an existing clinic, leasing a new space, or even constructing your facility from the ground up. Some veterinarians also consider buy-in options at practices where they’ve been associates or even franchise opportunities.
Equipment: Equipment expenses can add up quickly. Think x-ray machines, exam tables, surgery lighting, dentistry units, and computers. Many lenders offer capital leases to alleviate upfront costs, letting you pay over time and start generating revenue sooner. You could also explore high-quality used equipment on platforms like usedvetequipment.com, which can provide substantial savings.
Daily Supplies: Daily supplies—such as pharmaceuticals, syringes, cleaning agents, gloves, and more—are essential for smooth operation, but they’re recurring expenses that can add up.
Operating Costs: Besides equipment and supplies, ongoing costs include salaries, insurance, utilities, and more. Factoring these into your business plan is crucial for understanding your monthly expenses.
2. How Much Can I Afford to Live On?
Realistically, your practice might not turn a profit for the first 1-3 years. You may not be able to draw a regular salary during this time. Consider how this financial reality will impact your life, especially if you have personal financial responsibilities like dependents or other expenses.
Purchasing an established practice can sometimes mean quicker revenue, as you’re starting with an existing client base. However, building a practice from scratch may require a longer timeframe to become profitable. Understanding your financial tolerance—and having a personal financial plan—can give you confidence as you take on the demands of a new practice.
3. How Will My Student Loans Affect My Financing?
Veterinary lenders generally don’t require you to have your student loans fully paid off before you apply for a practice loan. Still, your student debt status matters—lenders are unlikely to approve a practice loan if your student loans default. Remember that you must account for your student loan payments in your personal budgeting and financial planning.
If you’re uncertain about how your student debt might impact your financing options, don’t hesitate to consult a financial expert to explore your eligibility and options.
4. Do you know where I can find the Right Lender?
Some lenders specialize in veterinary practices, and they can be an excellent option because they understand the field's unique financial needs. On the other hand, Small Business Administration (SBA) loans offer flexible terms and government-backed security, making them another viable choice.
When assessing lenders, compare factors like:
- Required down payment
- Loan term and interest rates
- Fees and penalties
- Options for graduated repayments (small initial payments that increase as your practice grows)
A business plan and financial projections are typically required, so be prepared to present these documents when applying.
5. How Can I Navigate the Financing Process?
Even though starting a practice involves uncertainty, planning and preparation can help you make informed choices. Consulting with a CPA, a veterinary management expert, and a demographics professional can provide valuable insights. These experts can guide you in developing a business plan and financial projections to support your financing application.
Investing in expert advice, along with doing your research, will pay off as you move toward achieving your practice ownership dreams.
Feel free to reach out to me if you need personalized guidance on securing financing for your practice. I’d be happy to help.
Brad Haven, Jr.
Call or text me: 530-355-5886

Hidden Profits: The Value of Regular Pet Dental X-rays

Beneath the Surface: How Routine Dental X-rays and Cleanings Improve Pet Health and Your Bottom Line
In the busy life of a veterinary practice, we know it can be easy to place dental health on the back burner.
After all, pets coming in for vaccinations, surgical procedures, or more obvious pain management often seem more urgent.
Prioritizing dental health through regular teeth cleaning and routine dental X-rays can benefit your patients' well-being and your practice’s financial health.
Let’s talk about why this is a worthwhile investment and why these procedures are essential to our standard of care.
The foundation of good health starts with routine dental cleanings.
Periodontal disease is among the most common health issues in dogs and cats, affecting around 80% of pets over the age of three.
Yet pet owners often underestimate the impact it can have.
Poor dental hygiene doesn’t just affect the mouth, it affects the entire body, leading to issues such as:
Chronic pain
Behavioral change
Weight loss
Systemic infections
Regular cleanings under anesthesia and using a well-equipped dental cleaning station allow us to remove tartar and plaque before they cause these more significant health issues.
They also allow us to discuss pet dental care with clients, which helps improve long-term compliance with at-home care.
Regular cleanings can extend pets’ lives and improve their overall quality of life.
After seeing their pet healthier and more comfortable, our clients often feel reinforced trust in our recommendations and the value of our services.
By encouraging routine dental care, our patients can experience benefits like:
Pain-free eating and play
Prevention of systemic disease
Fresher breath
Enhanced energy and comfort
Lower risk of dental complications
Dental X-rays are an underestimated diagnostic tool and offer an indispensable view of dental health.
Around 60% of dental disease is hidden below the gumline, making it impossible to assess a pet’s oral health without imaging fully.
A tooth may look healthy on the outside, but dental X-rays often reveal hidden problems like:
Root abscesses
Bone loss
Retained roots or resorptive lesions
When we skip these X-rays, we risk missing pain-causing issues that erode the pet's health and comfort over time.
If we avoid routine dental X-rays due to time, cost, or anesthesia concerns, our patients are the ones who ultimately suffer.
Undetected dental disease can progress until it’s obvious enough to require a more aggressive intervention, such as multiple extractions or management of a full-blown abscess.
At that point, the patient has already experienced unnecessary pain and discomfort, and the client faces a larger treatment bill than if the issue had been caught early.
Without early intervention, periodontal disease can lead to chronic infections that eventually spread to other organs, adding further complications to the pet’s health.
For older pets, untreated dental disease may contribute to a shortened lifespan.
Investing in dental health and digital imaging is an opportunity to enhance the health of your practice.
Clients who understand the long-term benefits of preventive dental care and regular checkups will likely invest in these services.
This is especially true when they recognize the care your practice offers—thanks in part to digital imaging technology.
In many cases, veterinary practices that establish clear dental protocols, including routine X-rays, report increased client retention and an expanded service portfolio.
When clients see the advanced diagnostics and appreciate that you’re doing everything possible to prevent disease, they tend to return and spread positive word-of-mouth referrals!
If your practice is ready to integrate or expand digital dental imaging, here are a few tips to ease the transition:
Demonstrate the Importance: educate clients by using examples of cases where X-rays uncovered unseen issues. This helps to give a real-world understanding of what’s at stake.
Offer Dental Packages: Consider bundling dental cleaning and x-ray services for a comprehensive approach. This encourages pet owners to embrace both as part of a complete care package.
Train Your Team: Ensure your entire staff knows the value of digital X-rays and dental cleanings to discuss these services with clients confidently.
Incorporating regular dental care isn’t just about filling appointment slots. It’s about providing your patients with the highest level of care and adding a consistent revenue stream that reflects the value you bring to patient care.

First Aid for Pets: Essential Steps in Emergencies

Preparing for the Unexpected: tips to give pet parents for handling emergencies at home
As veterinary providers, we’re often the first responders to patient emergencies. Yet, as much as we try to be available, pet parents should also be prepared to act quickly when their pets are distressed.
Offering education on responding at home before they reach our practices can significantly affect the outcome of a critical situation.
Here are some key strategies we can share to help them stay calm and competent during a crisis.
1. The Importance of a Pet First Aid Kit
A well-stocked, pet-specific first aid kit is one of the most essential tools for any pet owner. While most households already have basic first aid supplies, reminding clients to include items specific to pets can help them be better prepared. Essentials include:
Sterile gauze and bandages (self-adhesive)
Tweezers and blunt-tipped scissors
Hydrogen peroxide (for inducing vomiting under professional guidance)
Non-stick wound pads
Thermometer and lubricating jelly
Emergency contact information (vet clinic, after-hours ER, poison control)
2. Recognizing Signs and Symptoms of a True Emergency
It’s not uncommon for pet parents to hesitate in determining whether their pet's behavior or symptoms warrant immediate care. Advise them to seek immediate veterinary attention if their pet is experiencing:
Difficulty breathing or choking
Seizures, collapse, or ataxia
Persistent vomiting or diarrhea (especially if blood is present)
Severe pain (vocalizing, limping, or reluctance to move)
Ingestion of toxins (medications, chocolate, plants)
Major trauma (e.g., from a fall or vehicle accident)
Heatstroke symptoms (excessive panting, lethargy, bright red gums)
3. Pet CPR: Basic Instructions
Teaching the basics of pet CPR can save lives in critical moments. While pet parents shouldn’t attempt to handle all medical emergencies at home, understanding CPR for pets can be crucial while on route to the hospital.
Consider offering short workshops or providing clear, visual handouts on CPR for both dogs and cats. Some simple steps to share for CPR include:
Ensure the airway is clear
Check for breathing and a heartbeat
If no heartbeat, begin chest compressions (compressions vary based on size)
Combine with rescue breathing (mouth over muzzle for dogs, mouth over nose for cats)
Remind them this is a temporary measure while getting the pet to a veterinarian, not a solution.
4. Handling Common Injuries at Home
Pet’s may experience injuries like cuts, burns, or bite wounds, which need immediate care. Giving pet parents clear instructions on stabilizing the pet and controlling bleeding can prevent complications. For example:
Cuts or lacerations: Clean the wound with a saline solution and apply gentle pressure with a non-stick pad. Elevate the area if possible to reduce blood flow.
Burns: Cool the burn with cold water for several minutes, but avoid ice. Bandage the area loosely to prevent further injury.
Bite wounds: Rinse the wound with clean water and cover it with a sterile bandage until it reaches the clinic.
While these steps help, professional veterinary care is critical for preventing infection or further complications.
5. Stay Calm and Keep Safe
One of the most valuable things we can instill in pet parents is the importance of staying calm in an emergency. Reassure them that it's okay to feel overwhelmed and that staying composed will allow them to make clearer decisions.
Encourage them to avoid putting themselves at risk, such as reaching into a pet's mouth during a seizure or attempting to break up a dog fight without tools.
7. Preparing for Natural Disasters
Whether they live in a region prone to wildfires, hurricanes, or earthquakes, encourage pet owners to include their pets in their disaster preparedness plan. Having a checklist on hand can be a helpful way to help them prepare.
The checklist might include:
A portable carrier or crate for each pet
A week's worth of food and water stored in an easily transportable container
Copies of medical records, vaccination status, and any necessary medications
Identification tags or microchip registration up to date
Empowering Pet Parents During Critical Moments
By offering guidance on handling emergencies at home, we can empower them to act swiftly and effectively. Whether teaching them the signs of a severe emergency, demonstrating CPR techniques, or helping them prepare a disaster kit, these steps help bridge the gap between the initial crisis and the moment they walk through our clinic doors.
Prepared pet parents make all the difference in those critical moments, and with our support, they can be ready to give their pets the best care possible.

The Power of Telemedicine in Veterinary Critical Care

Telemedicine in Veterinary Emergency Care: A Lifesaving Tool for Our Patients
Most of us have seen the chaos that can unfold during an emergency visit…
Adrenaline spikes, and we rush to stabilize and strike the problematic balance between time, skill, and resources to save a life.
Whether it's a dog hit by a car or a cat in respiratory distress, time is often the one thing we don’t have enough of.
Telemedicine has emerged as a powerful tool, changing how we respond to emergencies, offering real-time expertise, and, most importantly, saving lives.
Expanding the Reach of Critical Care in Veterinary Medicine
Telemedicine allows veterinarians to provide expert advice without delay, making it invaluable in emergencies.
Many practices, especially in rural or remote areas, might need more access to specialists or advanced diagnostic equipment. With telemedicine, that barrier disappears.
Instead of relying on limited resources, veterinarians can consult with specialists—board-certified surgeons, neurologists, or radiologists right from their hospital.
Imagine the power of receiving expert radiographic interpretation for a suspected GDV case in the middle of the night when no specialist is physically nearby. Or having access to a cardiologist’s input in a heart failure case, where every second counts.
Veterinary telemedicine can empower more informed decisions on patient care, guiding whether a patient can be stabilized in-house or requires referral to a higher level of care.
The peace of mind comes with being able to tap into a virtual lifeline of expertise.
Faster Triage and Treatment Decisions for Veterinary Patients
One of telemedicine's biggest impacts on veterinary emergency care is in triage. In busy emergency rooms or during after-hours calls, it’s essential to prioritize cases based on their urgency.
However, assessing a patient's condition can be tricky over the phone or in text descriptions.
Telemedicine platforms incorporating video and photo capabilities bridge this gap, allowing veterinarians to see the patient.
We’ve all taken a phone call about a “slightly lethargic” dog only to find a critically ill patient when they arrive. With telemedicine, the guesswork in these situations diminishes significantly.
Whether it's giving hope to a worried owner, being able to stabilize a patient sooner, or ensuring recovery post-crisis, telemedicine is quickly becoming an essential component of lifesaving care.
During the height of the COVID-19 pandemic, when curbside care became the norm, some were fortunate to witness how video consultations transformed emergency response.
Triage teams could assess vital visual cues like mucus membrane color, respiratory effort, or pain response. This not only gave us more precise information but often sped up decision-making.
Elevating Veterinary Post-Emergency Follow-Up
The telemedicine advantage doesn’t end when the immediate crisis is over. The follow-up care for an emergency patient is just as critical.
From reviewing radiographs to monitoring wound healing, telemedicine can offer flexibility in virtual check-ins, which can be valuable to a patient’s recovery plan.
Pet parents appreciate the convenience of telemedicine follow-ups, especially when transporting a recently hospitalized pet can be stressful or unnecessary.
Additionally, it allows veterinary professionals to ensure that pet parents are correctly administering meds and following post-op care instructions.
With a video call, you can watch them handle their pet, address any concerns, and adjust before minor issues become more significant complications.
The Future of Telemedicine in Veterinary Emergency Care
Telemedicine in veterinary emergency care has challenges—such as technological limitations in certain areas and concerns about missing vital information when relying on virtual consultation. But as technology evolves, so will the opportunities it provides.
What’s most exciting about the future of telemedicine is its potential to revolutionize access to care, offering flexibility in location, clinic hours, and specialist availability.
Whether we’re providing life-saving care in the middle of the night or potentially guiding clients through urgent situations, telemedicine allows us to expand our reach in ways that were unthinkable just a few years ago.
In the world of veterinary emergency care, where every minute can make the difference between life and death, telemedicine is a tool we can’t afford to overlook. There’s no telling how far it will take us and how many more pets will benefit from the care we can provide.
For those who spend countless hours in the emergency room, it’s heartening to know that telemedicine lets us extend our expertise where it’s needed most.