


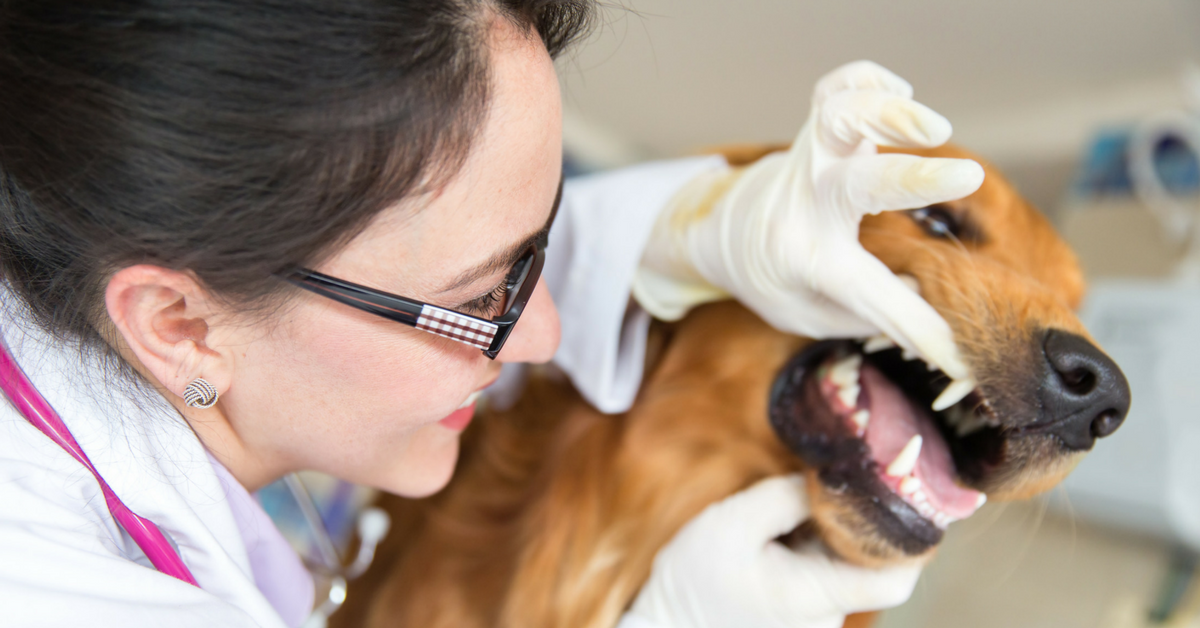
Patient Injury & Complications In Veterinary Dentistry

The nature of anesthesia brings risk in general. In veterinary medicine, during dental procedures, pets are often placed in vulnerable positions which can lead to increased risk of injury and medical complications.
These risks can be minimized or entirely avoided with careful consideration, and proper training and continuing education of staff. Listed are a few of the more common injuries that can occur during a dental procedure.
Aspiration Pneumonia
Aspiration pneumonia in pet patients occurs when the patient inhales a foreign substance and develops lung inflammation and infection as a result.
The most common occurrence during dentistry is water and debris entering an unprotected airway, hence allowing fluid and debris to enter the lungs. This can occur from an underinflated tracheal tube, or repositioning during the procedure that allows fluid to enter the airway.
Aspiration pneumonia can also occur if the patient vomits or regurgitates during anesthetic recovery.. To reduce the incidence of dental-related aspiration pneumonia, maintaining the patient on their back during the procedure, and avoiding repositioning has proven to not only lessen the risk of aspiration but also lessens the amount of anesthesia needed during the procedure.
In addition, antiemetic medications given during the premedication phase can help reduce the incidence of post-anesthetic nausea and vomiting. Caution should be taken during the recovery phase to wait until the patient is alert and responsive enough to deflate the cuff and remove the tracheal tube.
Tracheal rupture
Tracheal rupture in dogs and cats are more frequent during dental procedures than any other medical procedure. Seventy-five percent of tracheal ruptures are thought to be associated with oral surgical procedures with the incidence more common in cats than dogs.
Tracheal injury can cause symptoms such as mild dyspnea, and even death. The most likely cause of tracheal rupture is thought to be due to an overinflated tracheal cuff, as well as failing to detach the tracheal tube from the anesthesia hose during repositioning, which can cause a torque on the inflated cuff resulting in a tear of the dorsal membrane of the trachea.
Another common cause of tracheal rupture is a patient that is not adequately anesthetized and coughs or lunges upward during intubation, tearing the trachea.
Pressure from an overinflated cuff can cause pressure necrosis of the trachea, showing delayed symptoms of inflammation and scarring.
Avoiding over-inflation of the cuff, using new tracheal tubes, testing the cuff to ensure proper inflation prior to use, avoiding repositioning as much as possible, and ensuring a level plane of anesthesia prior to intubation can help minimize the risk of tracheal rupture.
Artery Damage during Tooth Extractions

Arterial damage to arteries such as the palatine artery which runs the length of the mandible can accidentally occur during routine tooth extractions where the instrument can slip from the practitioner’s hand.
These injuries can be mild to more severe requiring surgical intervention.
The most effective way to avoid this type of injury is to implement extraction techniques involving gingival flaps where the roots are exposed, and more easily undermined, and extracted.
Written by: Dr. Tammy Powell, DVM

The Best Places to Buy Used Vet Equipment at Great Prices

During the economic fallout of this unprecedented global pandemic, it’s more important than ever for businesses to stretch their dollars as far as they will go.
Buying used equipment is a budget-friendly way to purchase high-quality machines and supplies—so you can operate and upgrade your practice the way you want to.
More importantly, you can buy on a friendly, community-based platform that removes all headaches about negotiating, shipping, and payments—so you can securely get the equipment you need without taking time away from your busy schedule.
In case you’re not already familiar with it, we recommend you visit: usedvetequipment.com.
This website was started because veterinarians needed a marketplace just for their industry—somewhere to easily buy and sell quality used veterinary equipment from trusted colleagues.
Here’s what one happy buyer had to say:
“I purchased a digital x-ray system through usedvetequipment.com. The transaction was smooth. I would not have taken the chance without the third party mediator. Brad did a great job and the sellers were great to work with. I would not hesitate to use this service again.”
—Mark Robinson, DVM Montana
Here are a few advantages that usedvetequipment.com offers to you as a veterinarian buyer…
Quality. On the site, you’ll find products from top manufacturers such as Abaxis, Shoreline, Heska, SurgiVet, Cardell, Welch Allen, Idexx, and much more.
Choices. Whether you’re looking to invest in something as large as a full radiology unit, or something as small as a laryngoscope or warming pad, you can find it on usedvetequipment.com.
There are far too many examples to list here, but other items recently sold include endoscopes, Dopplers, stem cell therapy equipment, surgical tools, cages and floor grates, exam lift tables, and much more.
Easy Payment Options. You’ll be emailed an invoice for convenient online payment.
Good for Animals and the Environment. Reusing and repurposing equipment is not only a great way for the veterinary community to share resources to improve animal care everywhere—it can also help keep materials out of landfills.
Safety and Security. We’ve found the veterinary community to be honest in their descriptions of the equipment they are selling—and the standard buying process lets you inspect the equipment upon arrival before your payment is processed.
Stellar Service. Just check the site, and you’ll find reviews from tons of happy buyers and sellers!
If you’re ready to get started, head over to usedvetequipment.com.
Here are some things to keep in mind as you shop…
Compare your options. If there’s more than one listing for the equipment you need (a common scenario), search around and make obligation-free offers. And if you’re not in a big hurry, search over time to see what else pops up.
Ask Questions. This isn’t a big, faceless online store—instead, it’s all about community! You’re free to reach out to sellers with any questions you may have and to ask us about the details of shipping and payments.
Expect the Best Experience. The goal is for you to feel comfortable (and very happy!) with your purchase.
More interested in SELLING equipment rather than buying? Check out our next article, which will have detailed suggestions for how to successfully sell on usedvetequipment.com.
Until then, take a look around the site to browse what’s available, and be sure to bookmark usedvetequipment.com in case you need to come back to it to make a purchase in the future.
Wishing you good luck in your search—we’re sure you’ll find just the right equipment you need for all the services you’d like to offer at your practice.
A community marketplace like this is the perfect place to buy and sell with colleagues as you build the practice of your dreams.
“… 10,000 times better than any eBay / Amazon kind of purchase! We will definitely look here 1st for future purchases.”
—Sandy Pamplin, Manager Pleasanton Road Animal Hospital San Antonio, Texas

“I recently purchased a film processor through Used Vet Equipment. I was very impressed with the website- pics and descriptions. I received a quick response to my questions. Brad was very professional and thorough in handling the transaction through delivery and tracking info. He made sure I was completely satisfied with the product. I would definitely do business here again! 5-star rating!”
—D Davis, Colorado
Written by: Dr. Tammy Powell, DVM

Sell Your Used Veterinary Equipment On A Community Website

Sell Your Used Veterinary Equipment
Welcome to the other half of our series on buying and selling your used equipment on usedvetequipment.com.
If you’re looking to sell some of your equipment, you’re not alone. There are many reasons why you might pursue this option as a veterinarian…
Maybe that new in-house chemistry analyzer or the extra kennels you purchased didn’t get used as much as you expected—and you’re not seeing the return on investment you wanted…
Maybe you want to upgrade, but you aren’t sure what to do with your current equipment. Or, maybe times are tight and you need to increase your cashflow.
Whatever your reason, selling your used veterinary equipment can put some cash in your pocket, while also helping out a fellow member of the veterinary community who needs the machine, gadget, or gear you’re selling.
If that sounds great to you and you’re ready to get started, we recommend visiting usedvetequipment.com. Here’s why…
List Anything! Whether you’re looking to sell an ophthalmoscope, an autoclave, an x-ray processor, or a vehicle… there’s no item too large or too small.
Set Your Own Price. You choose how much you’d like to sell for, and you can accept or reject any offer that comes your way.
We’re Here to Help. We’ve done this thousand of times—so no matter what you need to ship, we can help you with logistics and also ensure prompt payment from your buyer.
Since this is a community-based platform, you’ll find interactions to be secure, reliable, and honest.
Affordable. There’s no cost to you to list your equipment (including unlimited photos and videos to showcase your items), and no time limit in which to sell.
Good for Animals and the Environment. Reusing and repurposing equipment is not only a great way for the veterinary community to share resources to improve animal care everywhere—but it can also help keep materials out of landfills.
Stellar Service. Just check the site, and you’ll find reviews from tons of happy buyers and sellers! Like this one below…
“I can’t say enough about the great job Brad did in selling our cages and floor grates. It was quick and everyone is happy. Brad found the right buyers and made all the arrangements. I highly recommend this website.”
—JS in NY
Selling is simple on usedvetequipment.com. But, we also have some tips to help you get the most success out of your listing.
For the most success when you sell your equipment, be sure to include…
Pictures! You can include as many pictures as you’d like to on your listing, and video if that will help to show your item.
Images will help your equipment sell—and most smartphones are perfectly capable of producing the high-quality photos you need.
Try photographing from different angles, cleaning the items before you take pictures, and removing any distracting clutter from your shot so the focus is solely on the equipment you’re selling.
Detailed Descriptions. Include all relevant details about the brand name, manufacture date, current condition, size and weight, the reason for selling, etc.
Also, let potential buyers know how the item has helped you in your daily practice—and how it can help them.
A Smart Pricing Strategy. Sometimes, pricing used equipment appropriately can be difficult—you know there will be some depreciation, but what’s a fair price?
The easiest way to get a starting point is to research similar items that have recently sold.
And, if you’re hoping to sell fast—it helps to go a little under the going rate or to include shipping in your price.
And that’s it! Once your equipment is listed on usedvetequipment.com, you can easily connect with colleagues who are interested in buying.
With each sale, that’s money you can invest back into your practice for expanding, upgrading, marketing, or compensating your amazing team members.
Plus, you’d be helping out a fellow practitioner in the veterinary community—someone who really wants the equipment you don’t need anymore. It’s a win-win for both of you.
Good luck, and happy selling!
“I had an entire Veterinary Clinic of items to sell and Brad sold them all! He is diligent in getting items sold and payment is speedy. Brad and UsedVetEquipment.com are The Best!”
—S.F. in Colorado

“Brad was able to sell my cages within a week of posting the items. He had great communication and payment was prompt. I will list my items with him again.”
—Wes Godwin - Texas
Written by: Dr. Tammy Powell, DVM
Advanced Veterinary Dentistry: The Role of Digital X-Rays

Veterinary dentistry has become advanced over recent years, particularly with the advent of oral dental radiographs.
The idea of regular dental care for our pets is new to many pet owners who are beginning to realize the importance of regular exams, teeth cleaning, and oral radiographs.
Practice standards are changing, and pet dentistry has become sophisticated and cutting edge. Similar to when humans have an oral examination and teeth cleaning, the dentist will request radiographs to check for underlying problems or concerns.
The same should be expected for pets when they go to the veterinarian for teeth cleaning. Dental radiology is at the forefront of ever changing veterinary practice standards.
With most of a tooth lying below the gum surface (think of an Iceberg), problems cannot be appreciated until a radiograph is taken and reviewed.
It is virtually impossible to practice veterinary dentistry without dental radiographs, which allow visualization of tooth roots, bone, and surrounding structures not visible otherwise.
Dental radiographs today are not taken with the conventional x-ray unit seen at most veterinary clinics.
Today’s advanced dental x-ray units give exceptional detail and clarity. Dental x-rays are easy to use and typically located adjacent to the patient. They are made using small radiographic films or digital sensors placed inside the patient’s mouth, and can generally be accomplished within 10 or 15 minutes when performed by an experienced and trained technician.
Typically 6-8 images are taken during a routine pet dental cleaning. The radiation risk to the patient from dental radiographs is minimal and outweighs the risk of missing underlying dental problems.
Dental radiographs should be performed early to establish a baseline for future comparison.
Ideally, this can be accomplished at the same time puppies and kittens are undergoing routine spay and neutering and should be performed under anesthesia to effectively diagnose and assist in treating a patient with periodontal disease or underlying pathologic complications.
Anesthesia is important to obtain dental radiographs because the sensor or films must be placed in the pet’s mouth, which would be difficult to accomplish awake.
Studies show that without dental radiographs, up to 75% percent of significant dental problems are missed in pets undergoing routine teeth cleaning.
In addition, the AAHA (American Animal Hospitals Association) Dental Care Guidelines for Dogs and Cats state that preoperative and postoperative dental radiographs are mandated for all tooth extractions.
Dental radiographs taken prior to extractions ensure that a procedure can be properly planned and that no underlying issues such as developmental defects surprise the individual performing the extractions.
Post extraction radiographs ensure that all root fragments are removed and that no inadvertent damage was caused.
A pet can be left in discomfort for years if problems are missed during a dental.
Pets showing dental problems may avoid hard food, have red or bleeding gums, bad breath, have problems picking up and dropping food, make noises when they yawn, chew on one side of the mouth, excessively sneeze, express facial discomfort by pawing at the mouth, excessively salivate, exhibit ropey drool, and more.
Any pet exhibiting these signs should have a dental with oral radiographs to allow the veterinarian to make an accurate diagnosis. Once a diagnosis has been established, the proper treatment plan can then be instituted. Without dental radiographs, an accurate diagnosis is not possible, and pets may needlessly suffer.
Indications for dental radiographs in pets:
Periodontal Disease and Extractions: Radiographs help to determine a treatment plan, identify retained tooth roots, follow each pet’s dental progression as they age, and to assist the operator during extractions to avoid potential injury such as jaw fractures.
Trauma: Identify a fracture or foreign body such as shrapnel or other material.
Defects and Variations in Tooth Density: Identify cavities or resorption lesions in cats.
Endodontic Issues: Determine if a tooth requires a root canal.
Developmental Defects/Anomalies: Detection of supernumerary teeth, missing teeth or teeth that have failed to erupt.
Swellings, Cysts, Tumors: Help determine the source of facial swelling and pain.
Advanced procedures: Pets receiving advanced procedures such as crowns, braces, jaw fracture repair, oral tumor removal.
With modern medical advances in veterinary dentistry, dental radiographs should always be implemented in the complete periodontal exam and treatment of pets undergoing dental cleaning with extractions.
It is otherwise not possible to provide good quality dental care and documentation without utilizing radiographs.

Dental radiography is the number one diagnostic tool in the practice of complete pet dentistry.
Written by: Dr. Tammy Powell, DVM

Mastering Ultrasound-Guided Cystocentesis in Dogs and Cats

There are several ways to collect a urine sample from your patient, including free catching, using a urinary catheter, and doing a cystocentesis.
A cystocentesis—which involves obtaining a urine sample via a needle placed directly into the bladder—may be the preferred method in many cases.
This is especially true when you need a sterile urine sample, such as for culture and sensitivity testing for UTIs. And in general, a cystocentesis will provide more accurate results than a free catch urine sample, since it reduces contamination from cells or pathogens of the skin.
It’s possible to perform a cystocentesis by palpating the bladder or using anatomical landmarks alone. However, an ultrasound can make the process easier by removing the guesswork and allowing you to visualize everything.
Here’s how it works…
How to perform an ultrasound-guided cystocentesis for dogs and cats
Prepare for the procedure.
Use an appropriate size syringe (usually 3ml to 12ml) based on the size of your patient.
Choose a needle size and length based on your patient size. A 22g needle works well for many patients.
Use a towel, trough, or other cushioning to make your patient more comfortable during the procedure. This may help minimize their movement.
Use appropriate patient restraint.
For some dogs and cats, this could mean having a trained team member hold them. For very anxious or fractious patients, this might mean chemical restraint.
Dorsal recumbency is generally the best way to position your patient.
Be sure to clean the area of skin where you’ll be performing the cystocentesis. If needed, consider clipping the fur, too.
Estimate the bladder location.
You’ll use your ultrasound to see the bladder, but anatomical landmarks will give you a good starting point for where to place the probe. Try one of these methods…
Locate the caudal four mammary nipples and mentally draw an ‘X’ between them. The bladder will often be near the cross point of the ‘X’.
Place a small amount of alcohol on the caudal abdomen so it pools. Often, the bladder is located directly under where the alcohol naturally pools on the midline.
Visualize the bladder.
Place your probe onto the caudal abdomen. You should be able to see the urinary bladder on the screen—it’s a fluid-filled structure that has the appearance of a ‘black balloon’ with gray or white walls.
Check for any abnormalities.
You could focus on just doing the cystocentesis. However, while you’re visualizing the bladder, it may help to do a cursory exam (or even a more in-depth evaluation, if indicated) to look for any problems contributing to the patient’s urinary symptoms.
For example, note if you see any thickenings, masses, calculi, or other issues in the urinary bladder.
Obtain the urine sample.
Place the needle directly through the abdominal wall, just in front of the ultrasound probe.
Aim the needle slightly caudally.
You should see the needle on your ultrasound screen. Use this visual to guide you, to be sure you get a good, clean sample rather than aspirating part of the bladder wall.
Prepare your sample for analysis.
Right after the cysto, replace the needle on the syringe with a sterile one.
Then, divide and prepare the sample in a timely manner (the fresher the sample, the better for testing) for any tests you need to perform, whether that’s in-house or at an outside lab.
In many veterinary hospitals, cystocentesis is safely performed several times per day, and complications are very rare. However, as with all medical procedures, some risks exist.
These may include…
Hematuria (usually mild and transient).
Much rarer complications such as bladder injury, leakage of urine into the abdomen, puncture of internal organs or blood vessels, or vagal reactions (retching, panting, hypersalivation, collapse).
Seeding of tumors.
If you suspect your patient has a bladder tumor such as transitional cell carcinoma, it may be best to avoid a cystocentesis. Otherwise, the needle could ‘seed’ the tumor as you withdraw your sample from the bladder, allowing cancer to spread into the abdominal cavity.
An ultrasound may help you to notice abnormalities such as bladder tumors during the procedure, in which case your recommendation to the client may change.

Fortunately for most pets, a cystocentesis is a quick outpatient procedure that provides a lot of valuable information. And many dogs and cats don’t show any side effects at all.
For patients with urinary symptoms, a cystocentesis is often the way to go for the most accurate diagnostic testing results and to get to the bottom of the issue faster for healthy pets and happy clients.
Written by: Dr. Tammy Powell, DVM

Veterinary Solutions for Pet Oral Health and Periodontal Care

Periodontal disease is an inflammation and infection in the gums around your pet’s teeth caused by bacteria which adheres to a sticky substance called plaque.
Left untreated, this turns into hard tarter (calculus), which builds up under the gum line and surface of the teeth. Periodontal disease is characterized as gingivitis and periodontitis. Gingivitis is inflammation or reddening of the gums (gingiva), and periodontitis is loss of bone and soft tissue around the teeth leading to non-salvageable loose teeth, malodorous breath, and potential jaw fractures.
This is a very common issue in pets. Periodontal disease is a painful disease and is thought now to be an epidemic. When it starts, periodontal disease shows no outward signs and symptoms, and many pet owners are unaware of the problem in the pet’s mouth until the disease has advanced.
Some symptoms of severe periodontal disease include:
Pawing at the mouth
Red or bleeding gums with bad breath
Loose teeth
Problems picking up food and dropping food
A swelling on the muzzle near the eye caused by an abscessed tooth root (often pet owners think this is a bite).
Making noises when a pet eats or yawns
Head shyness
Bloody or ropey saliva seen in water or toys
Chewing on one side of the mouth
Sneezing or nasal discharge – the nasal cavity can become infected
All breeds and sizes of dogs and cats are at risk of periodontal disease.
This disease not only affects the mouth, but bacteria entering the bloodstream affects the immune system. The risk of associated health complications can be reduced by proper dental hygiene.
Multiple health problems linked to periodontal disease include internal organ problems such as heart and lung disease, liver and kidney disease, bladder infections, pancreatitis, weight loss, and behavioral issues such as biting or suddenly becoming isolated, among others.
Periodontal disease can almost always be prevented or minimized with a combination of home dental care and veterinary dental cleaning.
Once tartar is formed, it cannot be brushed off with a toothbrush. Routine daily teeth brushing can remove the sticky plaque, however, not the tarter.
Trying to brush the teeth when the mouth is inflamed and teeth are loose and Infected will cause your pet to resent brushing and oral care.
Once your pet has undergone a thorough dental and the mouth heals, daily brushing will prevent further dental disease.
A deep thorough subgingival cleaning under the gum line is important and necessary to remove the tarter and infected teeth and must be performed under anesthesia. Non-anesthesia teeth cleaning is solely cosmetic and does not address the source of the problem laying under the gum line. It is important to start brushing as a puppy and kitten and make this a daily routine.
As long as the surfaces of the teeth are cleaned frequently, the gums will stay healthy. The sooner you start to clean your pet’s teeth, the less likely your pet will need extractions.
Periodontal disease prevention includes:
A veterinary examination of your pet’s mouth and teeth at all ages is important. Early detection of problems such as teeth crowding and retained baby teeth can be addressed and resolved.
On-going plaque and tarter control are key to the prevention of oral disease. Teeth brushing daily is the most important way to prevent gum disease. Many pet owners are concerned that they will not be able to perform this task. Many dogs and cats will actually enjoy the daily interaction and like the taste of the dental products.
Look for products with the Veterinary Oral Health Council (VOHC) seal of approval such as toothpaste, oral rinse, and water additives, made to keep your pet’s teeth clean and the gums and bone healthy.
Canned food tends to stick to the teeth more than dry food. Look for dental diets that help pet’s teeth as they chew. A good quality dry kibble works best. Your veterinarian has information about dental based diets.
Offer Dental treats and chews. This is a good way to help prevent periodontal disease in pets. Look for bendable, soft toys and treats and avoid hard treats such as antlers. Use rope toys, rubber balls, and rubber toys where you can hide treats.

Oral health is fundamental to the general health of pets and essential to preventing periodontal disease. Teaching the pet owners that your animal hospital serves to get into the habit of daily dental care with their pet allows bonding time, and can be fun and looked at as “treat time” for their pet.
Written by: Dr. Tammy Powell, DVM

Post-Dental Care for Dogs & Cats: Prevent Periodontal Issues

Much attention is focused on the time leading up to and during dental work in dogs and cats, with much attention being placed on the dental procedure itself.
Without education of the pet parent, preventative care can fall to the wayside, leading to continued periodontal problems in the pet.
Dental calculus can form hours after teeth cleaning, thus making the education of the pet parent a vital part of their pet’s dental health.
Properly educating the pet parent about post-dental preventative care entails a recheck visit a week or sooner after the dental, where the pet’s mouth is rechecked, handouts and dental preventative products are introduced to the pet parent, and a demonstration performed to demonstrate proper oral care techniques.
The best way of preventing gum and tooth disease in dogs & cats is to actively brush the pet’s teeth at least 3 to 4 times weekly.
There are some excellent products, including enzymatic toothpaste-like C.E.T. which can break down much of the tartar and debris on the teeth.
During their recheck examination, pet parents can be shown how to brush their pet's teeth using a standard toothbrush, finger brush, and even gauze.
Emphasis should be placed on emphasizing the importance of making the effort to get the habit of home oral care started.
Other products that the pet parent can offer their dog or cat are chewable products such as C.E.T Hygiene chews, Greenies, and other over the counter dental products such as powders, sprays, and gels, as well as water additives.
During the post dental recheck visit, importance should be placed not only on the aforementioned but mentioning diet as well.
Pets eating canned food may be more susceptible to periodontal disease due to the sugars in the food, as well as the wet food sticking to the teeth.

Regular visits to the veterinarian for an oral health exam can give the pet owner an indication of how well they are maintaining the oral health of their pet.
Written by: Dr. Tammy Powell, DVM

Veterinary Marketing: The Key to a Strong Online Presence

You might have the best veterinary clinic in the world, with stellar medical care, an amazing team, and great customer service…
But, for clients to bring their pets to you, those clients must be able to easily find your practice and learn how great it is.
So, when you open a new veterinary practice, how will your clients find you?
The First Place Your Potential Clients Will “See” You
In modern times, many pet owners locate and research their next veterinarian via an online search.
That’s even more true during the 2020 pandemic, when physically “stopping by” a veterinary practice to meet you is difficult.
Even if you have a prime hospital location with a lot of foot traffic and nearby businesses, pet parents who see your hospital in passing will probably Google your practice before bringing their pets to you. So, it’s still important to have a strong online presence.
For that reason, we’re talking about websites and social media in today’s article.
Because even though you’ll have a lot of important decisions to make before you open your practice—such as financing, equipment, staffing, and more—it’s never too early to start thinking about messaging and marketing strategies for your clinic’s success.
Your Veterinary Practice’s Website
Think of your practice’s website as an online hub where clients can come to learn more about you, your staff, your services, and your facility.
But, creating an effective website can be tricky. There’s a lot to think about, including searchability.
And, it’s crucial to make sure your website paints a clear picture of who you are and all the wonderful things you do to help pets.
Here are a few tips to help make your practice’s website effective…
Use warm, inviting photos and images.
For example, images of your caring team members—smiling, in action, and holding cute pets—is much more effective than a picture of the outside of your hospital.
This creates the right mood for your website and also helps potential clients know what to expect when they bring their dog or cat to see you.
Just remember: If using pictures of client-owned pets on your website, get the client’s permission in writing first.
Focus on your clients’ needs and wants.
When writing about your practice, be sure to include your experience, expertise, and services offered… But, don’t forget to tell clients HOW these things benefit them.
For example, instead of saying, “We have 40 years of combined experience,” say, “Our 40 years of combined experience means your pet will receive excellent care from experienced veterinarians.”
Make all key information easy to find.
Place your practice’s physical address and contact information right at the top of the page, where it’s easy for a potential client to find it.
Pay attention to SEO.
SEO stands for search engine optimization, and it’s what makes your practice’s website show up higher in Google’s search results (which makes it easier for clients to find you!).
Don’t worry, you don’t have to be an expert in SEO… Actually, it’s a pretty broad field that can take some time and dedication to truly master. And, it’s constantly evolving.
But it’s important, so consider hiring a consultant—or, if you’re creating your own website content, at least be familiar with SEO basics.
We’ll have an article with more details on SEO basics later in this series, so keep an eye out for that.
Do You Need Social Media?
Social media is an excellent way to extend the reach of your website.
By posting on Facebook, Instagram, or other social media platforms, your posts can make pet parents smile and prompt them to learn more about you by following a link back to your website.
However, the world of business-related social media may seem nebulous and confusing if you’re new to it…
So, we’ll have a more in-depth article on social media further into this series. But for now, here are a few things to keep in mind…
Start with one platform at a time.
If you try to master Facebook, Twitter, Instagram, LinkedIn, and more all at the same time, you’ll probably feel overwhelmed—and then give up. So, just start with one platform. When you feel comfortable, consider expanding.
On that same note, set a realistic schedule for how often you are going to post.
Where do your potential clients spend the most time?
Facebook is a very common and effective platform. But, if you have a younger clientele, maybe they spend more time on Instagram and would be more likely to see your posts there?
A veterinary consultant or marketing expert could help you determine factors like this.
Use photos or images as much as possible.
Images are more likely to catch attention than posts that contain just text.
As with your website, obtain a client’s permission if you post their pet’s picture.
Try to engage your followers.
Ask them questions, ask them to post pictures of their pets, and so on—anything that encourages them to interact with you in a positive way.
While you’re planning the veterinary practice of your dreams and working out the more material aspects of financing, equipment, and so on, go ahead and start thinking about how you want potential clients to see your practice.
Think about your practice’s philosophy and culture, as well as the impact you would like it to have on pets and pet owners in the community.

Then, think of how to express that message in everything you do online—on your practice’s website and all of your social media posts.
That way, new clients who find you online can get to know you and feel happy about scheduling their pet’s first visit.
Written by: Dr. Tammy Powell, DVM

Veterinary Flat Panel Detectors: Canon Cesium vs. Heska Cuattro

Compare before you buy
If you’re thinking of upgrading your x-ray equipment from films or CR, a DR flat panel detector is a great option.
There are several manufacturers that make these products, with Canon Cesium and Cuattro by Heska being top contenders.
Read on for more information that may help you decide which system is best for you.
What Is a Flat Panel Detector?
A flat panel detector is used for capturing images with digital radiography. There are two types: direct and indirect.
Direct FPDs involve converting x-ray photons into an electric charge, while an indirect FPD converts electrons to light and then to an electric charge. In both systems, a thin film transistor (TFT—a reader that contains millions of pixels, similar to the sensor inside a digital camera) reads out the image.
For indirect FDPs, the scintillator layer (the one that converts x-rays into light) may be made of cesium iodide or gadolinium oxysulfide, with cesium generally considered the superior of the two options.
Why Use a Flat Panel Detector?
One of the primary advantages is the speed of DR systems, which allows you to take radiographs more quickly and efficiently.
This means greater profits (many clinics report taking MORE radiographs after upgrading to digital) and improved patient comfort/safety.
DR also provides excellent image quality with less retakes and lower radiation doses.
Canon Cesium Flat Panel Detector
Canon is generally regarded by the veterinary community as a manufacturer that makes good quality products for diagnostic imaging.
The Canon CXDI flat panel detector features…
A cesium iodide scintillator, along with an amorphous silicon detector.
6.1 million pixels for a 14”x11” plate, 9.5 million pixels for a 14”x17” plate, and 11.3 million pixels for a 17”x17” plate.
A/D 16 Bit.
Carbon fiber design with ergonomic handgrips.
Cuattro Flat Panel Detector by Heska
Heska is also widely regarded as a reliable system that produces high-quality images.
The Heska Cuattro flat panel detector features…
A cesium iodide scintillator, along with an amorphous silicon detector.
15 million pixels for a 14”x17” plate, and 18 million pixels for a 17”x17” plate.
A/D 16 Bit.
Automatic exposure detection.
Carbon fiber housing front and back.
Which Is Better: The Canon Cesium Flat Panel Detector, or the Cuattro Flat Panel Detector By Heska?
You really can’t go wrong with either system. Both have received overall positive reviews from veterinarians, and the final decision may come down to personal preference, along with complementary factors and services.
Here are a few things to consider when purchasing…
Warranty. Ask about warranty type (what it covers, and what it does not cover) and length, as well as cost to renew a warranty once it expires.
Loaner equipment availability. If you need to use your warranty or have equipment repaired, ask if loaner equipment is available and how quickly it can get to you. After all, you don’t want to be without radiographs for longer than necessary!
Ongoing expected costs, such as service/maintenance, software upgrades, and cloud-based storage costs.
Durability/expected lifespan of the equipment. Ask your sales rep and your veterinary colleagues for their experiences.
Software. You will use the software with each image you take, so be sure you like the accompanying software’s quality and ease of use. Also, check for image formats (jpeg or DICOM, for example) that you may need.
Compatibility. Will you use your current generator/table, and if so, does the DR system need to be fitted to your current equipment? Does the software integrate with your current practice management system?
Support availability. 24/7 support is best.
Upgrading to DR is an important decision that may take some research to choose the best system for your needs.

We recommend choosing a high quality, reputable brand (like Canon or Heska) and evaluating the software, deals, warranty/service, storage, and other factors that will impact your overall investment and satisfaction with your purchase.
Written by: Dr. Tammy Powell, DVM

EZ Dent: Advanced Veterinary Dental X-Rays with MyVet USA

Dental radiographs are an integral part of dental procedures in small animal medicine
Without x-rays, it’s not possible to see the full extent of periodontal disease or other problems (FORLs, dentigerous cysts, tooth root abscesses, etc.) that happen below the gumline.
As dental radiography has become prevalent in modern veterinary medicine, there are many companies and manufacturers that offer dental x-ray equipment and software for veterinarians. Today, we’ll be examining some of the features and considerations of the EZ Dent dental x-ray system by MyVet USA—including the x-ray generator, intraoral sensor, and software.
MyVet Imaging
In 2018, the US-based MyVet Imaging became a subsidiary of South Korea-based Rayence, a provider of digital x-ray equipment for human medicine.
Rayence and MyVet Inc. are headquartered in New Jersey for US operations, with veterinary offerings for small and large animal radiography, including digital dental radiography for small animal and equine patients. They advertise innovative dental imaging solutions, including the world’s first veterinary panoramic dental x-ray system and Carbon Nanotube (CNT) technology.
The EzRay VetTM Cart
Despite the intrigue of a panoramic system, many veterinarians prefer the details and consistency of traditional style DR or CR radiographs for small animal dental rads. The EzRay Vet Cart, a mobile intraoral x-ray cart system, is offered by MyVet for this purpose.
Some of the benefits of the EzRay Vet Cart advertised by MyVet include…
Carbon nanotube (CNT) technology, which they claim reduces maximum exposure time by 75% while still maintaining image quality. The beam has a 0.4mm focal spot, and exposure setting controls are said to automatically adjust the exposure setting to maintain image density.
Ergonomic design, featuring a non-drift arm and head that is compact, lightweight, and easy to position with one hand.
Preset technique options.
No warm-up time or waiting time between shots.
A wall-mounted unit is also available.
The EzRay Air VetTM
The EzRay Air Vet is a handheld generator option. This may suit the needs of veterinarians who require the unit to have ultimate mobility, or who have tight spaces in their clinic. MyVet advertises that the portable generator also features CNT technology, is up to 30% lighter than other handheld units, has no warm-up time (for faster workflow), and features a double scatter shield (with internal and external shielding) to protect from scatter radiation.
EzSensor Vet
The EzSensor Vet is an intraoral sensor for veterinary digital radiography, featuring CMOS technology. Available in sizes 1.0, 1.5, and 2.0, the sensor features rounded corners and a slim design to help with positioning. MyVet advertises superior image quality with low noise, as well as water and dust protection and a reinforced fiber optic cable, which helps with durability.
MyVet DentTM Acquisition Software
The DICOM-compliant MyVet Dent acquisition software is designed to be intuitive and work seamlessly with the EzSensor to quickly acquire, process, and manage images. Since it’s a digital system, there’s no need to process films or plates, so the results are fast. MyVet also advertises that the software features customizable options and tools, and easy integration into an existing clinical network.
Additional Considerations
The EzDent dental x-ray system from MyVet may be an affordable option for small animal veterinarians who perform dental procedures. As with any dental x-ray or other equipment purchase, it’s important to ensure you’re obtaining the best equipment for your needs and to calculate to see if the total costs are as expected and within a budget that makes sense for your practice.
To evaluate the equipment quality and user-friendliness, ask for a demonstration or for referrals to other veterinarians who are using the equipment and can give you honest feedback.
To calculate total costs, ask about any additional upfront fees (shipping and installation, for example) and ongoing costs (service and maintenance, warranty renewal, software upgrades, etc.).

By considering all these factors, you’ll know you’re receiving a good value, and you can confidently choose the best option for your dental needs.
Written by: Dr. Tammy Powell, DVM

What Dental Radiographs Reveal Beneath the Gumline in Pets

When it comes to dentistry, sometimes teeth are like icebergs—there’s a lot going on “below the surface.” In this case, under the gumline.
Unfortunately, the parts of the tooth you can see don’t always tell the whole story.
That’s where dental radiography comes in.
Here are a few situations when dental x-rays could make your client communications easier, help you provide better patient care, and improve your bottom line…
Finding pesky root tips
If you’re extracting a tooth with a fractured root—whether the root splintered prior to the dental procedure or the tip happened to break off during a difficult extraction—you generally want to be sure you’ve removed each and every piece.
In many cases, root tips left behind can lead to infection, pain, or an abscess, plus another procedure to retrieve the piece and an unhappy client.
Radiographs help because you have confirmation that you’ve removed all pieces of the tooth roots.
For extractions, it can be useful to take “before and after” images that clearly document the successful removal of the tooth and its root(s).
Informing owners of the risk of jaw fractures
Sometimes, periodontal disease has caused so much bone loss that it leads to a pathological fracture in the jaw.
Or, the jaw could have so much bone loss that there’s a high risk of iatrogenic jaw fracture during a dental procedure and extraction.
You can probably imagine what could go wrong without radiographs…
When you extract the bad tooth, a jaw fracture can occur if that area of the mandible is already severely compromised due to disease and bone loss. But without radiographic proof of the underlying condition, the client may be inclined to blame your technique, rather than recognizing the severity of their pet’s periodontal disease.
Taking radiographs beforehand helps to set up realistic expectations of risk.
Discovering retained and impacted teeth
Whenever teeth are missing, dental x-rays are a good idea.
Sometimes, below the gumline, you’ll find retained or impacted teeth. Left in place, they could lead to dentigerous cysts or other problems.
Without radiographs, these “hidden” teeth can be difficult to find and treat.
Detecting damage to neighboring teeth
Maybe there’s one tooth that’s obviously bad… But, bone loss and infection have also affected the integrity of the neighboring teeth.
Dental radiographs will help you determine whether or not neighboring teeth are viable. And, the images provide tangible evidence that a neighboring tooth needs to be extracted.
This visual aid can make it easier to show a client exactly what you’re talking about, and help to reinforce your recommendations.
And more…
Dental radiographs can also help you look for oral neoplasias, feline resorptive lesions, tooth root abscesses, and more.
Sometimes this will help to confirm your clinical suspicions based on the patient’s presentation and symptoms. Other times, the findings may come as a surprise—allowing you to treat before the problem becomes worse.
With all the information dental x-rays provide, they can really help you create a thorough treatment plan that covers everything a patient needs during their dental procedure.

Your treatment recommendations can help to improve your dentistry revenue. And, importantly, your dental images can also help you provide excellent patient care and increase client knowledge and compliance.
Ask us about a free demo for your hospital, to see how dental radiography can fit into your practice space and daily appointment flow.
Written by: Dr. Tammy Powell, DVM

Mastering FORLs: X-Ray Insights for Better Dental Procedures

To extract or not to extract that tooth root?
Is a crown amputation all that’s needed?
When it comes to feline odontoclastic resorptive lesions (FORLs), these may be the questions you’re asking yourself.
FORLs can cause loss of the protective surfaces (enamel, cementum, and dentin) of both the crown and the root(s) of a tooth, resulting in pain.
These lesions come in two varieties:
Type 1: Where the root appears radiographically normal.
Type 2: Where the root is radiographically hard to distinguish from the surrounding bone, with loss of visibility of the periodontal ligament space.
As you know, the treatment for these lesions is different—full extraction of the root(s) for Type 1, versus just a crown amputation for Type 2.
Performing a crown amputation and leaving a root in place for Type 1 could result in problems or complications, not to mention continued pain for the patient.
On the other hand, trying to extract the root of a true Type 2 lesion could be a monumental task and a big headache.
So, it’s very important to determine what type of lesion you’re dealing with. Here’s how…
Diagnosing FORLs
Patient presentation:
A client brings their pet to you because of halitosis, food dropping, and occasional jaw chattering.
During the physical exam, you notice bright red, inflamed gums and gingival hyperplasia near one of the mandibular premolars.
You suspect a FORL—and given that FORLs are one of the most common dental problems in cats, you’re probably right.
You suggest a dental procedure, including dental radiographs, a full cleaning, oral exam, and possible extraction. The client agrees with the plan.
The day of the procedure
After the patient is anesthetized, your technician obtains radiographic images of the entire mouth, which takes just a few minutes to perform.
Then, you look at the radiographs in conjunction with your oral exam.
While probing the tooth in question, you feel a rough patch under the gingival hyperplasia, consistent with a resorptive lesion.
The x-ray confirms your diagnosis.
Determining the best treatment plan
In this case, the patient’s tooth is clearly Type 1, with a periodontal ligament space still visible. So, you perform a full extraction.
While evaluating the dental rads, you also notice the premolar on the opposite side is starting to show radiographic evidence of a lesion.
Even though it’s mild, you call the owner and inform them of the likelihood of progression.
To prevent a painful lesion from developing between dentals, the owner decides to go forward with a pre-emptive extraction of that tooth as well.
Documenting the extraction
In addition to being an integral part of your treatment plan decisions, dental radiographs can also help you document that extraction was performed successfully.
A post-procedure x-ray image is a great way to document that there are no root tips left behind.
And, in cases where a crown amputation was indicated, dental rads provide visual proof that this was an appropriate treatment course.
In this way, dental radiographs not only help you to plan and implement a very high quality of medicine—but they also give you peace of mind and are a valuable part of your medical records.
Talking to clients about dental radiographs
Maybe you already know the benefits of dental radiography—but you’re concerned about discussing the additional cost with clients.
Often, it helps to include the x-rays as part of the dental procedure package. List them on the estimate so the client understands the value they are receiving—just don’t itemize the cost of the radiographs separately.
Be sure to adjust the estimate of the dental package accordingly, to cover your costs. And remember, with a monthly payment plan for your dental radiography system, just a couple of dental procedures per month can cover your investment.

Client education also helps. Explain how the results of the radiographs allow you to provide the best possible treatment and reduce the likelihood of future complications.
With clients who want the best for their pets, it’s a win-win for both of you.
Written by: Dr. Tammy Powell, DVM
Equine X-Ray Generators: Plug-In vs Battery-Powered Insights

Plug-In Or Battery Powered?
As an equine practitioner, many of your daily practice needs are different from those of your small animal colleagues.
Maybe you meet your patients where they are, in a barn or on a farm call. Or, even if you have a facility that allows for equine visits and hospitalization, you may still need portable equipment to bring with you into a stall.
So, which type of portable generator is best for you: plug-in or battery-powered? Here are some things to consider…
Benefits of Battery Powered Portable Equine Generators
One obvious advantage is that a battery-powered generator may be easier to use out in the field, for the simple fact that you’re “wireless” and thus not dependent on a power outlet. This may be especially helpful in situations where power outlets are not immediately accessible, during power outages in inclement weather, or in some barns or other locations where the power supply may be less consistent.
The lack of a cord also allows for simpler mobility during use. There’s no need to untangle a cord and no possibility of tripping over the wire at any point during the procedure.
Benefits of Plug-In Portable Equine Generators
The most common reason for equine practitioners to choose a plug-in generator is probably this: They don’t want the battery to run out!
Nowadays, there are battery-powered generators available that have long battery life. However, depending on how many hours you’re out, a battery may or may not meet your needs. Or, a team member may forget to charge it between shifts. Also, some practitioners note that battery life may decrease over time—and that the batteries of an x-ray generator can be very expensive to replace.
Additional considerations mentioned by some veterinarians are that plug-in generators may weigh less than battery-powered units. Also, plug-in units may cost less on average. There are variations in weight and equipment cost from model to model, though.
Other Considerations
Different brands and models may offer different price points, battery/equipment expected lifespan and other important differences. Researching before a purchase is crucial.
This includes talking to the company and colleagues for recommendations (ask companies for referrals to other practitioners in your area who use the equipment or ask around in online forums or in-person events).
In addition to the equipment itself, you’ll also want to consider things like warranty, ongoing costs (repair and service costs, and image storage costs for digital), integration with any of your current equipment (for example, if you already have a plate), ease of use, durability in rugged conditions or temperature extremes, and whether 24/7 live technical support is available.
With all this in mind, different veterinarians may have various preferences—there’s no one size fits all in terms of plug-in versus battery-powered portable equine generators or in terms of a particular brand and model that are best for everyone.

So be sure to do your research and gather feedback from colleagues, but also think about what will work best for your own preferences and individual practice needs.
Written by: Dr. Tammy Powell, DVM

How to Evaluate the Urinary Bladder Effectively on Ultrasound

An ultrasound of the urinary bladder can be recommended for a number of reasons, including suspected uroliths, cystitis, and neoplasia—to name a few.
Often, the evaluation includes the entire abdomen and any other parts of the urinary tract that can be visualized.
Given all the conditions that can affect the bladder, as well as important information from an ultrasound study to help guide the treatment plan, it’s beneficial to gain proficiency in evaluating the bladder via ultrasound.
Use a Systemic Approach to Evaluating the Bladder
A systemic approach to the whole abdomen is good, and a bladder evaluation is usually just one part of an abdominal ultrasound study. So while it may be tempting to jump to the bladder right away if the patient is having urinary symptoms, it’s best to complete your abdominal ultrasound study in the same order that you usually do it.
Once you reach the urinary bladder, a systemic approach is again useful, to ensure nothing is missed. Here is one method for a stepwise evaluation…
Is the overall bladder shape normal and as expected? Through practice, a veterinarian can get a good feel for what shape is normal for canine and feline patients, and how it may change if the bladder is full versus empty or nearly empty.
How does the lumen of the bladder look? If urine is present, is the urine is anechoic? Is there sludge, sediment, crystalline material, a polyp, or anything else that is abnormal?
If there are uroliths present, they generally appear as hyperechoic structures inside the lumen of the bladder. There may be acoustic shadowing, and the calculi may move freely depending on how large they are.
Is the bladder wall smooth, a normal thickness, and well-defined? Be sure to evaluate the entire bladder. If cystitis is present the wall may be focally or generally thickened or have irregularities in the mucosa, depending on the severity and duration of the cystitis. Keep an eye out for polyps or masses/tumors, too. Also, look for deviations in the wall that could indicate a urinary bladder diverticulum.
If a mass is present, make note of the size, appearance, and location. Transitional cell carcinoma, the most common neoplasia of the bladder, tends to occur in the bladder wall near the neck and trigone. Commonly, these masses are hyperechoic or mixed echoic and have been compared to cauliflower in appearance. Evaluate nearby blood vessels and regional lymph nodes, too. Avoid cystocentesis or aspiration for samples, because of the risk of seeding the neoplasia into the abdominal cavity when the needle is withdrawn. Sometimes, it’s easy to confuse blood clots with masses, so keep this in mind and re-evaluate as needed.
Be sure to evaluate other urogenital structures, including the kidneys and ureters (the latter are often not visible unless there’s an abnormality), as well as blood vessels and lymph nodes in the region. Remember to look for the uterus/ovaries in intact females and the prostate in males, although it might not be possible to visualize these structures in all patients, especially if they are normal.
Whenever abnormalities are noticed, describe them in detail and take measurements. Include all of this in the notes. Even if things look normal, it’s still a good idea to take some measurements (such as bladder wall thickness) and describe what you’re seeing, as a baseline for comparison in case anything changes in the future.
A Few Tips
A full bladder can help with visualizing certain lesions (such as hyperechoic uroliths) by providing “contrast” or a backdrop to help make abnormalities stand out. Also, a full bladder smooths out the bladder wall, whereas an empty bladder may lead to false readings of wall thickening or masses. Additionally, a large bladder allows for an easier ultrasound-guided cystocentesis. So whenever possible, try to ultrasound with a full, or at least partly full, bladder. In some cases, it may be appropriate to give the patient water or IV/SQ fluids and wait for the bladder to fill prior to the study.
Pressure from the transducer can alter the bladder’s shape.
So be sure to practice with various pressures and become familiar with how the appearance of the bladder might change.
Repositioning the patient can also be helpful.
This may give you a better viewing angle and position for certain structures. Having the patient stand up may put gravity in your favor by decreasing the distance between the bladder and the probe. Also, patient movement may cause sludge/sediment to move around or disperse so that it’s not mistaken for a urolith.
Have appropriately sized needles, syringes, and collection materials available.
In case an aspiration/cystocentesis is needed, it’s best to have supplies ready to go.

Ultrasound of the urinary bladder is a very valuable skill, and it works well in conjunction with information gained from x-ray studies. Training and practice in ultrasound of the urinary bladder are often well worth it for patient care and for additional income from ultrasound studies.
Written by: Dr. Tammy Powell, DVM

Adrenal Ultrasound in Big Dogs: Step-by-Step Techniques

A thorough abdominal ultrasound includes evaluating the adrenal glands.
Common reasons to look at the adrenals include searching for signs of neoplasia, Cushing’s, or Addison’s disease. And even in animals where adrenal disease isn’t suspected, sometimes growths or other changes to the gland(s) are discovered incidentally.
Unfortunately, sometimes adrenals can play “hide and seek” and be tough to find. That’s true for any dog—but especially for large dogs with deep abdomens, since the abdomen may be too thick for the ultrasound waves to penetrate well.
Having a repeatable system for where to look can help. Here are some steps for finding those tiny glands inside of a big dog…
Perform an Abdominal Ultrasound in the Same Order Every Time
Just like reading an x-ray or performing a physical exam, a systemic approach helps ensure that nothing is missed.
Each veterinarian may have their own preference for how to go through a scan in a stepwise fashion. For example, some may scan cranially to caudally. Others may scan clockwise, or have some other system. Any system is fine, so long as it covers everything you need to see and is easy to repeat on each patient. So choose what works best for you.
In addition to revealing unexpected abnormalities of the adrenal gland(s) sometimes, systemically examining the entire abdomen will also help a veterinarian gain experience. Then, when it’s time to locate the glands on a patient with suspected adrenal disease, you’ll have plenty of practice to fall back on and may feel less pressure.
Where to Find the LEFT Adrenal Gland
To narrow the search, first, find the left kidney by scanning the left dorsal mid-abdomen.
Next, narrow the search even further by finding the vascular landmarks: the aorta (in long view) and the left renal artery.
Look for the spot where the left renal artery branches off from the aorta. The left adrenal gland should be just cranial to this junction.
Where to Find the RIGHT Adrenal Gland
First, locate the right kidney by scanning the right cranial abdomen.
Next, locate the vascular landmarks: the caudal vena cava (in long view) and the cranial mesenteric artery.
Apply some pressure, which will cause compression of the caudal vena cava and allow better visualization of the adrenal gland. The gland is dorsolateral to the vena cava and just cranial to the cranial mesenteric artery.
A Few Tips
It may be tempting to use the kidneys as a primary landmark since the adrenal glands are located near each kidney. However, the kidneys may overshadow the small glands. So while the kidneys are a good starting point, it’s also important to use vascular landmarks.
Color Doppler can be a big help, too. It often makes it easier to find and view vascular landmarks.
Minimize the distance between the probe and the adrenal glands as much as possible. This can be done by moving the probe as needed, and by applying gentle pressure if the patient allows.
What to Include In the Medical Record
Be sure to describe any abnormalities. Additionally, rather than just noting ‘normal’ or ‘abnormal’, it’s good to provide specific details in case a comparison is needed in the future. Here are some things to note, even if the glands look normal…
Measure and record the size of each gland. Measurements are typically taken from the cranial to caudal pole, as well as a measurement of the thickness of each pole.
Note if the glands are hypoechoic to surrounding fat or if their appearance is different than expected.
Classic adrenal gland shape has been compared to a ‘peanut’, or sometimes an ‘arrowhead’ for the right adrenal. Note if the shape is as expected or if it’s abnormal.
If any abnormalities are noted, list the most likely rule-outs and a recommendation for follow-up/monitoring or further diagnostics if indicated.

With practice, locating the adrenal glands will become second nature. It may still be challenging on some patients, but having a repeatable system and gaining experience will help.
Written by: Dr. Tammy Powell, DVM

Essential Technologies to Transform Your Vet Practice
In part one, we explored some popular new technologies being adopted by many veterinary practices, such as cloud systems, telemedicine, and mobile apps.
Today, we’d like to take it a step further and discuss some new and evolving tech that may help you provide great patient care and customer service in totally new ways.
Here are some technologies to think about…
Pet Wearables
There are now devices available for pets that can monitor body temperature, heart rate, respiration, and more.
Often, this would be something pet owners purchase and use at home, similar to a FitBit. This technology may help pets with medical issues (such as tracking a resolving fever or monitoring exercise in overweight pets). Or it may help with something as simple as seeing true TPR values when a pet is at home and relaxed versus at the clinic and stressed.
Another thing to consider is the possibility of having these devices at your clinic, for a low-stress way to get a TPR during a pet’s visit.
You’ll have to decide for yourself the practicality and dependability of this relatively new pet trend—but the possibilities are certainly exciting!
Live or Visual Information Sharing
Times have changed from the days of placing x-ray films on viewers in your exam rooms for clients to look at (and reserving the room with the “best” x-ray viewer for that specific client!).
Don’t get us wrong—this traditional technology can still get the job done. But how much more convenient and interactive would it be to share digital info and images on large, flat-screen monitors that you have in each of your exam rooms?
This digital, high-depth technology looks impressive to clients. And even when you’re not using a monitor to present patient information, you may want to have informational pet care videos playing to keep clients entertained while they wait (and also promote some of your services).
Plus, there’s an opportunity for live sharing when clients can’t be in the room with their pets.
One example would be cameras mounted on the ceiling for live and convenient sharing of patient updates, bloodwork, ultrasound findings, etc. Even some microscopes can connect to Wi-Fi.
This type of visual, real-time sharing maybe even more relevant until pandemic restrictions are lifted…
Since clients can’t always accompany their pets into the clinic, this can help them feel like they’re still connected. Instead of worrying about the “unknown” (i.e. what happens when their pet is taken to “the back”), clients can see some of what’s happening during an exam or other procedures. This may provide mental comfort, confidence, and trust.
3D Printing
According to the University of Illinois College of Veterinary Medicine, 3D printing can help surgeons plan and practice a surgery ahead of time, via models of bone that are created based on CT scan images. Printers can also replicate muscles, blood vessels, and other organs for this purpose.
In addition to a veterinarian’s use for surgical planning, 3D printers can create models for client education purposes.
Encourage Clients to Use the Tech in Their Phones
While not considered new or ground-breaking anymore (since most of us have had smartphones for some time now), simple features on a phone like a camera or voice memo can be immensely helpful during a visit.
For example, if you’re going over bloodwork results, encourage a client to record what you say—that makes it less likely their spouse (who wasn’t at the visit) will call and want you to go over all the results a second time.
Or if your team is demonstrating how to clean a dog’s ears, have the client record it so they can replicate the process at home.
Choose What’s Right for You
If you’re just opening your own veterinary practice, it might be worth it to invest in new technology right from the start—to help set your clinic apart from the competition, and to customize your practice so it suits your workflow, communication style, and the type of medicine you’d like to practice.

It may also be practical to start with just a couple of new technologies at a time—to save some expenses when first opening a practice, and to wait and see what other new technologies are developed in the meantime until you’re ready to invest again.
Either way, it’s certainly valuable (not to mention fun) to start “dreaming” about how you want your veterinary practice to look and function.
Dreaming is the first stage of planning—and imagining what sorts of tech you’ll use in your veterinary practice can help you bring your dream to life.
Written by: Dr. Tammy Powell, DVM

Client Communication and Customer Service Training

Veterinarians and veterinary team members sometimes say they got into veterinary medicine because they like animals more than they like people.
But the truth is, no matter how much you and your awesome team love animals, a large part of your job will consist of dealing with the human beings attached to those animals.
Why Invest Time in Communications and Customer Experience Training?
You’ll probably have some clients you love, others you feel neutral about, and others that you find difficult to work with.
Sometimes, the art of “communications” is presented primarily as a way to become skilled at conflict resolution, for those times you’re dealing with people who are rude or argumentative.
But the truth is, communications can help ALL of your clients (everyone from difficult to A-list) better understand your services and the value you provide.
It can help them feel comfortable coming to you with their questions and concerns and have a better perception of you and your veterinary practice.
All of this can potentially lead to more income, as well as more flattering online reviews and word of mouth referrals.
Communications and customer experience are fields where there’s always more to learn, and these skills can continue to improve with practice over time.
But, here are a few good places to start…
Communicating for Clarity
One of the most important things to do is ensure your clients understand the information you’re telling them about their pet—and, that they’ll retain that information.
Here are some ways to do that…
Clearly state what is happening.
For example, we’ve probably all heard stories about clients who thought a neuter was the same thing as a vasectomy—until they got home and realized their pet’s testicles had been removed!
Clear communication at the beginning (and not just assuming a client already knows what the word “neuter” means), could prevent such misunderstandings.
Offer ways for a client to easily recall the information or learn more.
For example, give the client a handout with more detailed information to refer to, or allow them to videotape your talk.
This can also help when they go home and relay the information to their spouse—so you won’t get a request to repeat your entire speech for their spouse!
Use distraction-free communication.
Make your exam rooms cell phone-free zones.
Have something available to occupy rambunctious kids (for example, a movie or toys).
And wait to bring the pet back into the room until you and the client are done talking.
Prioritize Time With the People Who Truly Value Their Time With You
It may be tempting to spend extra time in the room and debate with the client who wants to listen to their breeder or Dr. Google instead of you…
And sometimes that’s worth it. But, if you’re pretty sure that person is never going to change their mind, your time may be better spent with a client who WANTS to hear what you have to say.
So instead, spend that extra time with the sweet client who is a little chatty but always seems to say thank you and really appreciate (and follow) your advice.
Keeping All Your Communications Consistent
If you and your technician both give a client the same advice about heartworm prevention—but then your receptionist tells the client, “Nah, I don’t use it for my own dog…”—what would be the end result?
Probably confusion and doubt in the client’s mind. And maybe suspicion that you are selling products that aren’t really necessary for their pet.
This could happen with a variety of products and services, including parasite preventions, good quality pet foods, dental procedures, and more.
It’s important to be sure your whole team is on the same page, sending a consistent message to your clients.
The Little Things You Can Do to Improve Client Perception and Experience
Often, small little things you do to brighten a client’s day can make a BIG, positive impression—and bond that client to your practice for the long-term.
A few examples include…
Helping elderly clients by going out to their car when you see them arrive, and offering to carry their pet’s carrier for them.
Sending a card after a pet is euthanized, or during the holiday season.
Allowing clients to go out the back door after euthanasia, for privacy when they’re crying.
Telling clients how you change to a fresh needle after drawing up a vaccine, so the injection is more comfortable for their pet (remember, if you don’t tell them, they won’t know!).
Avoiding Client Shaming
While still somewhat controversial, this topic is drawing more attention in the veterinary community…
Client shaming means unintentionally (or, sometimes intentionally) making a client feel guilty when they’re behind on care for their pet or did something they shouldn’t have done (like giving a human medication that’s toxic for pets)—especially if it’s led to their pet becoming ill.
The thing is, most clients already feel very bad about it without veterinary team members making them feel worse.
If you can make your practice a safe space for clients to come without judgment, you may find that some of those very same clients appreciate it so much that they’ll be bonded to your clinic long-term.
They may even start to bring their pet to you more frequently for routine care and preventive diagnostics!
Of course, it won’t go that way every time. And clients do need to be informed when they’ve made mistakes, so they can avoid repeating those mistakes.
So, use your judgment to figure out the best way to communicate in each unique client situation.
Who Can Benefit From Learning More About Communication and Customer Service?
In short—everyone! The whole team, from the medical director to kennel assistant, could benefit.
Even if someone is naturally a good communicator, there’s no harm in that person learning more and adding additional communication tools to their toolbelt.

To get started, you can look for formal communication and customer experience training. You can also do in-house training, with role-playing.
Progress checks from time to time may help, too, so everyone can continue to learn and grow.
The time you invest can be well worth it. It can make everyone’s daily interactions (for team members and clients alike) as smooth and pleasant as possible.
And, nurturing happy clients can certainly help to improve your bottom line.
Written by: Dr. Tammy Powell, DVM

How to Explain Halitosis Risks to Concerned Pet Owners

Bad breath, or halitosis, is one of those health problems that’s easy for pet parents to overlook.
Sure, it’s inconvenient. Stinky breath can certainly put a damper on a pet owner’s cuddle time or other interactions with their dog or cat.
However, many pet owners don’t realize that halitosis can mean something much worse… such as periodontal disease, or even an internal problem.
As a veterinarian, you know this very well—but it can be a challenge to communicate the dangers lying “under the surface” when it comes to bad breath.
Explaining halitosis to pet parents
The first step is figuring out where the bad breath is coming from, and explaining the potential risks to clients.
Dental problems such as periodontal disease are the most common cause of bad breath in pets.
But sometimes, halitosis begins somewhere in the body other than the mouth.
Possible sources of halitosis include…
Periodontal disease and other dental issues.
A health condition such as kidney disease (an ammonia-like or unpleasant smell) or diabetic ketoacidosis (more of a sweet smell).
Respiratory diseases.
Digestive issues or dietary indiscretions.
Objects (like branches or chicken bones) stuck somewhere in the mouth.
Oral neoplasias.
Certain toxins.
Based on your patient’s history and physical exam, you’ll determine the most likely cause of the bad breath and decide if diagnostic testing is needed.
If the patient in front of you seems otherwise healthy but has apparent terrible dental disease, you can probably assume the smell (or at least, a large portion of the scent) is coming directly from their mouth.
If a dental procedure is indicated, you’ll likely do pre-op bloodwork, which will help confirm that the patient is otherwise healthy.
A recap of periodontal disease
It all starts with plaque, that thin film that forms on teeth due to food and saliva. We get plaque as humans, too, but fortunately, plaque can be removed by tooth brushing.
If not brushed away, plaque hardens into calculus (tartar) within as little as 24-36 hours. Then, it accumulates more and more over time and harbors bacteria. Calculus can’t be removed by toothbrushing alone.
Soon, this calculus (and its resident bacteria) become very irritating to the gums—and they like to grow below the gum line, where it’s harder to observe the process visually. This results in gingivitis, an early stage of periodontal disease (a disease process affecting the structures that hold teeth in place) where the gums become red and inflamed and may bleed.
From here, as the periodontal disease worsens, it creates pockets in the gumline, destruction of the periodontal ligament, and even bone loss in the maxilla and mandible. In severe cases, this bone loss can cause jaw fractures.
This all leads to pain and tooth loss. And, opportunistic bacteria may enter the bloodstream via inflamed gums, traveling to and causing problems in organs such as the heart or kidneys.
Reminding clients of the dangers of periodontal disease can help them understand their pet’s bad breath is true health and quality of life problem—not just an inconvenience.
Evaluating and treating dental and periodontal disease
Your initial pre-op exam will be done while the patient is awake—ideally with the owner present so you can show them what you’re seeing.
However, awake exams don’t allow for a full oral assessment. And, dogs or cats who are painful might not let you get a good look.
So you’ll make a dental cleaning estimate based on your initial exam but explain to the client that the full assessment will be done during the procedure.
This assessment should include dental radiographs. Since much of the disease process starts below the gumline, x-rays are the only way to see the full extent of damage from periodontal disease.

Some patients will just need routine cleaning, while others may need significant dental extractions. And, you can talk to your clients about continuing dental care at home through tooth brushing and dental treats.
By providing this valuable service, you’ll be not only keeping your canine and feline patients in great health—but also increasing the human-animal bond by preventing halitosis from interfering with the quality time between a pet and their owner.
Disclaimer: This article is for general informational purposes only, and not intended as a guide to the medical treatment of any specific animal.
Written by: Dr. Tammy Powell, DVM

Good Exam Room and Dental Lighting: Why It Matters

When it comes to upgrading your veterinary practice, maybe the first things that come to mind are new exam tables, high-tech anesthesia monitoring equipment, or an in-house chemistry analyzer.
Was a new LED exam room light also on your list? If not, it should be. Here’s why…
While lighting is often overlooked, just think about how many times per day a good, strong light could make your life easier.
Times, when a high-quality LED light could come in handy in your exam room, include the evaluation of…
Lesions and wounds.
Dental disease or oral lesions.
Ocular health (you’ll use your ophthalmoscope and other equipment for a more detailed exam, but good room lighting can help you pick up subtle lesions during a routine checkup).
Paw pads and the spaces between the paw pads.
External ear structures.
Dander, fleas, and other skin and coat issues.
These are a few good examples—but really, good lighting can help with much of the physical exam by making it easier for you to accurately document tissue colors, textures, lesions, and other notable abnormalities in your medical record.
Good lighting is essential for dental procedures and surgeries
In our last blog post, we gave some advice on how to pick a good surgical light.
And along those same lines, don’t forget about dental procedures!
The mouth is like a dark cave, making it difficult for you and your staff to see what you’re working on if you don’t have good lighting.
Some things a good light will help you visualize include…
Calculus that needs to be cleaned—and verifying that all calculus was removed.
Enamel defects and small chips or fractures.
Staining, or other color changes such as pulpitis.
Subtle bleeding or mild gingivitis.
Oral abnormalities such as masses or inflammation.
Pharyngeal or tonsillar abnormalities.
Extraction sites—before, during, and after the extraction.
Placement and manipulation of small sutures.
Not to mention, a good overhead light can aid your laryngoscope light during intubation.
How affordable are good LED lights?
In the past, LED lights were very expensive compared to halogen bulbs—so it’s understandable if you’ve not purchased one before.
However, some brands are now 30-40% less than previous LED prices.
So, LEDs don’t have to be expensive anymore. And considering their performance and efficiency, a good LED light can be a great addition to your practice.
Plus, many cities, counties, states, and even electric power companies offer rebates for upgrading to LED lights, due to the decrease in power used.
Specific requirements for rebates vary by location—so be sure to check with your local municipality and utility providers to see what’s available in your area. Because it’s always great to get a cash rebate that can help cover the cost of your upgrades!
How do you choose a good exam room or dental light?
When it comes to selecting the best lighting, there are many things to consider…
Affordability. LED lights are much more affordable now than they used to be, so shop around and be sure you’re getting a good deal (to be sure you’re comparing apples to apples, check for the other factors on this list, too).
Quality and dependability. Plus, a good-value warranty helps to back up your investment.
Lighting adjustability in terms of intensity and dimming options, as well as area of focus.
Precise positioning. The light head and arm should be easy to move and manipulate—but then, stay right where you put it without drifting.
Easy to clean.
User-friendly, with simple controls on or near the handle.
Shadow-free illumination—or at least a design that minimizes shadows as much as possible.
Mounting options that match the layout of your rooms.
Comfortable and safe for pets, with adjustable settings you can change as needed, and low heat output.
Here’s what we recommend…
We recommend the new Burton veterinary LED exam light because it checks all the boxes listed above.
Plus, it has a high-quality LED (virtually heat-free and with a 75% energy savings compared to halogen), is assembled in the USA, and is backed by an industry-leading 5-year warranty.
At a competitive price point that optimizes design, performance, and value, it’s pretty hard to pass up!
Why invest in new lighting?
As we said, lighting is often overlooked in terms of equipment upgrades…
But, just think of how many times per day you’ll use a good-quality light in your exam rooms or dental area.
In terms of cost per use, that can make new lighting a great investment—something you’ll benefit from using many times per day.
And if your new light makes your life easier in terms of visualizing the patient and making accurate medical notes… that’s an investment that could save you time and headaches, and be well worth it!


The Value of Newsletters for Your Veterinary Practice

You don’t want to just see pets once and then not see them again for years…
Instead, you want to develop long-term relationships with your clients. You want to get to know dogs and cats when they’re first adopted, and keep caring for them well into their senior years.
There are many ways to develop this ongoing bond and trust with your clients. One simple but effective strategy is to stay in touch between appointments, through newsletters.
Why Should Your Veterinary Practice Have a Newsletter?
There are many ways newsletters are beneficial to veterinarians, including…
Staying front of mind.
Clients are busy, and after their pet’s checkup, they might not think about their veterinarian at all until the next time their pet needs something.
But informative or entertaining newsletters will help clients remember your practice and how helpful you are—so they’ll never have a reason to look elsewhere.
Developing trust.
They say people buy from those they trust. Newsletters help you in this regard.
By providing informative articles or other content, you can help dedicated pet owners learn more about their dog or cat’s health. Newsletters can reinforce what you teach clients during their visit, and also present new and valuable information on a variety of pet health topics.
Additionally, newsletters can show off a bit of your practice’s personality and culture. That’s especially valuable during curbside service when clients can’t always come in to “see” your practice for themselves the way they used to.
Sharing important announcements.
If you’re running a special promotion (such as dental month discounts or discounted vaccines on certain days of the week), newsletters are a great place to inform your clients.
Marketing and social engagement that isn’t subject to algorithms.
Last week, we shared information on social media for veterinary practices. And while social media is great, most platforms are subject to one potential disadvantage—algorithms.
In short, algorithms mean that social media platforms have a formula they use to determine which posts your followers actually see.
Newsletters, on the other hand, are delivered to EVERYONE on your email list, with no interference from finicky and unpredictable algorithms.
How Do You Set Up and Write a Newsletter?
Here are some tips for getting started…
Decide on a frequency.
Are you going to send your newsletter weekly? Every month? Every quarter?
This depends on your clients’ preferences, and your strategy may change over time.
If you’re not sure, one newsletter per month is usually a good place to start.
Create a template.
A template is a backdrop for your newsletter—the formatting, colors, and graphics that make it look visually appealing.
If you use a mail service provider like MailChimp, they generally have pre-made, professional-looking templates you can use.
If you want something more unique, you can look into formatting and designing your own template if you’re the creative type, or consider working with a professional graphic designer.
Brainstorm a list of ideas.
That way, you’ll never get “writer’s block.” See the section below for inspiration.
Share your articles.
Don’t just email your content. Also, post it on your website and share it on social media.
What Do You Write About?
Seasonal or timely content. This could include holiday hazards, fireworks safety, warm or cold weather advisories, and fun holidays like Love Your Pet Day or National Dog Biscuit Day.
Important announcements. Tell your clients about changes to the hospital (like closures or new staff members and new services offered), pet food recalls, local pet events, etc.
Veterinarian Q&A. Encourage people to send in general pet health and wellbeing questions, which may be answered by one of your veterinarians in a future issue.
Discounts and special offers.
Interesting or important pet health topics.
How-to articles, such as how to administer pills or brush a pet’s teeth.
Some Helpful Tips…
Keep the writing simple. Sometimes less is more, meaning shorter articles and shorter paragraphs are more likely to be read than larger chunks of text.
Include pictures, since they can make a newsletter more entertaining. Look for stock photos, including some of your own authentic photos from your practice, or work with an artist on Fiverr who can create infographics (such as a picture illustrating 10 plants that are toxic to pets) for a very reasonable price.
Also, create enticing subject lines that will make clients want to open and read your newsletters. For example, instead of a subject line that says “Pet Dental Health,” write “Dental Disease Affects a Pet’s Whole Body - Here’s Why…”
To save time and maximize your results, consider working with a professional marketer or copywriter who is familiar with the veterinary industry.
How Do You Know If Your Newsletter Is Effective?
If you put time into your newsletter, you want to know it’s accomplishing its purpose. Here are some ways to tell…
Look at statistics (such as how many people opened your email, and whether they clicked on any links you included) from your email service provider.
Take note of any engagement, such as people sending you questions, leaving comments, or even mentioning the newsletter during an appointment.
If you’re not getting a big response in the beginning, don’t worry—this is a marathon, not a sprint. Your goal is to build relationships over time, not get a huge wave of business with each article you send out.

All in all, newsletters are a good investment. They’re a great way to stay in touch and deepen those relationships that make caring for pets so rewarding.
Written by: Dr. Tammy Powell, DVM