


The benefits of stainless steel cages in Veterinary clinics
Advantages of Stainless Steel Cages in Veterinary Clinics
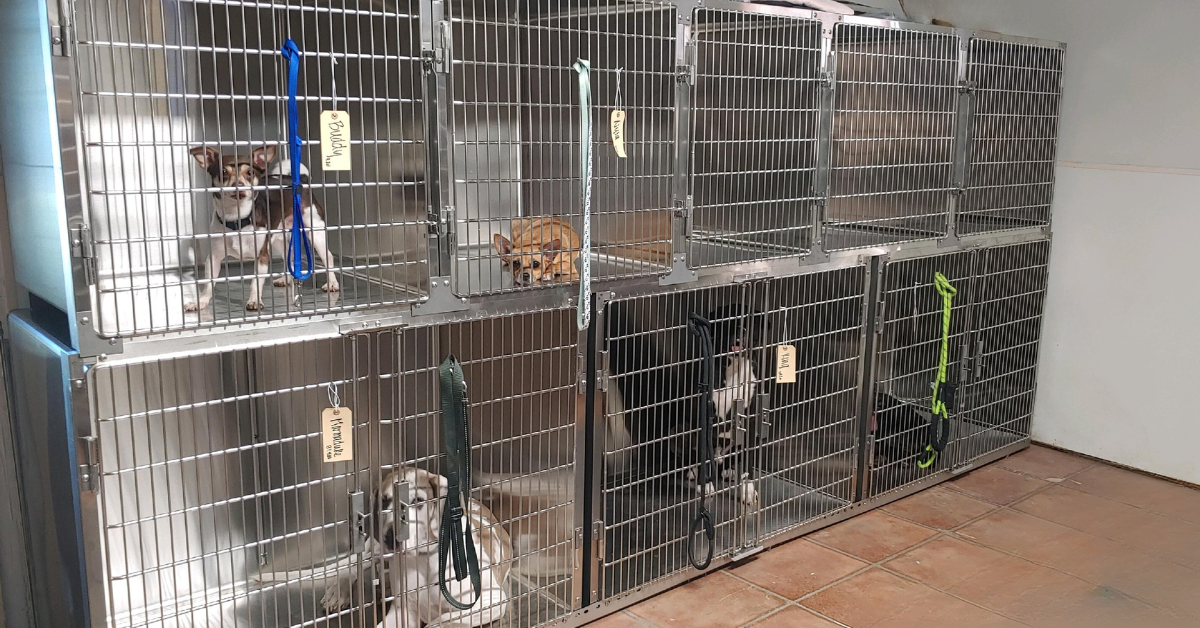
Stainless steel cages are now being widely used in veterinary practices across the world. Stainless steel is an iron-based alloy that is well known for its resistance from rusting and corrosion.
Stainless steel cages have gained popularity over the years because of their ease of maintenance, along with their smart appearance. These types of cages can also be used to comfortably and securely accommodate many species including dogs, cats, and exotics.
Therefore, they can be incorporated into many different types of practices. The following points will discuss the benefits of stainless steel cages in veterinary clinics, and we’re going to really focus on the hygiene benefits.
The importance of hygiene
Infection control and hygiene are of great importance in veterinary practices. The main reasons that practices have strict hygiene protocols are to prevent the spread of zoonotic and contagious diseases between patients or from patients to staff and to reduce the risk of antibiotic resistance.
Good hygiene provides a line of defense against harmful organisms and standard operating procedures are in place to set these protocols.
Hospital-associated infections sadly occur in both veterinary and human medicine and control is based on hygiene and environmental factors.
In veterinary practices, the more common diseases that can be easily transmitted between ward patients include urinary tract infections, viruses such as parvovirus or calicivirus, and multi-factorial syndromes such as pneumonia, infectious diarrhea, and kennel cough.
In already very vulnerable patients contracting these diseases during a hospital stay can be detrimental to their health.
Stainless steel cages – the benefits
Easy to clean
Stainless steel cages encourage and allow a good level of hygiene in the patient wards.
As stainless steel is a highly durable material with high chemical resistance, it is able to withstand and handle a wide range of different types of cleaners and disinfectants, as well as repeated application of these.
Plastic kennels can be relatively easy to clean but are often less resilient at withstanding repeated disinfectant applications.
Wooden kennels are an even poorer disinfectant, with microscopic pores that allow pathogens to evade the surface clean, and trapping organic debris that can inactivate many disinfectant agents.
Remain clean
The smooth and bright surfaces of stainless steel also allow the surfaces to be virtually free from bacterial retention after cleaning.
This high level of cleanliness is why places such as restaurants and hospitals also utilize stainless steel surfaces throughout their businesses.
Smooth surfaces mean that it is less likely that cracks and crevices appear that can harbor dirt and bacteria.
Time saved
Furthermore, the easier that something is to clean the less time that it takes. This means that more time can be spent focusing on looking after your hospitalized patients and delivering gold-standard care.
Strong and durable
Additionally, stainless steel cages are also extremely secure and safe. This is a feature that is vitally important in Veterinary practices as nobody wants an escapee patient!
Stainless steel is hard-wearing, and it is therefore able to withstand a lot of force even from the strongest of dogs.
Its robust physical properties also mean that, once they are installed, they are likely to be used for many years without needing to be replaced.
Smart looks
How aesthetically pleasing something is definitely is an important factor when planning any workplace environment. Stainless steel cages do give a professional appearance and the shiny polished surfaces provide a beautiful finish.
Hygenic separation
Often stainless steel kennels are positioned side by side or are stacked which helps to prevent the transmission of airborne pathogens to the patient next door.
To conclude, stainless steel is now a popular choice of material for cages in many types of Veterinary practices. Not only does stainless steel provide patient security and safety, but it also maximises hygiene which greatly benefits the health of both the patients and the hardworking veterinary staff.


Uncover the Advantages of Endoscopes in Veterinary Medicine
Shrinking Surgeries: The Advantages of Minimally Invasive Endoscopic Procedures
Endoscopy is a fantastic, minimally invasive tool that is now widely used throughout the veterinary field, both in small- and large animal medicine. You may or may not have access to endoscopy in your current veterinary clinic but even so, it is really handy to know when to reach or refer for this modality!
What is endoscopy?
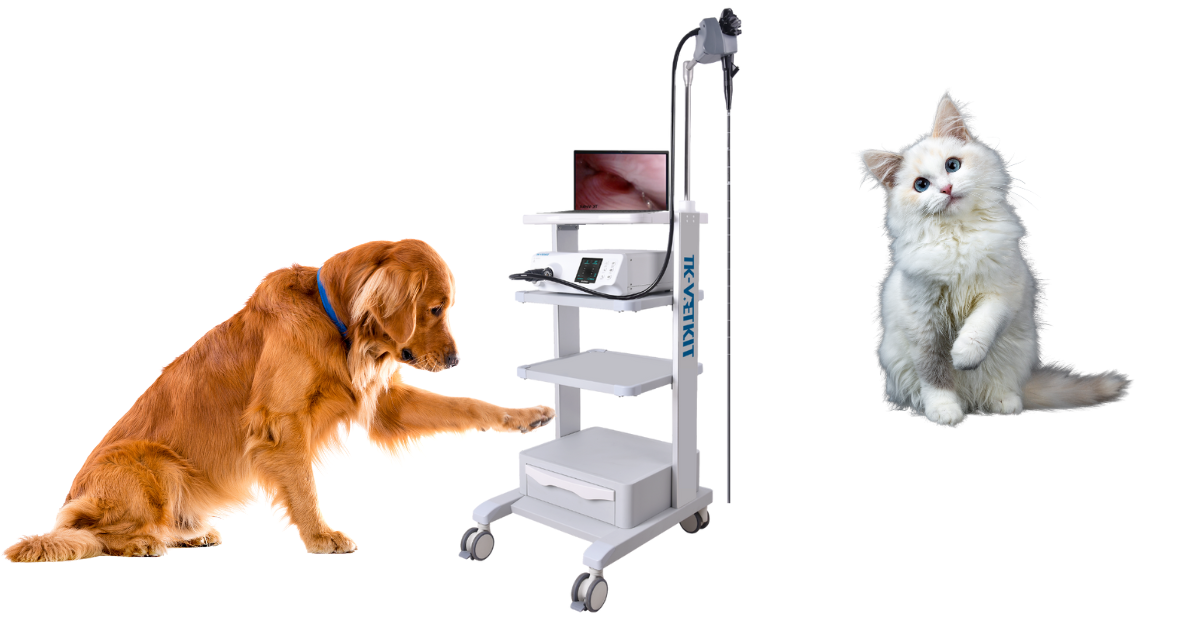
Let’s begin by reviewing how endoscopy actually works. Endoscopes are often described as “cameras'' which are used to view internal organs.
In reality, of course, we do not routinely place a camera into the patient; instead, we use an optical waveguide, typically in the form of fiber optics, which transmits light from the insertion tube and umbilical cord into the patient. The reflected light is sent back to the processor for image visualization
These optical devices rely on the principle of total internal reflection, a phenomenon whereby light can be reflected continually along an optical fiber or rod lens. The image can then either be viewed directly or projected onto a camera and displayed on a screen (as is increasingly common).
There are two major types of endoscope: rigid vs flexible
These are selected based on the area of interest. For example, if you wanted to examine the colon, bronchioles, oesophagus, or stomach then you would opt to use the flexible endoscope.
Flexible endoscopes are made up of moveable and easy-to-manipulate insertion tubes, containing one or more bundles of optical fibers.
Whereas fixed rigid endoscopes are better suited to procedures such as arthroscopy and laparoscopy, and comprise a steel sheath containing delicate rod lenses.
In either case, the insertion tube must be connected to an umbilical cord, which supplies light (it’s dark inside a patient, remember!), distilled water (for cleaning the lens), and in many cases the camera mount and other mechanisms.
In the case of flexible endoscopes, there will usually also be a handpiece on the end of the insertion tube that mounts the control wheels, for lateral and vertical flexion and extension of the scope. In many scopes, there is an instrument channel through which instruments can be passed such as surgical instruments, biopsy forceps, or grasping instruments.
The benefits:
There are many benefits of endoscopy in small animal procedures in particular which can enhance your clinical practice, improve patient outcomes, and reduce the requirements for referral to alternative or secondary providers.
Diagnostics:
Endoscopy is now a well-recognized diagnostic tool in the management of gastrointestinal disorders in dogs and cats (Rychlik and Kaczmar, 2020). Endoscopy and endoscopically guided biopsy have a high sensitivity to diagnosing mucosal disorders within the gastrointestinal tract.
Additionally, the endoscopic biopsy of the intestine is regarded as the gold standard in the diagnosis of IBD in dogs and cats in veterinary hospitals (Rychlik et al, 2007).
As well as gastrointestinal diseases being explored via endoscopy, the respiratory system can also be explored in this way too.
Rhinoscopy, bronchoscopy, and tracheostomy can all be performed to investigate pathology associated with these areas. Focusing on rhinoscopy, this technique allows direct visualization of the nasal mucosa, allowing samples to be obtained in a less traumatic way than direct surgery.
This is particularly relevant when nasal masses are present and require diagnosis (neoplasm or mycosis, for example) or where tumors require staging with minimal destruction of the overlying bony structures.
Minimally invasive surgery:
Whatever it is used for, endoscopy is always described as ‘minimally invasive.’ This is due to the small incision size and minimal exposure of the body cavity.
Consequently, because of the smaller surgical wounds with endoscopy compared to conventional surgical approaches, the healing process is quicker than with traditional surgical wounds.
Quicker healing times are of particular importance in dogs with working, competition or service duties, because of their rapid return to normal function.
Many clinics are now offering laparoscopic (keyhole) ovariohysterectomies or ovariectomies as an alternative to the traditional ventral median celiotomy technique.
As stated above, this spay technique is not only less invasive but it has also been associated with fewer postoperative complications (William et al, 2009).
Post-operative pain scores in dogs were found to be significantly higher in cases using the traditional technique versus the laparoscopic technique (Devitt et al, 2005). Other surgeries which can now be performed via endoscopy include gastropexy, cryptorchidectomy, and abdominal organ biopsy.
Foreign bodies:
Unfortunately, as we are all well aware, foreign bodies are common presentations in small animal practices. Whether endoscopy can be offered is dependent on the nature of the foreign body and its location within the gastrointestinal tract.
Endoscopy is currently the superior treatment of choice for the majority of gastric or oesophageal foreign bodies (Poggiani et al, 2020). Without the aid of endoscopy, in most circumstances, the alternative option is invasive surgery to physically remove the foreign object.
Endoscopy is greatly beneficial in the majority of these cases because it offers a less invasive and less costly option to the pet owner.
Additionally, endoscopy is associated with a much shorter hospitalization time which is beneficial for the patient.
To summarise, endoscopy has many benefits in small animal Veterinary medicine.
Whether you’re already a pro at endoscopy or a budding novice endoscopist, the movement is happening, and it is becoming widely available within the veterinary field worldwide.
Advancing Veterinary surgery: Exploring the benefits of endoscopes in small animal procedures
References
Devitt, C, M. Cox, R, E. Hailey, J, J. 2005. Duration, complications, stress and pain of open ovariohysterectomy versus a simple method of laparoscopic-assisted ovariohysterectomy in dogs. Journal of American Veterinary Medicine Association. 227: 921- 927.
Rychlik, A. Kaczmar, E. 2020. Endoscopic biopsies and histopathological findings in diagnosing chronic gastrointestinal disorders in dogs and cats. Vet Med Int. 9. Rychlik and Kaczmar
Rychlik, A. Nieradka, R. Kander, M. Depta, A. Nowicki, M. Sarti, K. 2007. Usefulness of endoscopic examination for the diagnosis of inflammatory bowel disease in the dog. Polish Journal of Veterinary Sciences. 10: 113-118.
Poggiani, F, M. Duarte, R, P. Santana, M, S. Galera, P, D. 2020. Endoscopic removal of foreign body in upper gastrointestinal tract in dogs: Success rate and complications. Sci Vet. 48: 1735.
William, T, N, C. Mayhew, P, D. Brown, D, C. 2009. The effect of laparoscopic versus open ovariectomy on postsurgical activity in small dogs. Veterinary Surgeon. 38: 811-817.

Veterinary Dental Care: Digital Radiology at the Forefront

Transforming Veterinary Dentistry with Digital Radiology
Dental disease is the most prevalent condition in dogs and cats presenting to small animal primary care veterinarians.
Periodontal disease is listed as the most common oral issue observed.
In recent years, digital radiology has revolutionized dental procedures in veterinary practice.
Accessing detailed images of what is lingering below the gingival surface at the click of a button can prove crucial in time-dependent clinical decision-making.
Digital dental radiology can vastly increase procedure efficiency, reduce serious complications, and improve the welfare of many veterinary patients.
Dental radiographic equipment is considered essential in the U.S. veterinary hospital according to the WSAVA global dental guidelines.
However, to appreciate the importance of dental radiology, it is essential to understand its clinical application in treating different dental conditions.
This article explores the use of digital dental X-rays in practice through specific clinical examples and how this technology might benefit your team and your patients.
Periodontal disease
Periodontal disease occurs when subgingival plaque and bacteria cause inflammation of the soft tissue and alveolar bone supporting the tooth.
Common sequelae include oronasal fistulae, abscessation, osteomyelitis, pathological mandibular fractures, and ocular disease.
Evidence is also growing to support the notion that periodontal disease contributes to systemic conditions in some patients.
Periodontal disease is most easily identified in anesthetized patients and has been observed in 44-100% of dogs as young as the age of two years in various studies.
The condition is identified by probing for periodontal pockets around each tooth. However, for teeth with a tight interproximal space (e.g., molars), pathological pockets cannot be reached with a probe and will only be detected via dental radiographs.
Without radiology, several teeth affected by periodontal disease could be missed entirely, with serious consequences for that patient.
Additionally, dental X-rays must be performed in small-breed and toy-breed dogs.
Their mandibular molars occupy a larger area of the jaw than other breeds and severe periodontal disease can cause areas of bone lysis that dramatically weaken the mandible, causing pathological fractures in some cases.
Dental extractions without radiographs risk iatrogenic mandibular fractures in these dogs and cats.
Feline resorptive lesions
Dental radiology is integral to determining the appropriate treatment in cases of TR or tooth resorption.
Where roots are retained without evidence of replacement resorption (dentoalveolar ankylosis), the roots remain painful, and there is a risk of an endodontic infection developing.
However, where a dental X-ray identifies roots that are completely resorbed and replaced by bone, infection is unlikely to occur, and extraction is not recommended.
In these cases, crown amputation is an acceptable treatment. For those feline patients with resorptive lesions where some evidence of the root and periodontal ligament remains, or signs of infection or stomatitis, coronectomy is unsuitable, and surgical extraction may be necessary.
Without dental radiographs, it is impossible to determine the condition of the tooth root and the appropriate course of action.
Performing coronectomy inappropriately can lead to extensive oral pain, root infections, and the requirement for revision dentistry.
In addition, identifying the best approach for extracting affected teeth can save considerable time during a dental procedure and avoid the need for salvage procedures.
PDT or persistent deciduous tooth
Deciduous teeth that fail to exfoliate can lead to overcrowding, malpositioning of permanent adult teeth, and increased plaque build-up, with all the consequences that this entails.
In addition, fractures and pulp exposure of deciduous teeth can cause endodontic disease and osteomyelitis, damaging the adjacent adult teeth in the process. Retained deciduous teeth, similar to FT, should be assessed for root resorption before extraction.
In many cases, where the root is partly resorbed, a surgical extraction approach is required. Non-surgical extraction without radiography risks tooth fracture and retained roots, leading to painful endodontic infections.
Where the root is entirely ankylosed, the clinician can be confident in their decision to amputate the crown, saving them time and stress and eliminating any unnecessary trauma to the patient.
Tooth trauma
Crown fractures with Dentin exposure can be painful and lead to root infections in the same way that pulp exposure can.
But, due to the subtle presentation, clients often chose to ignore these innocuous injuries.
In these cases, dental radiographs can assess the deeper structures for signs of inflammation and infection and demonstrate to the client when further action is warranted. Interventions include root canal therapy or tooth extraction.
However, when the tooth is viable, the exposed dentine can be sealed, and regular dental radiology can be used to monitor for future issues.
Similarly, where teeth are worn down due to excessive chewing, the viability of each tooth can only be assessed through dental radiology.
Other dental anomalies
The application of dental radiology is extensive.
Other uses include the assessment of ‘missing teeth’ for retained roots or unerupted teeth, dentigerous cysts, oral tumors (where CT is not available as a first-line assessment), and in cases of persistent oral pain.
In addition, digital dental radiology can be useful in cases of dental trauma where advanced imaging is not available.
Conclusion
Visual dental assessment is no longer acceptable to assess the extent of dental disease a patient is suffering.
And in many veterinary clinics, it is hard to imagine the future of veterinary dental care without digital radiology.
The WSAVA advises that dental radiographs are essential before and after all dental extraction procedures, allowing rapid assessment of whether tooth extraction is required, the most suitable technique, and the potential risks the clinician might face.
Through dental radiology, complications are reduced, vets work more efficiently, reasons for clinical decisions are evidenced, and the outcome of a procedure is visually documented.
But, most importantly, patient welfare is prioritized in therapeutic planning, and dental radiology is a huge step forward in reducing life-long dental disease and oral pain in veterinary patients.
References:
Fulton, A.J., Fiani, N., Verstraete, F.J. (2014). Canine pediatric dentistry. Veterinary Clinics of North America Small Animal Practice 44(2), 303-24
Gorrel, C. (2015). Tooth resorption in cats: pathophysiology and treatment options. Journal of Feline Medicine and Surgery 17(1), 37-43
Lund, E.M., Armstrong, P.J., Kirk, C.A. (1999). Health status and population characteristics of dogs and cats examined at private veterinary practices in the United States. Journal of the American Veterinary Medical Association. 214(9), 1336-41
Niemiec, B., Gawor, J., Nemec, A., et al. (2020). World Small Animal Veterinary Association Global Dental Guidelines. Journal of Small Animal Practice. 61(7), E36-E161
O'Neill, D.G., James, H., Brodbelt, D.C., et al. (2021). Prevalence of commonly diagnosed disorders in UK dogs under primary veterinary care: results and applications. BMC Veterinary Research 17(1), 69
Wallis, C., Holcombe, L.J. (2020). A review of the frequency and impact of periodontal disease in dogs. Journal of Small Animal Practice 61(9), 529-540
www.rvc.ac.uk/vetcompass/news/the-cat-s-out-the-bag-the-most-common-diseases-in-pet-cats-revealed

Revolutionizing Veterinary Care: Digital Dental Radiology

Exploring the Impact of Digital Dental Radiology in Veterinary Care
Since the discovery of X-rays over a hundred years ago, radiography has proved an invaluable tool in both the human and veterinary medical fields.
But it wasn’t until the mid-1980s that the technology made such a huge leap forward, that it turned the whole discipline upside down.
This is when digital radiography came along.
Up until this point, the process of obtaining radiographs was time-consuming, laborious, and at times, messy and potentially dangerous.
By using X-ray film and manually developing each image, practitioners were able to obtain an image, but if the alignment was wrong, or the settings were incorrect, they had no option but to repeat the whole process again.
With digital radiography, the image obtained can be instantly adjusted and manipulated to aid diagnosis and then stored digitally, allowing rapid recall of previous studies and saving vast amounts of physical space.
Where digital radiography has really come into its own though, is in the field of dentistry.
Veterinary dentistry has undergone a similar transformation in recent decades
Our understanding of the intricacies of how to provide a high-quality service has improved drastically, all aided by being able to look ‘under the surface’. When teaching dentistry, emphasis is placed on the areas below the gum line as often being the source of dental problems.
Therefore, it should be the required focus of treatment, much more so than the visible crown. We are now able to complement this knowledge with the ease and detail that digital dental radiology allows in order to provide a first-class, thorough treatment process for all our patients.
Teeth are regularly likened to icebergs
What you can see is only a small portion of the whole - and with teeth, it’s what is below the gum line that we need to focus on.
What we see on the crowns of the teeth, such as tartar or discoloration, and what we see on the gums, such as recession or gingivitis, are just markers for the damage we cannot see.
As with most things in veterinary medicine, it is always best to treat the source of a problem, rather than just manage the symptoms.
Scaling the tartar off the visible surface will give a good cosmetic appearance, but the bacteria and plaque – the origin of the tartar – will be in the gingival sulcus. If this isn’t cleaned as well, the problem can spread down into the periodontal space and tooth root.
The only way to thoroughly evaluate this area is to use radiography.
More complex pathologies really benefit from radiographic examination
Digital dental radiography can also bring huge advantages to the treatment of one of the most common, yet frustrating, aspects of feline dentistry – the feline resorptive lesion.
By utilizing dental radiographs, we can determine if the lesion is a type one or type two and therefore which of the two diametrically opposite treatment options – full extraction or crown amputation – is appropriate.
If radiography shows that only a crown amputation is needed, we have saved not only time and stress for the surgeon but also prevented unnecessary pain and trauma for the animal which would have occurred had the option chosen been to attempt full extraction.
Without the radiography, we only have half a diagnosis, and the treatment option chosen would be a ‘best guess’.
Imagine working like this in any other aspect of veterinary medicine!
Other things that can only be detected by radiography include:
bone loss
supernumerary teeth (especially if non- or incompletely erupted)
supernumerary roots
abnormally shaped roots
periapical disease
pulp diameter
It’s clear to see how the use of radiography in veterinary dentistry can yield huge benefits. And using digital dental radiography maximizes these benefits and brings its own.
With practice, a full-mouth series of digital radiographs can take a matter of minutes
This speed means that anesthetic time can be drastically reduced – a huge advantage, especially in fragile patients.
From an operator's point of view, digital radiography can provide vastly superior image quality and the ability to enhance certain features and correct radiographic faults.
This will all lead to improved diagnostic ability and treatment of patients.
The images can also be easily shared between practitioners and even sent to imaging specialists without the need to transfer the patient.
A key benefit that is also often overlooked is that digital imaging requires up to 80% less radiation to produce an image than traditional film radiography.
The big advantage in today’s market is a digital system is very reasonable in price.
The integration of digital dental radiography can revolutionize a veterinary practice.
See our complete package system - Click Here
References:
1. Lommer MJ, Vertraete FJ. Prevalence of odontoclastic resorption lesions and periapical radiographic lucencies in cats: 265 cases (1995-1998). J Am Vet Med Assoc 2000;217(12):1866-1869.
2. Heney CM, Arzi B, Kass PH, Hatcher DC, Verstraete FJM. The Diagnostic Yield of Dental Radiography and Cone-Beam Computed Tomography for the Identification of Dentoalveolar Lesions in Cats. Front Vet Sci. 2019 Feb 21;6:42. doi: 10.3389/fvets.2019.00042. PMID: 30847347; PMCID: PMC6393352.
3. Mupparapu M. Digital dental radiography - a review of the solid-state and semi-direct digital detector. Orofac J Sci2011;3(1):40

Veterinary Dental Care with Digital Radiographic Imaging

Elevating Veterinary Dentistry: The Power of Digital Radiographic Imaging
Dental radiography is considered an essential part of human dentistry to aid diagnosis and treatment of dental disorders. The veterinary world is catching up rapidly and dental radiography is fast becoming the standard of care for our veterinary patients.
The production of high-quality dental radiographs requires a number of specific pieces of equipment. First, specific dental X-ray plates should generally be used.
These are small and specifically designed to fit within the oral cavity, minimizing the superimposition of structures within the skull and simplifying radiographic positioning.
They come in a range of sizes from 0 to 4, with size 4 being the largest. Sizes 2 and 4 are the most commonly used. Secondly, a specific dental X-ray generator, either handheld or wall mounted, allows accurate and easy positioning for the various views required.
Traditional analog radiography uses X-ray films with an intensifying screen, set within a light-proof cassette. After exposure to an X-ray beam, this film is then processed using either manual or automatic techniques to provide a high-quality diagnostic image.
The use of digital imaging systems first introduced in the early 2000s has revolutionized dental radiography and has many advantages over older analog systems.
There are two types of digital X-ray set-up - Digital Radiography (DR) and Computed Radiography (CR). DR, or direct, systems use a solid-state sensor plate in place of an X-ray film.
This is linked directly to a computer via either a wire or wirelessly via Bluetooth. CR, or semidirect, systems use a photo-stimulative phosphor (PSP) plate which stores the X-ray exposure.
These are then scanned and translated into a digital image on a computer. Both have advantages and disadvantages, but DR systems are most commonly used in dental radiography systems and are generally accepted as superior.
The advantages of digital dental radiography
While there are many advantages, the most notable include:
Speed - DR systems will produce an almost instant image and the sensor can be left in place making any repositioning for repeat exposures quicker and easier
Reduced number of exposures - Digital radiography systems can adjust for suboptimal exposure settings, meaning repeat exposures due to faults are less likely
Ability to manipulate and magnify images - This allows easier viewing and interpretation of radiographs, picking up more subtle pathologies as the images are more easily interpreted
No degradation over time if stored correctly
No requirement for toxic developing and fixing chemicals
Less space required
Access to telemedicine services
Lower exposure settings - reducing radiation doses to patients and personnel by an estimated 50-80%
Initial problems were reported with reduced image detail compared with analog films, however, these have now long since been resolved.
Another commonly reported disadvantage of digital radiography set-up is that initial costs are somewhat higher than analog systems.
This is certainly true, however, it has been estimated that in a busy veterinary clinic, it would take less than a year to make up for these costs thanks to significantly lower running costs. Recent cost-benefit analyses have shown the investment is worthwhile.
Full-mouth dental radiographs
There are demonstrated benefits of full mouth X-rays as standard for all new patients, or where a clinical condition has significantly changed.
It has been suggested that around 40% more pathology will be detected compared with clinical examination alone.
Radiographs are much more sensitive to detecting periodontal pockets that may be missed by probing alone. They also allow assessment of the thickness and quality of the surrounding bone, reducing the risk of iatrogenic fracture if extractions are attempted, especially in small breed dogs.
Dental radiographs can detect any unusual anatomy such as a curved root that may make extractions more difficult, and post-extraction radiographs can be used to check that no root fragments are remaining.
Especially in cats
Dental radiography is essential when assessing feline mouths where resorptive lesions are present. Without it, it is impossible to differentiate Type 1 lesions that require complete extraction from Type 2 lesions that are better treated with crown amputations.
Diagnosing the lesion type before treatment improves patient outcomes and reduces procedure times. Deciduous teeth, in both cats and dogs, which may have undergone partial resorption can also be properly assessed.
Dental radiographs are useful when assessing fractured or worn teeth for subtle evidence of infection. They are vital in helping to determine whether “missing teeth” are truly missing, fractured crowns with roots remaining or impacted teeth that may lead to serious complications such as dentigerous cysts.
They can also be used to help assess oral masses.
How to make the best use of your dental X-ray system
To make the best use of a dental X-ray system there are a few important considerations;
Correct exposures should be used for different-sized patients and teeth. Some machines will have settings for different teeth programmed in others, others will require the use of a manual exposure chart.
Dental X-ray plates or sensors and correct plate sizes should be used to minimize exposures and allow easier positioning
Good radiation safety should be adhered to at all times following ALARA (as low as reasonably achievable) guidelines
The use of a specific dental X-ray generator is recommended to allow easier and more accurate positioning
Correct radiographic techniques should be utilized - generally, images should be obtained using either a parallel or bisecting angle technique, depending on the teeth and species being imaged. For cats, a near parallel (intra- or extraoral) will be required for maxillary cheek teeth.
Standard views should be obtained for full-mouth radiographs
Dental radiographs should be performed under general anesthesia
All radiographs should be assessed to ensure they are of diagnostic quality
Good training of personnel is vital for both positioning and radiographic interpretation
Digital dental radiography is rapidly emerging as an essential tooth in modern veterinary practice
The whole team should be educated on its benefits to both pets and their owners. Digital radiographic imaging allows early detection of dental disease, simplifies treatment, and improves patient outcomes enhancing veterinary dental care, as well as providing an additional income stream for veterinary businesses.
https://newvetequipment.com/dental-xray-equipment
References:
[1] Niemiec, B. A., Gawor, J., & Viadimír, J. (2017). Practical Veterinary Dental radiography. In CRC Press eBooks. https://doi.org/10.1201/b20288
[2] Niemiec, B. A., & Wright, M. (2011). Digital Dental Radiology. Clinician’s Brief., https://www.cliniciansbrief.com/article/digital-dental-radiology . Accessed 02/08/2023
[3] Bailey, M. (2021). Veterinary dental radiology – an overview. Royal Canin - VetFocus. https://vetfocus.royalcanin.com/en/scientific/veterinary-dental-radiology-an-overview . Accessed 02/08/2023
[4] Haws IJ. The evolution of oral radiography in veterinary medicine. Can Vet J. 2010 Aug;51(8):899-901.
[5] Van Der Stelt, P. F. (2005). Filmless imaging: The uses of digital radiography in dental practice. The Journal of the American Dental Association, 136(10), 1379–1387
[6] DuPont GA. Radiographic evaluation and treatment of feline dental resorptive lesions. Vet Clin North Am Small Anim Pract 2005;943-962.
[7] Niemiec, B. A. (2015). The importance of dental radiography. Today’s Veterinary Practice. https://todaysveterinarypractice.com/dentistry/dental-radiography-series-the-importance-of-dental-radiography/ Accessed 02/08/2023
[8] Niemiec, B. A. (2015). Dental Radiology Series: Techniques for Intraoral Radiology. Today’s Veterinary Practice. https://todaysveterinarypractice.com/dentistry/practical-dentistry-dental-radiology-series-techniques-for-intraoral-radiology/ Accessed 02/08/2023

Feline Radiograph Techniques for Sedation-Free Imaging
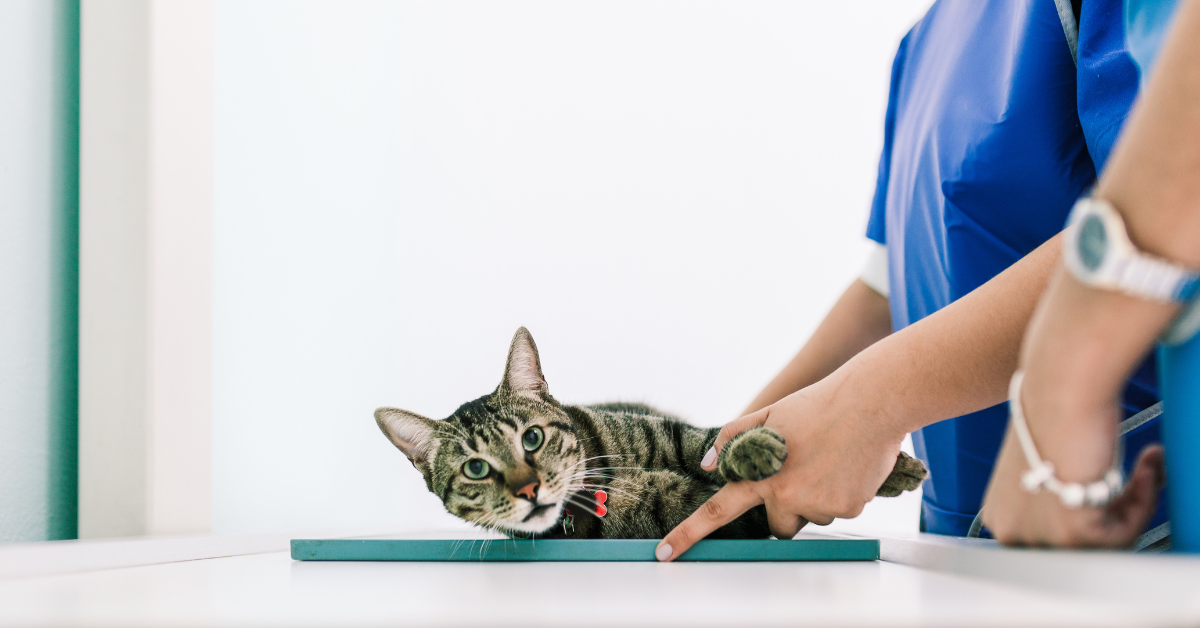
X-rays are a commonly used diagnostic tool in many veterinary clinics for our feline patients. Radiographs can provide a wealth of diagnostic information, as long as they are of good quality and well-positioned.
However, cats aren’t known for their trainability, or their propensity to lie perfectly still for periods of time in a veterinary hospital, to allow veterinarians and technicians to work around them! So how do you get an X-ray of good diagnostic quality in a cat without sedation?
Do you need X-rays without sedation?
The first question to be asked is if the radiographs really need to be taken without sedation or anesthesia. Safety is paramount – for both patients and veterinary staff.
Taking X-rays conscious is not worthwhile if the process ends up having to be repeated multiple times due to poor positioning or movement blur, increasing both stress and levels of radiographic exposure to the patient and staff alike.
In many cases, a short-acting sedation or anaesthesia is the safest option to gain radiographs.1 There are many protocols now in use for a variety of situations, including drugs which are more cardiac-safe, those which avoid either renal or hepatic metabolism, and those with short half-lives for those quick X-ray procedures.
However, there are scenarios in which a veterinarian may prefer to attempt a conscious X-ray. These may include:
Cats with advanced cardiac disease
Cats with severe renal or hepatic impairment
If a cat has eaten recently and there is concern for aspiration, but needs urgent X-rays
A known previous reaction to sedation or anesthesia
A moribund patient who requires urgent assessment but is clinically unstable
Techniques for conscious radiographs in cats
If you have a feline patient requiring X-rays in your veterinary hospital, there are a few ways to make the procedure safer and less stressful for all involved.
The welfare of the cat, and the safety of all involved, should always be at the forefront of decision making in a veterinary clinic.
Preparation
When taking X-rays conscious, it’s hugely important to be prepared – time is of the essence. Use an exposure chart to predict your kV and mA settings,1 have restraint equipment ready to go and veterinary staff primed as to their roles. Have a plan of which order the radiographs will be taken in, and how positioning is going to be achieved.
The process with be smoother if both staff and patient are relaxed. Practice feline-centric protocols: calm voices, quiet areas, pheromone diffusers, and minimal handling. Speed is helpful, but not to the detriment of calm handling and a low-stress environment.
Positioning
Firstly, keep the X-ray area secure by closing or locking doors: as well as being a distraction, doors opening suddenly can be an escape route for a stressed cat!
Positioning aids will be required
These may include:
Perspex box – if it is not possible to restrain the cat in a specific position, or the cat is very sick and/or recumbent, a clear Perspex box can be used to gain rapid radiographic assessment. Specific positioning will not be achieved, but a radiographic overview of a certain area – or even a full ‘catogram’ – can be achieved very quickly without the need for chemical or more aggressive physical restraint. Some boxes also allow oxygen to be piped in for those cats with respiratory concerns.
Sandbags, troughs, and foam wedges – cats who are mobile will require physical restraint. Wedges can be used to elevate anatomic areas, or to ensure correct alignment. Sandbags are useful mostly for limb restraint – they are heavy, so avoid placing them across the thorax as this can affect respiration. Always try and ensure positioning is comfortable for the patient, as this will aid them to lie still and not panic.
Be aware that “less is more” when restraining cats; and that cats with dyspnoea are brittle and require minimal restraint. In these patients, initial stabilization, thoracic ultrasonography, and general anesthesia for radiography (if cardiac failure can be excluded) is often the most appropriate approach.3
Taking the radiographs
A veterinary team member can stay with the cat until the machine is ready to go and the positioning is perfect, providing reassurance and extra restraint. Once the area is safe, personnel can exit and take the radiograph. The ‘beep’ or ‘click’ of the X-ray machine can cause cats to move, so you may need some background music or white noise to distract from this.
Allow the cat to rest and hide in a covered box in between X-rays. Provide reassurance, and reward (if clinically appropriate). If the patient is becoming distressed, consider moving to chemical restraint or postponing the radiographs.
There are many potential pitfalls when taking conscious radiographs, and it is more likely that these X-rays will be affected by poor positioning, movement blur or sub-optimal exposure. Wherever possible, sedation or anesthesia is preferable to achieve radiographs safely.
References
Larson, M. Feline Diagnostic Imaging. Published 2020 John Wiley. Ed. Holland & Hudson. ISBN:9781118840948
Lavin L: Small animal soft tissue, in Lavin L (ed): Radiology in Veterinary Technology, ed 3. Philadelphia, WB Saunders, 2003
Borgeat, K. and Pack, M. (2021), Approach to the acutely dyspnoeic cat. In Practice, 43: 60-70. https://doi.org/10.1002/inpr.15

The Art of Cat X-ray Imaging: Techniques and Interpretation

Introduction to Cat X-ray Imaging: Importance and Basics
Radiography is one of the most common diagnostic tools utilized in veterinary clinics. It can provide vital information about structures inside the body and can be used to identify pathologies in both bone and soft tissues.
Cats differ from dogs and other pets in many ways, including their propensity to hide pain and illness. As a result, radiographs can be an excellent method of collecting vital diagnostic information for these patients in a non-invasive manner.
Techniques
Safety for both patient and veterinary staff should be paramount when using X-rays. Veterinary clinics and hospitals should have effective radiation safety protocols in place and clinical staff should wear monitoring equipment.
Radiographs also need to be of good diagnostic quality to allow for accurate interpretation of injury and disease for cats presented to the veterinary clinic.
When a feline patient requires X-rays, certain procedures should be followed.
Be cat-friendly!
Taking X-rays of a fractious cat is no veterinarian’s idea of a good time! Keep these feline-centric principles in mind to reduce stress for all involved:
Quiet areas
Calm handling
Pheromone sprays/diffusers
Restraint
Cats must be adequately restrained for radiographs, to ensure correct positioning and to minimize motion blur. Even small movements can cause unacceptable blurring in the X-ray.
This can be minimized by adjustments to the exposure time and mA settings, but sufficient restraint is still the most desirable.
Sedation or brief anesthesia is usually required, but physical restraint using equipment such as sandbags and tape is also possible if necessary.
There are various sedation and anesthesia protocols that are suitable for cats, including cardiac-friendly combinations and short-acting sedatives.
Wherever possible, chemical restraint is preferred to physical in fractious animals.
Positioning
Depending on the body area requiring radiographic examination, the cat will need to be carefully positioned. Proper positioning is necessary to achieve X-rays of diagnostic quality in your veterinary clinic.
Take more than one radiograph
Multiple views are always necessary for radiography! A good example of this is in thoracic radiographs in cats: when in lateral recumbency, fluid accumulates in the down-side lung, and there is a degree of atelectasis (lung collapse).
This leads to an increased opacity of this lower lung field, which can obscure soft tissue nodules. Orthogonal views are also needed, as X-rays are two-dimensional images of a three-dimensional patient, therefore opposing views are needed to visualize the patient as a whole.
Interpretation
Radiographs require expertise and attention to detail for accurate interpretation. In a veterinary hospital, veterinarians should be encouraged to view X-rays in a quiet, darkened room and should not be rushed for a diagnosis.
When interpreting feline X-rays, it is best to proceed in a logical and step-wise manner, to avoid anything being missed.
Assess positioning and exposure
Before leaping to any diagnostic conclusions, first, evaluate the basics.
Is the X-ray:
Of the correct patient?
Clearly marked as to the positioning of the animal and the area exposed (i.e., left vs right markers)?
Is the X-ray well positioned and collimated correctly, and is the exposure adequate? A cat X-ray that is improperly positioned or exposed is difficult to interpret and reduces the amount of available information.
Are there orthogonal views available? X-ray images are two-dimensional representations of a three-dimensional subject (the patient), requiring some mental reconstruction of an anatomical image, using two radiographs taken at right angles to each other.
Are any exposure, positioning, or rendering artifacts visible? If so, note them at this point so as not to be distracted by pseudopathological changes later.
Assess the X-ray
A logical and systematic approach should be used to evaluate X-rays in a veterinary clinic. Clinicians should choose an approach that works for them – for example, evaluate from outside in, or from left to right, or whatever system suits them and allows a thorough assessment of the whole radiographic area.
All organs and structures should be assessed, and findings should be categorized by radiologic (or Roentgen) signs:
Number
Size
Shape
Position
Opacity/architecture
Margination
If possible, normal function can also be assessed, for example through contrast studies or through the use of physiological changes such as inspiratory vs expiratory thoracic radiographs.
Evaluate the X-ray
Once the radiograph has been thoroughly assessed and described, the findings can be evaluated for abnormalities and a radiographic diagnosis.
There is a wide range of ‘normal’, which can make this assessment of pathologies more difficult, and X-rays should be used alongside other clinical findings when making a list of differential diagnoses.
Radiography is a commonly utilized tool in veterinary clinics and has a wide range of indications in cats. However, taking good radiographs – and interpreting them correctly – is indeed an art form, requiring practical skills, study, and experience.

Achieving Diagnostic Images in Veterinary Radiography
What do kV and mA and mAs mean in veterinary X-ray and what are the best settings for a small cat, medium dog, and large dog?
Since 1895, when X-rays were first discovered, radiography has proven an invaluable asset in both human and veterinary medicine.
Over a hundred years later, nearly every veterinary clinic has an X-ray machine and it’s hard to imagine how we could ever be without one now. But just like with professional photography, it’s one thing simply taking a picture; it’s another to create an image.
And for us, as vets and veterinary technicians, we are all too aware of how the way a radiograph is taken can affect our decision-making process.
In order to take a ‘good’, or diagnostic X-ray, we must appreciate the exposure settings of the machine. Typically, there are three factors we, as the operators, can adjust – the kV, the mA, and the exposure time (s). Nowadays, most set-ups are digital, and both the X-ray generator and the processor will have presets for certain areas of the body.
We may also only be able to adjust the kV and the mAs (a combined milliamp-seconds control). However, it’s important that we are able to understand and fine-tune all the settings as required to get the image we desire.
The kV (kilovoltage)
This affects the amount of energy given to the X-ray photons. The higher the kV, the higher their energy and therefore their penetrating power into the patient. Adjusting the kV will allow for adjustments in both the contrast and exposure of the image produced.
But as the kV increases, so does the risk of scatter which not only can be dangerous to the operator but also leads to an image with poor contrast. Because of this, as kV is increased, the mAs ought normally to be lowered.
The mA (milliamperage)
This affects the amount of current, thus electrons, passing through the X-ray head. Raising the mA will increase the temperature of the filament from which the electrons are produced and subsequently, increase the number of electrons that are released. This will increase the number of X-ray photons produced, and thus the overall exposure.
The s (seconds)
This is simply the exposure time; the amount of time during which the X-ray photons are released, and the patient is exposed to them. The actual exposure time, in seconds, is equal to the mAs divided by the mA.
The mAs (milliampere seconds)
In many machines, as both mA and time control the number of X-ray photons, they are combined into a single control, the mAs.
In order to get the image required, we need to balance these three factors
How we do so will depend on several things
the size of the animal
which area of the body is being imaged
the depth of the area of the body being imaged
For example:
- imaging the abdomen of a large dog will require generally higher kV and mAs than imaging the abdomen of a cat, as you would need more electrons with higher energy levels in order to penetrate through to the X-ray plate.
- imaging an area of movement such as the chest will require as short an exposure time as possible to eliminate movement blur – this can be achieved by increasing the mA because of the equation exposure time = mAs ÷ mA.
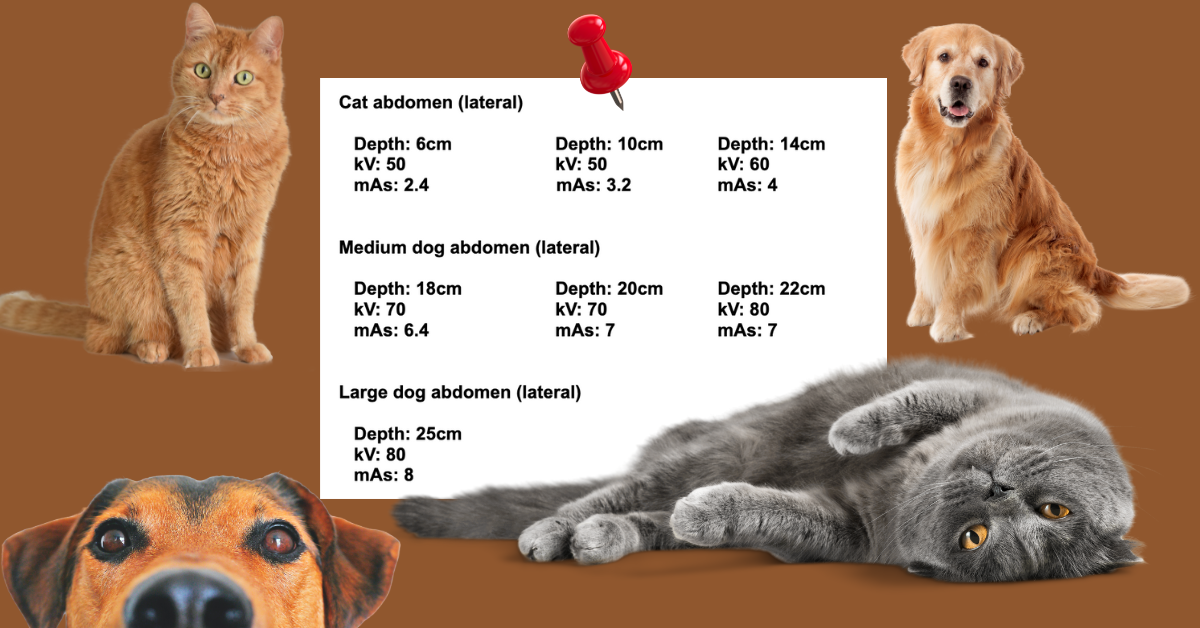
Exposure charts can be very useful to give a guide as to the likely appropriate settings to use for a particular body area on a particular-sized animal. Recommended exposures will vary depending on the machine used, therefore it can be difficult to suggest exact settings that can be used across the board.
However, the following gives a good example of how factors will change depending on the size of the patient. These assume a film focal distance of 80cm.

Compared to these figures for an abdominal radiograph, thoracic radiographs will require lower mAs to reduce motion blur, so the kV may need to be slightly higher, especially if the exposure time cannot be controlled independently.
Radiographs of extremities will require a lower kV and lower mAs, as the depth of the area of interest is smaller.
If the image requires high kV settings, it can be useful to use a grid to help absorb scatter and therefore improve image quality.
As a general rule of thumb, a grid is beneficial for body parts over 10cm in depth – however, with digital systems, there is more leeway due to post-exposure filtering.
When thinking about radiation safety, both the patient and the operator, always use the lowest possible settings needed to gain the diagnostic image.
It can also be helpful to record the settings used for each exposure, either on the system or by hand, so with time, we can begin to understand our machine and what settings work well for certain images.
In many jurisdictions, this is a legal requirement and is always “best practice” for reflection and continual quality improvement.
As a rule of thumb, if you see these effects on a digital image consider these adjustments:
If you notice a dark image, particularly of soft tissue or extremities, it is generally recommended to decrease the kV.
Conversely, if you come across a light image, especially of bone, it is advisable to increase the kV.
In the case of motion blur, you should consider increasing the kV and decreasing the mAs.
If you find poor contrast on the abdomen or thorax, increasing the kV is typically recommended.
On the other hand, if you observe poor contrast on an extremity, it is generally advisable to decrease the kV.
1. Radiography in Veterinary Technology (Fourth edition) by Lisa M. Lavin. Pg. 6
2. https://www.msdvetmanual.com/clinical-pathology-and-procedures/diagnostic-imaging/radiography-of-animals
3. Lo, W. Y., Hornof, W. J., Zwingenberger, A. L., & Robertson, I. D. (2009). Multiscale image processing and antiscatter grids in digital radiography. Veterinary Radiology & Ultrasound, 50(6), 569-576.

The Impact of Over-Exposed X-Rays in Animal Radiography

What is an over-exposed X-ray and how can I avoid that in my animal clinic's X-ray room?
X-rays are a vital and commonly used tool in every animal hospital. However, they are only of use if the X-ray image is of good diagnostic quality. If radiographs are of poor quality, for example through inadequate positioning or incorrect exposure, this can lead to errors in interpretation.
If X-rays taken in the animal clinic are over-exposed, this can be very frustrating to veterinary staff. The radiographs may need to be repeated, leading to increased exposure to X-ray beams for patients, and higher time and cost penalties.
X-rays being over or under-exposed is a common problem in veterinary clinics. In this blog, we’ll go through over-exposure, why it happens, and how to help. To learn more about the opposite problem, under-exposure, check out our blog here.
What is exposure?
Exposure is the term used to describe the number of X-ray photons present at a certain point. Over-exposure to animal X-rays happens when the concentration of these photons is too high, leading to excessive darkening of the film.
Four radiographic factors affect exposure:
Kilovoltage (kV) – the voltage applied across the X-ray generator, affecting the energy of the X-ray, and therefore the penetrating power of the beam
Milliampere (mA) – the current applied to the cathode to generate X-rays, affecting the number of electrons and thus of X-ray photons
Exposure time
The distance from the X-ray source to the patient (FFD – focus-film distance) – as distance decreases, the intensity of the beam increases.
The exposure of the X-ray is determined by changes to any of these four factors.
Why does an over-exposed X-ray matter?
A radiograph should be properly exposed so that all structures in the targeted anatomical region can be visualized.
In a film-based radiograph, over-exposure makes an X-ray very dark, making it hard to interpret but easy to detect. Using an over-exposed X-ray as a diagnostic tool may lead to subtle lesions being missed, or to artifacts being seen.
However, in a DR system, there are very few signs of over-exposure, as the computer will automatically filter the image and return an “optimal” radiograph.
If the exposure is massively excessive, however, there may be other artifacts generated, in particular, blocky or geometric shapes superimposed over the image.
This is more apparent in some systems than others but seems to be due to the local vs regional adjustment patterns generated by the filtering software.
So, an over-exposed DR radiograph rarely leads to a non-diagnostic image. However, over-exposure is also a safety concern, with animals and potentially staff being exposed to unnecessary levels of X-rays.
Correctly exposed X-rays are important for accurate diagnosis but above all for safety in the animal hospital.
"Exposure Creep” is a common problem with digital radiography, and with our increasing knowledge of the health concerns associated with cumulative X-ray exposure, something that all clinicians need to work to minimize – even in jurisdictions with relatively relaxed radiation safety limits, such as the USA.
Why is my X-ray over-exposed?
It can be frustrating to have an over-exposed X-ray, and difficult to determine the underlying problem. Here are some common reasons for over-exposure in animal radiography.
A common issue when struggling with exposure is non-deliberate changes in the distance between the film and the X-ray generator.
A small change in distance can have a huge effect on exposure, as the relationship between FFD and exposure is an exponential function.
If your X-ray is overexposed, the FFD may be too small, and require adjustment – or a corresponding change to the mAs.
In animal hospitals, moveable and adjustable X-ray tables can make changes to the FFD a common problem.
Technical errors in the choice of kV and mA levels are also common. If the kV setting is too high, the X-rays will have more power and penetrate straight through the patient, leaving a film that is overexposed and too dark to interpret.
Over-exposed X-rays require a decrease in the kV level and mAs. The omission of a grid when one is needed – or accounted for in the exposure chart - can also affect exposure.
Tips for avoiding an over-exposed X-ray
Interpreting X-rays requires films of high quality, excellent positioning, and good exposure.
A simple response to avoid over-exposed radiographs in the animal clinic is to ensure the kV and mA settings are correct. Over-exposure implies the settings are too high.
The use of an exposure chart can be invaluable to ensure accurate levels. A comprehensive chart, with suggested settings for all different species and sizes of animals, as well as differing anatomical locations, can help avoid mistakes when calculating appropriate settings.
It should be remembered that X-rays need to be of good quality and exposed correctly for the anatomical area. Different bodily areas have varying needs for good interpretation.
For example, the thorax has both soft tissue and bone which all need to be detailed whereas the abdomen contains high volumes of soft tissue structures, requiring excellent contrast.
Understanding this principle may lead to small adjustments to kV and mAs to maximize the quality of the X-ray.
Most DR systems are now equipped with Exposure Indicators, and these are invaluable for detecting higher-than-optimal exposures.
Ensure that you are familiar with how this works on your system and that you know how to interpret the numbers generated. LINK?
Remember to keep X-ray machines well-maintained and regularly serviced, for optimal performance.
Summing up
One of the reasons for observing overexposed X-rays is the failure to make necessary adjustments to the imaging technique when transitioning from film to CR to DR, or between different DR panels.
X-rays are a regularly used tool in animal clinics and have great diagnostic value. However, accurate interpretation relies upon good-quality X-rays.
Over-exposure rarely leads to a non-diagnostic radiograph but does lead to excessive radiation exposure to the patient and, potentially, staff.
Over-exposure can be caused by changes to the exposure factors: kV, mA, time, and distance.
Using accurate settings for the size, species, and anatomical location of the desired image, and knowing how to interpret the Exposure Indicator, are essential for optimal exposure and good quality X-ray.
Many instances of under or overexposure can be attributed to doctors failing to measure animals or consult the technique chart.
The DynaVue Duo x-ray machine for veterinarians automatically adjusts the exposure based on animal size, optimizing imaging and reducing radiation exposure.
This feature saves time, minimizes errors, and enhances diagnostic quality, improving veterinary care.
References
Mattoon, J. (2006) ‘Digital Radiography’ Vet Comp Orthop Traumatol 19(03) pp.123-132
Kirberger, R. (2005) ‘Radiograph quality evaluation for exposure variables – a review’ Veterinary Radiology and Ultrasound 40(3) pp.220-226

Veterinary Endoscopy: The Importance of Training
Training Opportunities in Veterinary Endoscopy
Veterinary endoscopy can be a great way to add value to a veterinary practice and help a lot of patients. But there is a learning curve when it comes to mastering diagnostic and therapeutic endoscopy procedures.
Here are a few ways to maximize the return on investment in a new veterinary endoscopy system by promoting training for veterinarians and veterinary team members…
Invest In Training as Early as Possible
Veterinary continuing education and training have many benefits when it comes to any new piece of veterinary equipment. Training should be required for any new treatment or diagnostic equipment at the practice to ensure it’s used properly and to its full potential.
For vets who will be using the scope, training increases confidence, efficiency, and accuracy. This means the practitioner will not only have more confidence in recommending the procedure to clients but also more confidence in the accuracy of their diagnosis.
It becomes less likely that anything will be missed due to inexperience. And vets will become faster over time, which is good for efficiency and profitability in the daily clinic schedule.
It’s probably never too early to invest in training. That way, veterinarians who will be using endoscopy will feel better prepared to start right away. Even though expertise will take time and practice, there’s a lot to be said for having a solid educational foundation in endoscopy driving, interpretation, and procedures as soon as the new scope arrives.
Plus, being proficient at endoscope functions can also help a veterinarian better evaluate machines prior to a purchase, to make the best choice when buying a scope for the hospital.
Offer Discounted Endoscopy Studies at First
Although there are excellent training courses and resources available, hands-on practice is always required to truly master any new clinical skill. Endoscopy is no exception.
Sometimes, it’s helpful for a veterinary practice to come up with a mutually beneficial solution for themselves and their clients. This might mean offering discounted studies in the beginning. Honesty is important, so clients should understand the pros, cons, and limitations based on the vet’s current skill level. Not all clients will be interested, but it’s likely that some will jump at the opportunity to help their pet while receiving a great deal on pricing.
Many vets also practice using new equipment on their own pets, staff pets, or local shelter animals who could benefit from an endoscopy study.
Invest in Staff Training
Training is crucial for anyone who will be involved in endoscopy at the practice, not just the veterinarian operating the endoscope.
Veterinary team members play a vital role in setting up the equipment, assisting the vet during a procedure, and maintaining and cleaning the equipment. Some staff members are also involved in discussing endoscopy with clients, conveying value when presenting price estimates, or calling tech support for the equipment when needed.
Appropriate training on how an endoscope can help patients, as well as proper use and upkeep of the equipment, has many benefits. It may help more clients say “yes” to a procedure. It can help prevent damage to the endoscope and its components and make procedures more efficient. It may even help the new endoscope last longer through proper maintenance.
Choose One New Service at a Time
Trying to learn everything at once can be challenging and inefficient since veterinary endoscopy has so many potential uses. It may be more practical for a veterinarian to pick one (or just a few) procedures to focus on at first, then add more once they feel comfortable with those.
The initial choice can be based on the type of endoscope (rigid or flexible) and its capabilities, as well as clinical interests and clinical demand. For example, a vet could start with laparoscopic procedures including surgeries and biopsies. Or, they might choose to jump right into upper GI studies, since that is a service that can benefit a lot of veterinary patients.
Resources for Veterinary Endoscopy Training
Here are a few suggestions for how and where to get started with veterinary endoscopy training…
Speak to colleagues and specialists who are already using endoscopy. Ask for their opinions, and if possible, see if you can shadow them on a few procedures.
Look for hands-on training at conferences, universities, and other CE providers.
See if the vendor of the endoscope you wish to purchase offers training. This can be a nice option because it’s specific to the machine you’ll be using.
Send out studies for consultation and interpretation with a specialist, if available. Be sure to interpret the studies yourself first, then compare it to the official report as a learning opportunity.
Join the Veterinary Endoscopy Society (Home - Become a Member | Veterinary Endoscopy Society), which offers resources, education, and networking opportunities for veterinarians interested in endoscopy.
Budgeting for training—on top of budgeting for the equipment itself—can feel expensive or overwhelming. However, it’s truly an investment.

Written by: Dr. Tammy Powell, DVM
Practice makes perfect, and training will help a veterinary practice offer the best patient care while also maximizing the return on investment in their new veterinary endoscopy system.

How to Avoid Under-Exposed X-Rays in Your Animal Hospital
Mastering X-ray Imaging: Essential Techniques for Crystal Clear Animal Radiographs
As veterinarians, we’re sure that you use X-rays commonly as a part of a diagnostic process. In order to achieve an accurate diagnosis, however, these radiographs must be correctly positioned and of high quality. If X-rays are taken poorly, lesions may be both under and over-diagnosed, due to problems with interpretation.
What is an under-exposed X-ray and how do I avoid that in my animal hospital X-ray room?
Having to repeat X-rays is far from ideal, both in terms of increased radiographic exposure for our patients, but also in terms of cost, time, and frustration for the veterinary professional.
We all want our X-rays to be the perfect first time – so how do we achieve that? Exposure problems are a common X-ray fault in animal hospitals, so in this blog, we will go through under-exposure, and how to avoid it. The opposite, over-exposure, is also a common issue – read more about that here.
What is exposure?
Exposure refers to the concentration of X-ray photons in the air at a specific point. If an X-ray is under-exposed, it means there was less penetration of the beam through the target tissue.
X-ray exposure is affected by four factors:
Kilovoltage (kV) – controls the energy of the X-rays, and therefore the penetrating power
Milliampere (mA) – the current applied to the tube to generate X-rays, and therefore the number of photons produced
Exposure time
Focus-film distance (FFD - the distance from the X-ray source to the patient) – as distance increases, the intensity of the beam decreases
It is a combination of these factors which determines the overall exposure of each X-ray.
Why does an under-exposed X-ray matter?
In conventional radiography, an under-exposed X-ray will look ‘lighter’ or ‘whiter’ than a properly exposed X-ray. This whitening effect can make it very difficult to spot subtle abnormalities and lesions. Under-exposure can also lead to increased mottling or cloudiness of an image, which can obscure parts of the radiograph, or lead to artifacts.
Most veterinary staff were taught the “Rule of Toast” to describe this – underdone toast is too white.
However, in a modern digital radiograph, the computer will automatically add additional filters. It is very, very rare for an underexposed digital radiograph to appear pale or white.
This can “trick” the inexperienced radiographer into thinking that the exposure is correct when, in reality, the computer is enhancing and filtering the image.
This enhancement adds an additional layer of complexity when diagnosing from the radiograph because there may be insufficient raw data to obtain a reliable image, despite excellent-appearing radiographs.
Mildly under-exposed images are unlikely to be diagnostically catastrophic, as the signal: noise ratio of a modern DDR plate is high enough that it is likely that sufficient data has been captured. However, the more underexposed the image is, the more serious the potential for errors.
In more severely under-exposed images, the most common sign is pixelation of the image. It may appear subtly grainy, or even blurred (like an image zoomed in too far). This can significantly obscure subtle or fine pathology, especially when viewing lung fields, or fine structures like small animal phalanges or dentitions.
Under-exposure is therefore a real problem when it comes to the interpretation of X-rays in an animal hospital. Poor X-ray quality can lead to both over and under-diagnosis of disease in our patients.
Why is my X-ray under-exposed?
Having problems with under-exposed X-rays in your veterinary clinic? Here’s where you might be going wrong!
A common error when it comes to exposure is changes in the distance between the X-ray machine and the patient. Even a relatively small increase in distance can have a large effect on exposure, and therefore X-ray quality, as exposure is controlled by the inverse square law of radiation dispersal.
A small increase in the FFD requires a corresponding significant increase in the mAs to avoid an underexposed X-ray. Common causes for a variable FFD include adjustable X-ray tables in small animal hospitals, or large animal veterinarians standing too far from the patient with a portable machine.
The kV and mA settings play a large role in the exposure. Low kV levels affect X-ray penetration and therefore result in lower exposure. If an image is under-exposed, this usually means that the kV or mAs need to be increased.
However, adjusting the kV will lead to contrast changes, so in most cases, unless the contrast is too high, the mAs is the adjustment of choice to correct exposure errors.
Exposure can also be low due to various common technical errors, such as using a grid unnecessarily or underestimating the weight or body size of a patient.
Tips for avoiding an under-exposed X-ray
Achieving the right exposure is vital for X-rays of good diagnostic quality. In basic terms, if radiographs are often being under-exposed at your veterinary hospital, then increases to the kV or mAs settings will be needed.
However, for an X-ray of true diagnostic quality, it should be remembered that an image needs to be of high quality, rather than just exposed correctly.
For example, different approaches may be used when imaging the thorax as compared to the abdomen. Thoracic radiographs require a high kV: there is high natural contrast between bone, soft tissue, and gas, and using a high kV value enhances detail in the soft tissue areas of the lung fields.
Conversely, the abdomen has low natural contrast due to the vast majority of content being soft tissue, and therefore abdominal X-rays require a lower kV to maximize contrast.
The mAs setting will therefore need to be adjusted appropriately to accommodate the change in kV whilst retaining good exposure.
Exposure charts can be a really useful way to give a good starting point for determining the best settings. By including appropriate settings for multiple species, breeds, and sizes of animals, as well as different areas of anatomy, quick reference charts can be invaluable for maximizing X-ray quality and exposure.
The other two exposure factors of distance and time should be standardized as much as possible. Using correct restraint of patients should minimize motion blur. It is also important to ensure your X-ray machine is regularly maintained and serviced, to minimize the likelihood of equipment error.
Most modern DR systems have embedded Exposure Indicators, and with “exposure creep” a significant issue in digital radiography, we strongly recommend you use this under-utilized tool to ensure that your exposures are optimal. https://newvetequipment.com/dr-digital
Summing up
Under-exposed X-rays lead to interpretation errors, especially as they can be difficult to detect on a digital radiograph. Under-exposure can be caused by changes to the exposure factors: kV, mAs, distance, and time.
Standardizing exposure factors, using correct calculations for kV and mAs, and using accurate Exposure Indicators will lead to correct exposure and X-rays of true diagnostic quality in your animal hospital.
Many instances of under or overexposure can be attributed to doctors failing to measure animals or consult the technique chart.
References
Mattoon, J. (2006) ‘Digital Radiography’ Vet Comp Orthop Traumatol 19(03) pp.123-132
Kirberger, R. (2005) ‘Radiograph quality evaluation for exposure variables – a review’ Veterinary Radiology and Ultrasound 40(3) pp.220-226

Choosing the Right Veterinary Endoscope System

How Much Do Veterinary Endoscopes Cost?
Veterinary endoscopy is valuable for a variety of diagnostic, therapeutic, and surgical procedures that can help patients.
However, different types of scopes serve different purposes. It’s important for a veterinary practice to ensure they’re investing in the right type and size of the endoscope, not to mention the entire system used for performing endoscopy procedures.
Here are some important factors to consider prior to a veterinary endoscope purchase…
How to Evaluate a Veterinary Endoscopy Purchase
The endoscope itself is, of course, central to the purchase consideration. However, a veterinary practice probably won’t just be investing in scope alone, but rather in a system or package with all the necessary components for performing endoscopy studies.
This could potentially include the scope, a high-definition monitor for viewing images and videos, accessories like biopsy forceps, and more. So, when comparing prices, it’s important to compare what’s included in the price.
Also, not all endoscopes are created equal. Different types of scopes have different uses. A veterinary practice must research exactly what they need in terms of the type of endoscope (rigid or flexible) for the types of studies they plan to perform, as well as the size of the scope (based on the species and size of patients seen, and the type of procedures to be performed).
Some practices might want to incorporate more than one endoscope to accommodate different sizes of patients and types of procedures. In that case, it’s necessary to plan for the total cost of both scopes, plus all additional equipment or accessories for one of both of them.
How Much Does a Veterinary Endoscopy System Cost?
Keeping in mind the above factors, it’s still helpful to have a ballpark figure in mind when shopping for endoscopes. In a search of vendors, average prices ranged from about $7,000-$30,000, depending on the type of scope and what was included in the system.
But prices are variable and may run higher or lower than this. Used veterinary endoscopes may also be a good option for some practices.
Additional Costs and Financial Considerations
The system’s price tag is an important factor. But it’s not the only factor in the total financial picture when purchasing an endoscopy system.
Here are some examples to consider…
Warranty, maintenance, and repairs. Everyone wants their investment to last for years and years. But all veterinary equipment needs maintenance—as well as occasional repairs or replacement parts—to keep running at its best. There should be a plan in place for this.
For new or refurbished equipment, this might mean a warranty or service agreement. Without a maintenance plan, a clinic should set aside funds for when repairs or technical support are needed.
Also, find out if loaner equipment is available to use while your equipment is being repaired.
Hardware and software. Endoscopy studies require a system on which to view and store the collected images and videos.
Components and accessories. Common features include a light source, water flow, suction, and gas insufflation. Common accessories include biopsy forceps and various attachments for retrieving foreign bodies.
Accessories are typically passed through the scope channel, so they must be appropriately sized based on the scope channel diameter and how many channels there are. The cost of these accessories can add up quickly. But it is possible to add these on over time rather than purchasing all of them upfront.
Financing. A veterinary practice should decide whether to purchase their equipment outright or to get a loan or financing. Financing is a popular option, which helps with monthly cash flow since potential profits can help support the monthly payments. But interest and other charges must be factored in.
Tax breaks. Speak to a tax professional to learn about tax advantages and deductions available with the purchase of new business equipment.
Training. It’s necessary to invest in training to ensure the equipment is used properly and to its full potential. This helps maximize a practice’s return on its financial investment. It also helps avoid equipment damage due to improper usage and cleaning.
Purchasing the Best Veterinary Endoscopy System for Your Practice
Prior to a purchase decision, general practitioners may find it useful to speak to a specialist who regularly performs endoscopy studies. Specialists can provide a lot of insight into the best scope, system, and components to purchase.
Try out equipment from vendors prior to purchasing, if possible. But do a basic endoscopy training course first. Having some comfort and familiarity with driving a scope will allow a veterinarian to better evaluate the systems they are testing.

All of this information will help a veterinary practice choose the best endoscopy system for their needs, to provide excellent patient care, and keep the practice financially healthy.
Written by: Dr. Tammy Powell, DVM
https://newvetequipment.com/endoscope

Why Vertebral Heart Score Calculation Matters in Vet Care

Heart disease is a very common presentation when a patient visits a vet clinic. If cardiac problems are suspected, the diagnostic pathway may include a history and physical exam, blood tests, and diagnostic imaging – typically, radiography and/or ultrasound.
Understanding how to utilize the vertebral heart score as part of radiographic interpretation is a vital tool in veterinary practice.
The vertebral heart score: what is it for?
The vertebral heart scale/score (VHS) system was designed as a way to objectively measure the cardiac size from X-rays. Developed by Drs. James W. Buchanan and Jorg Bücheler at the University of Pennsylvania found a good correlation between heart size and vertebral column length, It allows for the evaluation of heart size despite variations in breed, size, and conformation of canine patients.
The vertebral heart score has been shown to correlate well with other methods of assessing cardiac size, such as echocardiography.
Why do we use the vertebral heat score?
While a full cardiac work-up may include an echocardiogram and an electrocardiogram, thoracic radiography is an important tool in the veterinary clinic and can be a cost-effective option for the diagnostic process, particularly for assessing cardiomegaly.
The guidelines for managing cardiac disease have progressed rapidly over the last few years. Accurate methods for staging and monitoring the progress of the disease are more important than ever, to allow for timely interventions at the appropriate stage of the disease.
The use of radiographs and the VHS have three main indications:
As part of a diagnostic pathway, alongside a clinical history, physical examination, and any other diagnostic tests
Monitoring of patients with suspected cardiac disease
Monitoring the progression of heart disease
Radiography and VHS measurements have also been proven useful in differentiating whether a cough is cardiogenic or pulmonary – or mixed.
Mitral Valve Disease (MVD)
MVD is a hugely common cardiac disease in dogs and is often diagnosed presumptively after basic diagnostics such as a physical examination and thoracic x-rays, particularly in high-risk smaller breed dogs.
The ACVIM consensus statement recommends that dogs with a new murmur should have thoracic radiographs taken as a baseline, and then annually.
In Cavalier King Charles Spaniels, serial VHS measurements have been shown to be predictive of the onset of congestive heart failure, with the rate of change in VHS measurements rapidly increasing in the 6-12 months prior to onset.
Cats
The VHS can also be used in cats. It has shown promise in the diagnosis of congestive heart failure in dyspneic cats, which can be difficult due to the propensity to pleural edema. However, cats in CHF often have a degree of pleural effusion which can obscure the cardiac apex and thus make measuring the VHS difficult.
Measuring the Vertebral Heart Score in Dogs
So how do we measure the VHS? Here’s a quick guide:
Take a lateral thoracic radiograph, with clear delineation of thoracic vertebrae T4-T12
Measure the long axis of the cardiac silhouette, from the ventral margin of the carina of the mainstem bronchus to the apex (L)
Measure the short axis, perpendicular to the long axis, at the widest part of the cardiac silhouette (S)
Transfer these measurements to the thoracic vertebrae, starting at the cranial edge of T4, and count how many vertebrae fit within the measurement for each one
Add the two measurements (vertebrae contained within L + vertebrae contained within S) to give you the total VHS
There is a handy guide here.
Interpretation of the VHS
The published range for a normal dog is 9.2-10.3 on a lateral radiograph. Any score above 10.5 should be considered to indicate cardiomegaly. The normal range for cats is 6.7 to 8.1.5
Further considerations
There are some points to consider in the clinical setting when interpreting a VHS.
Breed
The VHS was designed to produce a standard measurement across any breed, size, or conformation of a dog, and this appears correct for the majority of dogs. However, more recent research has found some variation in certain breeds.
These include the Boxer, Bulldog (English and French), Pug, Cavalier King Charles Spaniel, Boston Terrier, Whippet, Labrador Retriever, and Pomeranian, which are now known to have average VHS scores above the standard range.6-7
In some of these breeds, such as the Bulldog, changes to the size and shape of the vertebrae may be a cause of these increased values. Care should be taken in interpreting VHS in any dogs with abnormal thoracic vertebrae.
Observer variability
Studies show that there is some variation between individual assessments of the VHS. If using the VHS as a monitoring tool for ongoing disease, the same clinician should interpret successive radiographs.
Pericardial effusion
The presence of a pericardial effusion will increase the VHS and should be a consideration for any dog with cardiomegaly seen on an x-ray.
Normal values
Heart size within the normal range on X-rays does not rule out cardiac disease, and the VHS should be used as part of a wider diagnostic process.
Summing up
The VHS was designed as an objective measure of cardiac size on X-rays. It is an important tool in veterinary medicine, providing a useful tool in both the diagnosis and monitoring of cardiac disease.
References
Buchanan JW. A vertebral scale system to measure heart size in radiographs. Vet Clin North Am Small Anim Pract. 2000 Mar;30(2):379-93
Guglielmini C, Diana A, Pietra M, Di Tommaso M, Cipone M. Use of the vertebral heart score in coughing dogs with chronic degenerative mitral valve disease. J Vet Med Sci. 2009;71(1):9-13
Atkins C, Bonagura J, Ettinger S, et al. Guidelines for the diagnosis and treatment of canine chronic valvular heart disease. JVIM. 2009;23(6):1142-1150
Lord PF, Hansson K, Carnabuci C, Kvart C, Häggström J. Radiographic heart size and its rate of increase as tests for the onset of congestive heart failure in Cavalier King Charles spaniels with mitral valve regurgitation. JVIM. 2011;25(6):1312-1319
Sleeper MM, Roland R, Drobatz KJ. Use of the vertebral heart scale for differentiation of cardiac and noncardiac causes of respiratory distress in cats: 67 cases (2002-2003). JAVMA. 2013;242(3):366-371
Jepsen-Grant K, Pollard RE, Johnson LR. Vertebral heart scores in eight dog breeds. Vet Radiol Ultrasound. 2013;54(1):3-8
Lamb CR, Wikeley H, Boswood A, Pfeiffer DU. Use of breed-specific ranges for the vertebral heart scale as an aid to the radiographic diagnosis of cardiac disease in dogs. Vet Rec. 2001;148(23):707-711.

Choosing the Best Veterinary Endoscope for Your Practice

What to Look for in a Veterinary Endoscope
Veterinary endoscopes are an amazing tool that can help with diagnostics and therapeutic procedures in several body systems. However, because of their wide range of uses, there are many different options to choose from when purchasing an endoscope.
The previous article covered key features such as endoscope sizes, whether the scope should be rigid or flexible, and the importance of high-quality images and video.
Below, read on for more information on specific features, tools, and other considerations for purchasing the right endoscope for your practice’s needs.
Features, Tools, and Accessories
Tools can really boost an endoscope’s functionality and expand the number of services a veterinary hospital offers.
Some tools may come as part of the endoscope, while others are added on. The good news is, more tools can be added over time. However, if there is a specific type of procedure a veterinarian knows they want to offer, it’s important to check that the scope being purchased will accommodate a tool or attachment for that purpose.
Here are some frequently used features and tools in veterinary endoscopy…
Light source. Typically included as part of the endoscope system, a good light source such as LED is important for seeing and assessing things clearly.
Air and water. These allow for the cleaning of debris from the lens or area of interest, as well as air insufflation when necessary.
Suction. Suction can be useful for removing excessive fluids or secretions in the area being evaluated, removal of saline or air insufflation administered during the procedure, or for aspirating fluid samples for testing (for example, bronchoalveolar lavage). It can also be helpful for cleaning the endoscope after a procedure.
Biopsy forceps. This is probably one of the most commonly used endoscopy tools that would be passed through the working channel of the instrument. These small forceps can obtain “pinch biopsies” for histopathology evaluation. Biopsy cups and other instruments might also be used for this purpose. The largest biopsy tool that can fit into the channel is the best option to obtain large enough tissue samples for analysis.
Foreign object retrievers. These can come in a variety of shapes and sizes, including rat tooth or alligator forceps, snares, baskets, or nets. The variety of options makes it possible for veterinarians to remove many different types of foreign bodies from the digestive or respiratory tracts, without the need for more invasive surgery.
Balloon dilation. A set of catheters for balloon dilation can be used in the treatment of strictures.
While not a complete list of all possible tools, features, and functions, this list gives an idea of some of the most common accessories that a veterinarian may want to look for when purchasing an endoscopy system.
As a general rule, make sure the working channel is wide enough to accommodate the tools you plan to purchase. And use tools that are longer than the endoscope so it will be easy to advance them into the channel and use them in a controlled manner.
User Friendliness and Learning Curve
Adequate training, including hands-on experience and practice, is crucial for any practitioner planning to use endoscopy. This allows for accurate and safe patient evaluation.
Team members also need to be trained on their endoscopy roles, which may include setup, assisting the vet during a procedure, and keeping the equipment clean and well-maintained.
Courses are available at some conferences and other continuing education events. Some veterinary endoscopy systems even come with training, whether in person or remotely. Personal guidance and instruction, as well as hands-on practice, are important.
Other Considerations
A veterinary practice will want their investment to last. Factors such as the durability of the equipment itself, as well as what a warranty and service plan look like and cost, should be considered.
Compatible hardware and software are necessary for viewing, storing, and sharing endoscopy studies.
Speaking to a specialist who frequently uses endoscopy is a smart way to ensure the practice is purchasing a scope that meets their clinical needs and has a good recommendation.
Finally, a veterinary practice should have a financial or business plan incorporating financing and budget for the purchase, tax benefits, and a plan of use for the equipment (expected usage, how much to charge, marketing and talking to clients about endoscopy, etc.) to maximize the return on investment for this equipment.

While this can all require a lot of research, the time will be well spent because it helps a veterinary practice determine the best endoscope for them, and then maximize their ROI on that investment while providing great patient care.
Written by: Dr. Tammy Powell, DVM

Choosing the Right Tools for Veterinary Endoscopy

What to Look for in a Veterinary Endoscope
Endoscopy has a wide variety of useful applications in veterinary medicine—especially GI studies, but also including rhinoscopy, evaluation of the airways and genitourinary systems, laparoscopic surgeries and biopsies, and more.
However, like any diagnostic or surgical procedure, it’s important to have the right tools for veterinary endoscopy.
For some practices, especially busy referral centers, having a range of endoscopes with different sizes and uses may be a realistic option. However, for most general practices, the budget and expected usage would probably mean it’s more practical to have just one or two “all-around” endoscopes that can be used on many different-sized patients.
Here are some things to think about that can help narrow down the choices, so a veterinary practice can choose the endoscope that best suits their needs…
Rigid or Flexible Endoscopes
One of the most basic categorizations of veterinary endoscopes is whether they are rigid or flexible. This is exactly what it sounds like (i.e., whether the scope can bend or not), and it determines which types of procedures they would be appropriate for.
Here are some of the key differences…
Images and Views. Rigid endoscopes only allow visual evaluation in one direction—the direction that the end of the scope is facing. To view a new angle or direction, the operator must maneuver the entire scope around. Flexible scopes, on the other hand, have the ability to bend or rotate to obtain a 360-degree view of the area being evaluated.
Maneuverability. As you might expect, flexible endoscopes have a greater capability to maneuver around corners and follow the natural contours inside of organs like the stomach and intestines. This makes them well-suited to upper GI studies and colonoscopies, which are some of the most common indications for endoscopy. It also means there are some studies in which a flexible endoscope is the only option.
Types of Studies. As a general rule, rigid endoscopes may be used for studies in which the distance the scope needs to travel is shorter and doesn’t require curving or bending (examples: laparoscopic evaluation and surgery, thoracoscopy, and maybe cystoscopy), while flexible endoscopes can facilitate studies where the scope needs to travel further and bend around curves (examples: upper GI studies, rhinoscopy, and bronchoscopy).
Learning Curve. Although the functionality of flexible veterinary endoscopes is pretty amazing, it also means there are more functions to learn—thus, potentially a longer learning curve. Rigid endoscopes can be a great option to start with if it suits the types of procedures a veterinarian plans to perform.
Scope Sizes
When deciding which endoscope size to purchase, it’s important to look at both the length and the width/diameter of the tube.
As with so many instruments in veterinary medicine, purchasing decisions are largely based on which sizes of patients are seen. A feline-only practice could probably get away with just having a smaller size scope, whereas a practice that sees everything from small kittens to giant dog breeds might want to have a couple of different sizes of scopes available.
Length is important because it determines how much a veterinarian will be able to see in certain endoscopy studies—particularly GI studies, which might be the most common use for these tools. For example, a longer scope could potentially allow a practitioner to see not only the esophagus and stomach but also pass the instrument through the pyloric sphincter to evaluate the proximal duodenum.
Diameter is important for a couple of reasons. The most obvious is probably the limitations of size, such as the inability to pass a larger scope through a narrow cat nostril or urethra. However, that doesn’t necessarily mean a thinner veterinary endoscope is the best choice. There’s also the matter of passing tools through the channel. A wider diameter makes this easier and may even allow more than one tool to be threaded through and used at once.
Imaging Technology
Video technology has advanced over the years, from fiber optics to HD digital imaging.
This is important because the better the image and video quality, the more a practitioner will be able to see. Accurate colors mean subtle lesions or inflammation can be better visualized. Accurate video orientation also makes it easier for a veterinarian to see where they are going in order to manipulate tools and obtain biopsies.
A veterinary practice should also consider the hardware and software that will be used not only for viewing during an endoscopy procedure but also for storing and sharing images and videos in the patient’s medical record.
What Else to Look For?

These features provide a great start and foundation when shopping for veterinary endoscopes. In the next article, we’ll cover some additional tools and features to consider prior to an endoscope purchase.
Written by: Dr. Tammy Powell, DVM

Benefits: Endoscopy to Remove Dog Bladder Stones (Video)

Stones in the bladder of a dog can cause a lot of discomfort and pain, and if left untreated, it can lead to severe complications such as blockages and infections.
The conventional method of removing bladder stones involves surgery, but with the advent of endoscopic technology, veterinarians can now remove stones non-invasively using an endoscope.
In this report, we will discuss the benefits of using an endoscope to remove bladder stones in dogs.
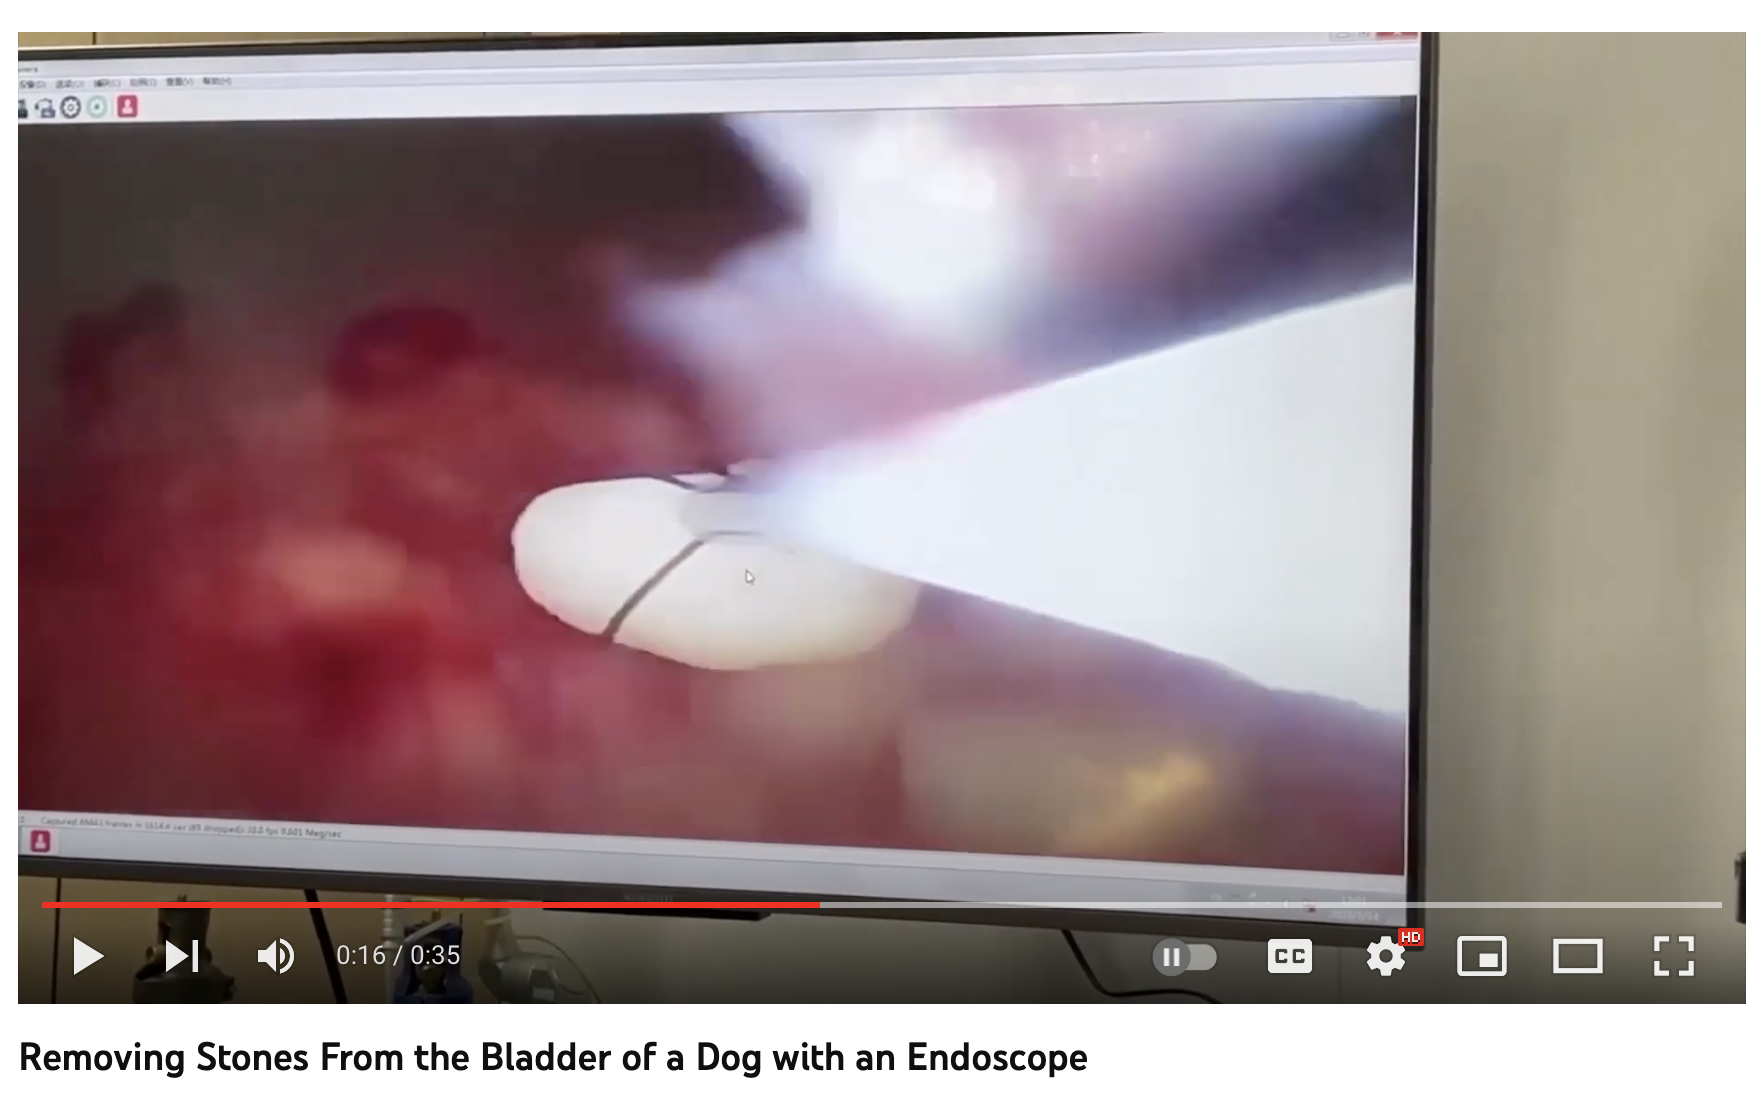
Non-invasive Procedure
The use of an endoscope in removing bladder stones is a non-invasive procedure. The endoscope is a thin, flexible tube equipped with a camera and light source that allows the veterinarian to see inside the bladder without making large incisions.
With the help of an endoscope, the veterinarian can locate the stones and remove them using special instruments that are passed through the endoscope.
Unlike surgery, endoscopy does not require the use of general anesthesia or extensive recovery time, making it a safer and less stressful option for both the dog and its owner.
Better Visualization
The use of an endoscope allows for better visualization of the bladder and surrounding tissue. The camera attached to the endoscope sends real-time images to a monitor, giving the veterinarian a clear view of the bladder's interior.
This makes it easier for the veterinarian to locate stones and other abnormalities in the bladder, making the removal process more efficient and precise.
Additionally, the endoscope can be used to assess the condition of the bladder's walls and detect any signs of inflammation, infection, or tumors that may require further treatment.
Cost-effective compared to surgery, the use of an endoscope to remove bladder stones in dogs is a cost-effective option.
While surgery requires general anesthesia, hospitalization, and post-operative care, endoscopy can be performed on an outpatient basis, reducing the cost of the procedure significantly.
Additionally, the use of an endoscope reduces the risk of complications, such as bleeding or infection, which can result in additional costs associated with surgery.
Conclusion:
The use of an endoscope in removing bladder stones in dogs is a safe, efficient, and cost-effective option for veterinarians.
The procedure is non-invasive, allowing for a quicker recovery time and reducing the risk of complications associated with surgery.
The better visualization provided by the endoscope makes the removal process more precise, and the procedure's cost is significantly lower than surgery.
Overall, the use of an endoscope is a valuable tool for veterinary practices, allowing them to provide better care to their patients while reducing the cost and stress associated with traditional surgical procedures.

Veterinary Endoscopy: Uses and Benefits for Patient Care

Minimally Invasive Procedures: The Benefits of Veterinary Endoscopy
Just like other advanced imaging modalities—such as veterinary CT systems, fluoroscopy, and more—endoscopy is becoming more common for use by general practitioners.
Is an endoscope a good value to add to a veterinary practice? How is it used, and how does it improve patient care?
In the next few articles, we’ll cover common uses and purchasing questions when it comes to veterinary endoscopy.
What Is an Endoscope?
An endoscope is a rigid or flexible tube that is used for imaging, diagnostic testing, and/or certain surgeries and procedures on veterinary patients.
The scope provides light and visibility (which may include high-resolution video on some models) to help the veterinarian better assess the patient’s anatomy and look for abnormalities. This veterinary equipment is typically hollow to allow the passage of tools and accessories—such as biopsy and retrieval forceps—to the area of interest.
Uses for Endoscopy in Veterinary Medicine
Standard uses may include non-invasively assessing anatomy, obtaining biopsy samples, and removing foreign objects.
A very common use of endoscopy in veterinary medicine is the evaluation of the GI tract, including the esophagus, stomach, and proximal duodenum. The scope would be inserted through the mouth and passed through the esophagus to visualize the inner portions of these organs without the need to perform surgery.
While evaluating the GI tract, a veterinarian might take note of abnormalities like inflammation, wounds or bleeding (examples: esophageal trauma or gastric ulcers), masses, strictures, foreign bodies, or other issues.
This visual exam can help with diagnosis, but biopsies are usually needed for a definitive diagnosis of many conditions, including inflammatory or neoplastic conditions. These biopsies can typically be obtained via the scope, so long as a full-thickness surgical biopsy isn’t required.
Tools or attachments can be used to retrieve and remove many types of foreign bodies. For a stricture, endoscopy can help facilitate balloon dilation therapy. It’s even possible to provide hemostasis with some scope accessories.
The colon, cecum, and parts of the ileum may also be evaluated via a colonoscopy. In addition to the GI tract, endoscopes may be used to evaluate other body systems such as the respiratory tract (examples: rhinoscopy or bronchoscopy) or urinary tract.
Similar to the upper GI tract, uses of the scope include visual assessment, biopsies, and minor procedures. For example, the tool can assist with traction and removal of nasopharyngeal polyps, or with biopsies of the bladder without the need to perform a cystostomy.
Additionally, laparoscopic-assisted surgery may be performed, especially for routine procedures like spays or even gastropexy. Scopes may also assist with feeding tube placements.
For exotic species like birds or reptiles, veterinary endoscopy can aid with gender determination, in addition to helping with diagnostic and minor surgical procedures.
Should a Veterinarian Refer to a Specialist for Endoscopy?
It’s probably never “wrong” to offer clients a referral—both for the best interest of the patient when indicated, as well as for liability purposes. If a general practitioner doesn’t have the right equipment or feels confident using the equipment, a referral is usually best.
However, it’s also true that endoscopy isn’t strictly limited to specialists like surgeons or internists anymore. It’s possible for general practitioners to gain experience using this modality and expand their offerings to their own patients.
That being said, a general practitioner shouldn’t simply order an endoscope and set up shop immediately. It’s important to research the equipment prior to purchase and then to gain lots of knowledge and hands-on experience on how to safely and effectively use it.
Consulting with a veterinary specialist who frequently uses endoscopy can be helpful. They can guide you on which types of scopes (there are many options out there) might be the best investment for your budget, for the widest range of uses on the types/sizes of patients your practice sees.
Then, pursue hands-on, guided instruction in the use of the new equipment. Some endoscopy systems include training, which is nice because it’s geared toward the specific model your practice purchased. There are also in-depth courses—many with guided, in-person instruction from a knowledgeable teacher—available at conferences, universities, or other continuing education venues.

With some due diligence and training, adding veterinary endoscopy can potentially be exciting and profitable to a practice that wants to provide a high level of care to its patients.
Written by: Dr. Tammy Powell, DVM

The Complete Small Animal Endoscope System

The Complete Small Animal Endoscope System$16,995 or $295 a month.
Are you looking for a reliable and affordable small animal endoscope system?
Look no further than our complete system, priced at only $16,995 or $295 a month.
With shipping included and a 3-year parts warranty, you can rest assured that your investment is protected.
Versatility: Important Uses Of The Endoscope In Small Animal Diagnostics
Our small animal endoscope system is an essential tool for the evaluation of animals with a variety of symptoms such as vomiting, diarrhea, and difficulty defecating.
It is also useful for obtaining biopsies of the stomach, intestines, and potentially esophagus. With the ability to remove foreign material and place feeding tubes, this system is an invaluable asset to any veterinary practice.
LED Light Source: Excellent Visualization And Sampling
Our system comes equipped with an LED light source generating a vivid, vibrant image. Accompanied by both a water and air pump, our scope provides excellent visualization and sampling of the gastrointestinal tract from the inside.
The scope can be easily plugged into a standard 110 outlet, making it easy to use in any practice.
Training Included: Endoscope Training Program
We understand that mastering the use of an endoscope can be challenging, which is why our Endoscope Training Program is designed to help you take your endoscopy skills to the next level. Our comprehensive program offers a step-by-step guide to building, setting up, and using an endoscope and its accessories with ease.
With live remote training using Team Viewer, you can learn from the comfort of your own practice.
Suction: Schuco Aspirators
Our small animal endoscope system is also equipped with a reliable and durable Schuco aspirator. The entire family of Schuco aspirators has evolved to meet the changes in standards and provide just the right aspirator for your suction requirements. With improved scratch and flake resistance, high vacuum range, and a vibration-free gauge, this aspirator is a must-have for any veterinary practice.
In conclusion, our Complete Small Animal Endoscope System is a versatile, reliable, and affordable tool for any veterinary practice. With its LED light source, Schuco aspirator, and comprehensive Endoscope Training Program, you can take your endoscopy skills to the next level.
Contact us today at 530-722-4977 to learn more.

Veterinary X-Ray Systems for Nonprofits and clinics

Many pet rescue organizations can greatly benefit from having radiographs available at their facility.
Here are some reasons to look into veterinary X-ray machines and how to acquire this equipment to offer diagnostic imaging to dogs, cats, or other pets at a nonprofit center.
Reasons to Invest in Veterinary Digital X-rays
Radiographs provide diagnostic value in many situations. Although the level of medical care provided by a nonprofit varies depending on their capacity, funding, staffing, and goals, x-ray images are one of the best tools that can be used on a wide variety of patients with a wide variety of medical conditions.
One example is taking radiographs of a pregnant dog or cat that arrives at the facility, to see how many puppies or kittens are expected and check that they are all delivered safely. Another common use is evaluating a pet for a potentially surgical medical problem, such as an intestinal obstruction. Radiographs can also help a veterinarian evaluate the extent of damage with traumatic injuries like fractured bones and help plan for treatment.
This is just scratching the surface. Radiographs are one of the most widely used diagnostic tools at veterinary clinics. Any rescue offering veterinary services (to facility pets awaiting adoption, or to client-owned pets) can certainly benefit from having a good X-ray system. Exotic pets, and even large animals like horses (typically with a portable X-ray machine), also frequently need imaging for a variety of medical conditions.
What About Digital Versus Film Radiographs?
Digital is largely favored nowadays. Specifically, veterinary DR systems (rather than CR x-rays) are a preferred technology.
DR radiographs offer several advantages, such as the speed of image acquisition (immediate), automatic settings, ease of image sharing, and reduced need for retakes thanks to quick image analysis and automatic settings that help adjust the image.
Additionally, there is no need to purchase further equipment to process images, unlike film and CR technology, which require a film processor and plate processor, respectively. Finally, as technology continues to advance, it’s easier to find replacement parts for newer tech like DR.
The Business Plan
With any new equipment purchase, it’s important to make sure the new machine and financial investment make sense for the organization.
Some private and government-owned nonprofits must provide a business plan or proposal to whomever they are held accountable, whether that is public/government regulations, board members, or other overseeing entities. Even if a formal report or proposal isn’t necessary, it still makes sense to create a plan to ensure the investment is financially feasible.
Here are a few factors to consider for a business and financial plan…
How will the equipment be used? Is it only for pets waiting to be adopted? Or will the organization offer services to client-owned pets in the community?
Which specific services will be offered? While a lot of X-ray studies are standard, the medical team may also have the option to offer contrast studies or other variations.
Who will perform the services? Vet techs can set up and take veterinary X-ray studies. And through experience, many technicians also gain some skill in reading images, or at least checking them for correct alignment and quality to make sure the image is usable. However, radiographic studies should be ordered by a licensed veterinarian. The vet is also the only one who can interpret the images, for making a diagnosis and treatment plan. Some nonprofits might already have qualified staff on their team. Others must consider hiring, either on a full-time or part-time basis or working with experts who are willing to volunteer their time.
Do any other equipment or supplies need to be purchased? A film processor or CR plate reader would be examples—although fortunately, neither is needed with DR technology. However, if the DR unit doesn’t come with a sensor, the organization must add that to its purchase list. Another consideration is sedation or general anesthesia. Chemical restraint is becoming favored in X-ray studies, both for patient comfort and staff safety. Finally, think about props such as positioning troughs.
Remember radiation safety. Don’t forget lead aprons, radiation badges, and other safety/compliance supplies. Setting up an X-ray suite can also require lead-lined walls and other radiation compliance factors in the local jurisdiction.
Will the nonprofit charge for veterinary x-ray studies—and if so, how much? If performing radiographs on adoptable pets, the cost should be factored into the operating costs of the facility. If offering services to client-owned pets, consider how much local pet owners can pay and how much the organization needs to charge per study to maintain financial health.
How to make the purchase of new equipment financially feasible? For many organizations, donations, grants, or a funding drive can really help with this. Think about any money the new equipment will bring in, as well as any associated new costs, such as equipment maintenance, interest/financing charges, staff time, and associated supplies or services.
How to educate pet owners on the value being provided? This is especially important if offering services to client-owned pets.
Are all local regulations and legal requirements for nonprofits in that state/jurisdiction being met?
Finding Veterinary X-ray Systems
A good strategy would be to invest in the best possible X-ray unit within the nonprofit’s budget. But where to look for one or find a good deal?
Used or refurbished X-ray systems may present an affordable option that is still in very good condition. Some will still have warranties and service plans in place, while others will not.
Some nonprofits benefit from donations of new or like-new veterinary equipment. This could come from other veterinarians in the area or even local human hospitals who are upgrading their equipment.
Some vendors or other organizations might offer new equipment as part of their own grant program, nonprofit arm, or effort to save on taxes. Or they might be willing to part with their demo or loaner machines for a very reasonable price.

Veterinary X-ray systems are one of the most universally used pieces of equipment that can help a lot of patients. With some planning and due diligence, it can be an excellent investment for any rescue or nonprofit that offers basic or advanced veterinary services to the animals in their care.
Written by: Dr. Tammy Powell, DVM

Veterinary Dental Equipment and X-ray for Nonprofits

Many pet rescue organizations, adoption centers, and other nonprofits use veterinary dental care to improve the health of pets being adopted or to provide a service to the local pet-owning community.
Here are some reasons to consider looking into veterinary dental equipment and offering dental services to dogs, cats, or other pets at a nonprofit center—as well as ideas for making it happen.
Reasons to Invest in Veterinary Dental Care
Along with obesity, dental disease is one of the most common preventable medical ailments in pets in the US. According to AAHA, most dogs and cats over the age of three have some degree of dental disease.
Dental disease can lead to periodontal disease, in which the structures that hold teeth in place are compromised. This can cause pain, infections, and tooth loss. Additionally, many pets suffer from common dental conditions like broken teeth, resorptive lesions (mainly in cats), and more.
Many of these conditions can be treated right there in the nonprofit or rescue organization. This could potentially offer benefits such as allowing pets to be more comfortable until they’re adopted or improving the mood and sociability of these pets by alleviating any dental pain they might be experiencing.
Additionally, many experienced or knowledgeable pet owners know that they would need to pay for dental treatment (along with associated anesthesia costs) for a pet that has dental or periodontal disease. So, in theory, a “clean dental slate” could possibly improve the adaptability of some pets. The pet’s better-smelling breath might help in that regard, too.
Some nonprofit organizations also offer low-cost veterinary services to the community, either to all pet owners or to those who demonstrate proof of a low income. Dental care could be a great way to improve the overall well-being of those pets.
The Business Plan
While it would be wonderful to offer every possible healthcare service to pets in need, whether those waiting to be adopted or those who already have homes in the community, any organization must do their due diligence and ensure the new equipment/service offerings make sense to them.
Some private and government-owned nonprofits must provide a business plan or proposal to whomever they are held accountable, whether that means public/government regulations, board members, or other overseeing entities. Even if a formal report or proposal isn’t necessary, it still makes sense to create a plan to ensure the investment is financially feasible.
Here are a few factors to consider for a business and financial plan…
How will the equipment be used? Is it only for pets waiting to be adopted? Or will the organization offer services to client-owned pets in the community?
Which specific services will be offered? With dental care, this might include dental cleanings, dental radiographs, and treatment of specific conditions such as extractions of diseased or injured teeth.
Who will perform the services? Veterinary dental cleanings, radiographs, and oral surgery require general anesthesia under the guidance of a licensed veterinarian. Radiographs and cleanings can generally be performed by trained vet techs, but under the direction and supervision of a veterinarian. Some nonprofits might already have staff who are qualified to perform these procedures. Others must consider hiring, either on a full-time or part-time basis, or working with qualified experts who are willing to volunteer their time.
Do any other equipment or supplies need to be purchased? As mentioned, general anesthesia is required. This is no problem for many organizations that already have surgical capabilities. But it might represent an additional investment for centers that are new to offering such services.
Will the nonprofit charge for veterinary dental services—and if so, how much? If performing dental services on adoptable pets, the cost should be factored into the operations costs of the facility. If offering to client-owned pets, consider how much local pet owners can pay and how much the organization needs to charge to maintain financial health.
Is the purchase of new equipment financially feasible? For many organizations, donations, grants, or a funding drive can really help with this. Think about any money the new equipment will bring in, as well as any associated new costs, such as equipment maintenance, interest/financing charges, staff time, and associated supplies.
How to educate pet owners on the value being provided? This is especially important if offering services to client-owned pets.
Are all local regulations and legal requirements for nonprofits in that state/jurisdiction being met?
Finding Veterinary Dental X-ray Machines and Equipment
A good strategy would be to invest in the best possible machine within the nonprofit’s budget. But where to look for one or find a good deal?
Used or refurbished dental X-ray systems or cleaning units may present an affordable option that is still in very good condition. Some will still have warranties and service plans in place, while others will not.
Some nonprofits benefit from donations of new or like-new veterinary equipment. This could come from other veterinarians in the area or even local human hospitals or dentists’ offices who are upgrading their equipment.
Some vendors or other organizations might offer new equipment as part of their own grant program, nonprofit arm, or effort to save on taxes. Or they might be willing to part with their demo or loaner machines for a very reasonable price.

With some planning and due diligence, many nonprofit pet organizations can find ways to offer veterinary dental services—yet another way to continue improving the health and quality of life of the animals they serve.
Written by: Dr. Tammy Powell, DVM