Achieving Diagnostic Images in Veterinary Radiography
What do kV and mA and mAs mean in veterinary X-ray and what are the best settings for a small cat, medium dog, and large dog?
Since 1895, when X-rays were first discovered, radiography has proven an invaluable asset in both human and veterinary medicine.
Over a hundred years later, nearly every veterinary clinic has an X-ray machine and it’s hard to imagine how we could ever be without one now. But just like with professional photography, it’s one thing simply taking a picture; it’s another to create an image.
And for us, as vets and veterinary technicians, we are all too aware of how the way a radiograph is taken can affect our decision-making process.
In order to take a ‘good’, or diagnostic X-ray, we must appreciate the exposure settings of the machine. Typically, there are three factors we, as the operators, can adjust – the kV, the mA, and the exposure time (s). Nowadays, most set-ups are digital, and both the X-ray generator and the processor will have presets for certain areas of the body.
We may also only be able to adjust the kV and the mAs (a combined milliamp-seconds control). However, it’s important that we are able to understand and fine-tune all the settings as required to get the image we desire.
The kV (kilovoltage)
This affects the amount of energy given to the X-ray photons. The higher the kV, the higher their energy and therefore their penetrating power into the patient. Adjusting the kV will allow for adjustments in both the contrast and exposure of the image produced.
But as the kV increases, so does the risk of scatter which not only can be dangerous to the operator but also leads to an image with poor contrast. Because of this, as kV is increased, the mAs ought normally to be lowered.
The mA (milliamperage)
This affects the amount of current, thus electrons, passing through the X-ray head. Raising the mA will increase the temperature of the filament from which the electrons are produced and subsequently, increase the number of electrons that are released. This will increase the number of X-ray photons produced, and thus the overall exposure.
The s (seconds)
This is simply the exposure time; the amount of time during which the X-ray photons are released, and the patient is exposed to them. The actual exposure time, in seconds, is equal to the mAs divided by the mA.
The mAs (milliampere seconds)
In many machines, as both mA and time control the number of X-ray photons, they are combined into a single control, the mAs.
In order to get the image required, we need to balance these three factors
How we do so will depend on several things
the size of the animal
which area of the body is being imaged
the depth of the area of the body being imaged
For example:
- imaging the abdomen of a large dog will require generally higher kV and mAs than imaging the abdomen of a cat, as you would need more electrons with higher energy levels in order to penetrate through to the X-ray plate.
- imaging an area of movement such as the chest will require as short an exposure time as possible to eliminate movement blur – this can be achieved by increasing the mA because of the equation exposure time = mAs ÷ mA.
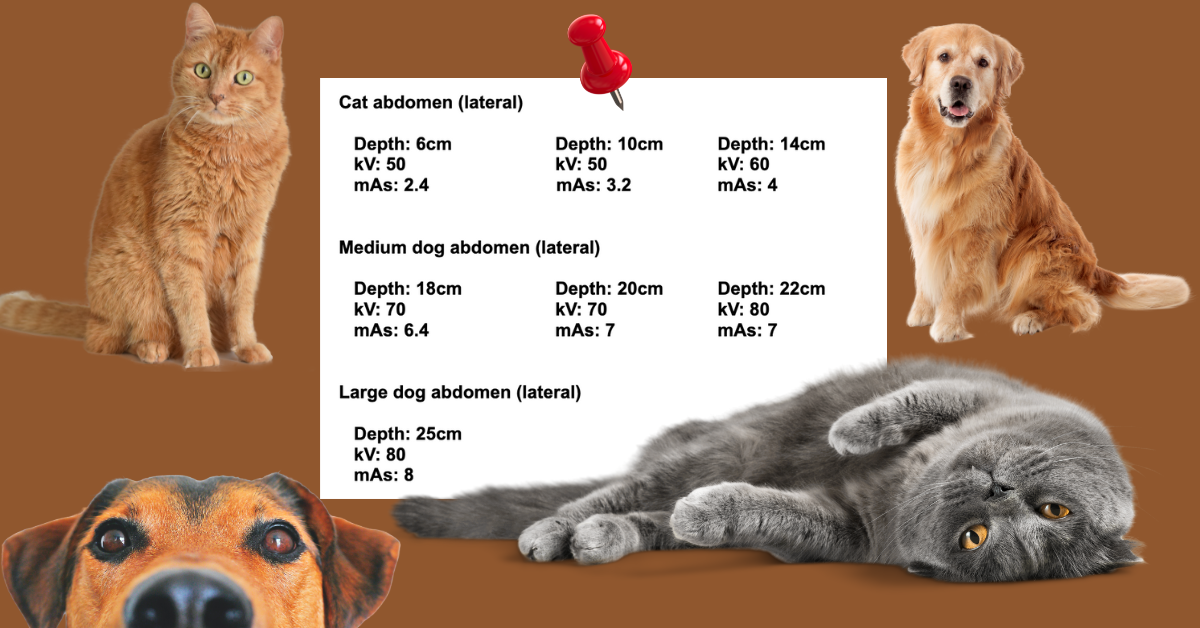
Exposure charts can be very useful to give a guide as to the likely appropriate settings to use for a particular body area on a particular-sized animal. Recommended exposures will vary depending on the machine used, therefore it can be difficult to suggest exact settings that can be used across the board.
However, the following gives a good example of how factors will change depending on the size of the patient. These assume a film focal distance of 80cm.
Compared to these figures for an abdominal radiograph, thoracic radiographs will require lower mAs to reduce motion blur, so the kV may need to be slightly higher, especially if the exposure time cannot be controlled independently.
Radiographs of extremities will require a lower kV and lower mAs, as the depth of the area of interest is smaller.
If the image requires high kV settings, it can be useful to use a grid to help absorb scatter and therefore improve image quality.
As a general rule of thumb, a grid is beneficial for body parts over 10cm in depth – however, with digital systems, there is more leeway due to post-exposure filtering.
When thinking about radiation safety, both the patient and the operator, always use the lowest possible settings needed to gain the diagnostic image.
It can also be helpful to record the settings used for each exposure, either on the system or by hand, so with time, we can begin to understand our machine and what settings work well for certain images.
In many jurisdictions, this is a legal requirement and is always “best practice” for reflection and continual quality improvement.
As a rule of thumb, if you see these effects on a digital image consider these adjustments:
If you notice a dark image, particularly of soft tissue or extremities, it is generally recommended to decrease the kV.
Conversely, if you come across a light image, especially of bone, it is advisable to increase the kV.
In the case of motion blur, you should consider increasing the kV and decreasing the mAs.
If you find poor contrast on the abdomen or thorax, increasing the kV is typically recommended.
On the other hand, if you observe poor contrast on an extremity, it is generally advisable to decrease the kV.
1. Radiography in Veterinary Technology (Fourth edition) by Lisa M. Lavin. Pg. 6
2. https://www.msdvetmanual.com/clinical-pathology-and-procedures/diagnostic-imaging/radiography-of-animals
3. Lo, W. Y., Hornof, W. J., Zwingenberger, A. L., & Robertson, I. D. (2009). Multiscale image processing and antiscatter grids in digital radiography. Veterinary Radiology & Ultrasound, 50(6), 569-576.


