


5 Tips to Improve Proficiency With Ultrasound
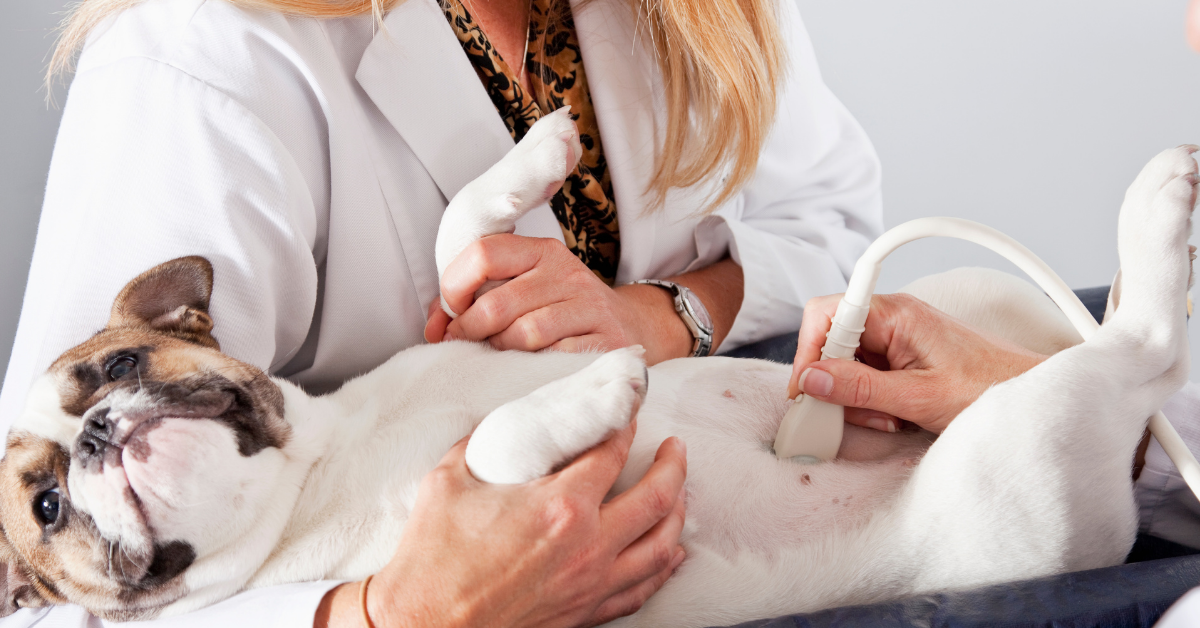
By becoming proficient at ultrasound studies, a veterinarian can elevate patient care at their practice while also boosting profits.
Whether you’re evaluating the abdomen, the heart, or something else, an ultrasound study can be a very valuable tool.
Here are five ways for a practitioner to improve their ultrasound skills and offer more of this valuable service to pet owners…
The Right Equipment Can Make a Vet’s Job Easier
Having good, well-functioning equipment can really make life easier for a veterinarian and their team.
This could include a variety of factors, such as…
Does all of the ultrasound equipment—probe, machine and monitor, and any programs for saving videos and information—work? Does any component (or the whole system) need to be repaired or replaced?
Is the equipment of a good quality? Maybe it’s technically working, but do the images you produce have enough detail and clarity to see what you need to see? Is any part of the process cumbersome, which can make it less likely that the ultrasound will be used to its full capacity and potential?
Would routine maintenance or an upgrade improve efficiency and make it easier to offer this service to clients and their pets?
This is all-important because even as you learn, practice, and improve your skills, inefficient or subpar equipment may make it challenging to fully implement your new training and may lead to frustration.
Standard Protocols and Techniques Can Improve Efficiency
If an ultrasound is only performed once in a while, it may feel like a hassle or lead to confusion or inefficiency when trying to schedule and perform an ultrasound study.
To improve efficiency and make it easier to offer ultrasound services at your practice, consider all stages of the process, including…
Has the veterinary team been trained and empowered in all aspects of scheduling an ultrasound study? For example, is there a specific day of the week, especially if there is only one doctor at the practice who performs ultrasounds? Has enough time been scheduled, especially if sedation is needed? Having a standard set of instructions or protocols can help the team and make things run smoother for everyone.
If the patient needs any special instructions to prepare for their ultrasound study (such as fasting from the previous evening), is there a clear process for communicating this to the client?
Does the veterinary team know all the tools you would prefer to have available during an ultrasound study? This may include everything from a v-trough, towel, and clippers, to syringes and microscope slides in case an FNA is indicated. Having a kit or list prepared ahead of time will help save time so no one has to run to the other room and grab supplies mid-study.
If a patient is sedated or under anesthesia, is there a standard format/form for monitoring?
Is there a report prepared for the client? Can video clips or still images be saved as part of the medical record? Will the client be present during the ultrasound in some cases? Make sure the whole team knows what should be done.
Take Advantage of All the Resources You Find Helpful
This may include textbooks and other references for what is normal on each ultrasound study and what is not.
Access to a second opinion can also be helpful. Consider discussing your findings with colleagues within the practice, subscribing to an online forum such as the Veterinary Information Network (VIN), or even using a specialist consultation service for an expert, second set of eyes on your ultrasound images or videos.
Practice Makes Perfect
Any new skill can be challenging at the beginning. But ultrasound proficiency will improve over time, with practice. So even if fitting more ultrasounds into a busy schedule feels time-consuming at first, it will probably get to be second nature over time.
In addition to training and courses, it may help to ultrasound healthy patients for practice, to gain a thorough understanding of all the different ways normal anatomy can look in different sizes and breeds of veterinary patients. This could be done with the pets of veterinary team members, or possibly offered to clients at a discounted price in the early stages.
Communicate Effectively With Clients
If pet owners are unsure about proceeding with ultrasound for any reason or experiencing sticker shock, the conversation can take up a lot of time for veterinarians and their team members. By planning what to say and gaining comfort with these conversations, time can be saved while providing patients with the care they need.
Efficient conversations about pet ultrasounds may include general principles for good communication (active listening, empathy, non-verbal communication, etc.), as well as explaining the excellent value that clients are receiving for the cost. For example, explain just how much information can be gathered from an abdominal ultrasound study. In addition to looking at suspected abnormalities, it’s a thorough look at many important organs. Occasionally, unexpected issues are caught early, or if the dog or cat is normal then the owner can have peace of mind.
Putting all these principles together, a veterinary team may find the whole ultrasound process becomes more efficient. This is good for team morale, as it helps to keep the day running as smoothly as possible. It can also increase a practice’s bottom line while providing excellent care for patients.

For all these reasons, it may be well worth it for a veterinary team to invest time and effort in adding ultrasound to their practice!
Written by: Dr. Tammy Powell, DVM

Ultrasound of the Duodenum and Jejunum in Dogs and Cats

There are many reasons why a veterinarian may perform an ultrasound of the duodenum and jejunum sections of the small intestines in a dog or a cat.
For example, the vet may suspect a GI foreign body, inflammatory disease, or neoplasia.
Here are a few key checkpoints to remember when scanning the duodenum and jejunum.
Setting Up the Gastrointestinal Ultrasound Study
If a patient can be fasted, that’s ideal.
An empty gastrointestinal tract may be easier to visualize, whereas food or digestive content may cause artifacts such as beam attenuation. However, this won’t be possible for all patients, especially in an emergency situation.
Patients are often placed in dorsal recumbency, although lateral recumbency may also be used. The patient can also be repositioned mid-study if needed for better visualization.
Performing a Thorough Evaluation
Often, a GI ultrasound study is part of an entire abdominal study. In some cases, the GI tract may be visualized on its own. Either way, to ensure nothing is missed, it’s important to perform the study the same way each time. Many experts recommend keeping it simple by following the GI tract in its normal order of digestion, i.e. starting with the stomach, then moving on to the small intestines (duodenum, jejunum, ileum), cecum, and colon. Examine each segment in both longitudinal and transverse views.
Evaluation should include wall thickness (and whether that thickness remains uniform within each GI section), wall layers, luminal contents, signs of obstruction, the presence of a GI mass or multiple masses, infiltrative disease, and whether there’s normal motility/peristalsis.
The Duodenum
The duodenum is located along the right lateral abdominal wall in dogs. It can be found near (ventral to or ventrolateral to) the right kidney. The cranial portion may be challenging to see and may require viewing via an intercostal approach.
In cats, the duodenum may be closer to midline, or just right of midline.
The wall of the duodenum is up to 5mm thick in dogs, and 2-2.5mm thick in cats.
Jejunum
It’s often difficult to trace the long jejunum loop by loop. So, most veterinarians evaluate the jejunum by sweeping the transducer from side to side across the abdomen, in a cranial to caudal direction. Slightly overlapping each sweep will ensure that nothing is missed.
The wall of the jejunum is 2-5mm in dogs, and 2-2.5mm in cats.
Evaluating the Layers of the Intestinal Walls
The walls of the intestinal tract have 5 specific layers, in this order: the luminal-mucosal interface (most interior layer), mucosa, submucosa, muscularis, and serosa (outermost layer).
In longitudinal view, these layers are easily distinguished from one another (in a normal patient), thanks to their alternating pattern of hyper- and hypoechogenicity. The inner and outermost layers, and the submucosa, are hyperechoic. The mucosa and muscularis are hypoechoic.
If these 5 layers are not distinctly visible throughout the intestines, it could indicate a problem. For example, focal wall thickening with obliteration of the layers could indicate focal neoplasia.
Make notes of any wall thickenings, whether they’re focal or diffuse, and whether the 5 layers are still distinguishable or not.
One normal finding that could be mistaken for abnormal is Peyer’s patches (pseudoulcers) in dogs, which appear as focal, hyperechoic indentations within the hypoechoic mucosal layer.
Signs of Obstruction
Sometimes, the obstructing foreign body may be visualized directly. However, this is often not possible. So, a foreign body obstruction may be detected due to differences in intestinal dilation proximal and distal to the point of obstruction. The intestinal tract proximal to the obstruction would tend to be dilated with fluid and gas, while the distal intestinal tract is normal or even empty.
With a linear foreign body, plication of the intestines may be seen via ultrasound. The foreign body itself may or may not be well visualized.
In case of an intussusception, the affected section of intestines will have a characteristic “bullseye” appearance in transverse view. If this is noted in an older pet, be sure to search for signs of neoplasia that could explain why the intussusception occurred.
Intestines may be hypermotile with a recent obstruction, but possibly hypomotile with a more chronic condition.
GI Neoplasia and Inflammatory Conditions
Neoplasia in the digestive tract may occur as a solitary mass, multiple masses, or diffusely as an infiltrative disease.
As mentioned above, discreet masses are often identified because of their focal thickness relative to the rest of the intestines and disruption of the wall layers.
Infiltrative disease, however, can be more difficult to pinpoint. There may be wall thickening with or without disruption of the wall layers. In particular, it can be challenging or impossible to differentiate between small cell lymphoma and inflammatory bowel disease in cats without further testing.
Regional lymph nodes should be evaluated, too.
Conclusion

The duodenum and jejunum are an important part of any GI evaluation. It’s helpful to get an idea of what’s normal and what’s not for these sections of the small intestines, as they’re commonly evaluated for a variety of conditions, including those listed above.
Written by: Dr. Tammy Powell, DVM

Evaluating the Urinary Bladder on Ultrasound

An ultrasound of the urinary bladder can be recommended for a number of reasons, including suspected uroliths, cystitis, and neoplasia—to name a few.
Often, the evaluation includes the entire abdomen and any other parts of the urinary tract that can be visualized.
Given all the conditions that can affect the bladder, as well as important information from an ultrasound study to help guide the treatment plan, it’s beneficial to gain proficiency in evaluating the bladder via ultrasound.
Use a Systemic Approach to Evaluating the Bladder
A systemic approach to the whole abdomen is good, and a bladder evaluation is usually just one part of an abdominal ultrasound study. So while it may be tempting to jump to the bladder right away if the patient is having urinary symptoms, it’s best to complete your abdominal ultrasound study in the same order that you usually do it.
Once you reach the urinary bladder, a systemic approach is again useful, to ensure nothing is missed. Here is one method for a stepwise evaluation…
Is the overall bladder shape normal and as expected? Through practice, a veterinarian can get a good feel for what shape is normal for canine and feline patients, and how it may change if the bladder is full versus empty or nearly empty.
How does the lumen of the bladder look? If urine is present, is the urine is anechoic? Is there sludge, sediment, crystalline material, a polyp, or anything else that is abnormal?
If there are uroliths present, they generally appear as hyperechoic structures inside the lumen of the bladder. There may be acoustic shadowing, and the calculi may move freely depending on how large they are.
Is the bladder wall smooth, a normal thickness, and well-defined? Be sure to evaluate the entire bladder. If cystitis is present the wall may be focally or generally thickened or have irregularities in the mucosa, depending on the severity and duration of the cystitis. Keep an eye out for polyps or masses/tumors, too. Also, look for deviations in the wall that could indicate a urinary bladder diverticulum.
If a mass is present, make note of the size, appearance, and location. Transitional cell carcinoma, the most common neoplasia of the bladder, tends to occur in the bladder wall near the neck and trigone. Commonly, these masses are hyperechoic or mixed echoic and have been compared to cauliflower in appearance. Evaluate nearby blood vessels and regional lymph nodes, too. Avoid cystocentesis or aspiration for samples, because of the risk of seeding the neoplasia into the abdominal cavity when the needle is withdrawn. Sometimes, it’s easy to confuse blood clots with masses, so keep this in mind and re-evaluate as needed.
Be sure to evaluate other urogenital structures, including the kidneys and ureters (the latter are often not visible unless there’s an abnormality), as well as blood vessels and lymph nodes in the region. Remember to look for the uterus/ovaries in intact females and the prostate in males, although it might not be possible to visualize these structures in all patients, especially if they are normal.
Whenever abnormalities are noticed, describe them in detail and take measurements. Include all of this in the notes. Even if things look normal, it’s still a good idea to take some measurements (such as bladder wall thickness) and describe what you’re seeing, as a baseline for comparison in case anything changes in the future.
A Few Tips
A full bladder can help with visualizing certain lesions (such as hyperechoic uroliths) by providing “contrast” or a backdrop to help make abnormalities stand out. Also, a full bladder smooths out the bladder wall, whereas an empty bladder may lead to false readings of wall thickening or masses. Additionally, a large bladder allows for an easier ultrasound-guided cystocentesis. So whenever possible, try to ultrasound with a full, or at least partly full, bladder. In some cases, it may be appropriate to give the patient water or IV/SQ fluids and wait for the bladder to fill prior to the study.
Pressure from the transducer can alter the bladder’s shape.
So be sure to practice with various pressures and become familiar with how the appearance of the bladder might change.
Repositioning the patient can also be helpful.
This may give you a better viewing angle and position for certain structures. Having the patient stand up may put gravity in your favor by decreasing the distance between the bladder and the probe. Also, patient movement may cause sludge/sediment to move around or disperse so that it’s not mistaken for a urolith.
Have appropriately sized needles, syringes, and collection materials available.
In case an aspiration/cystocentesis is needed, it’s best to have supplies ready to go.

Ultrasound of the urinary bladder is a very valuable skill, and it works well in conjunction with information gained from x-ray studies. Training and practice in ultrasound of the urinary bladder are often well worth it for patient care and for additional income from ultrasound studies.
Written by: Dr. Tammy Powell, DVM

Finding the Adrenal Glands in Large Dogs using Ultrasound

A thorough abdominal ultrasound includes evaluating the adrenal glands.
Common reasons to look at the adrenals include searching for signs of neoplasia, Cushing’s, or Addison’s disease. And even in animals where adrenal disease isn’t suspected, sometimes growths or other changes to the gland(s) are discovered incidentally.
Unfortunately, sometimes adrenals can play “hide and seek” and be tough to find. That’s true for any dog—but especially for large dogs with deep abdomens, since the abdomen may be too thick for the ultrasound waves to penetrate well.
Having a repeatable system for where to look can help. Here are some steps for finding those tiny glands inside of a big dog…
Perform an Abdominal Ultrasound in the Same Order Every Time
Just like reading an x-ray or performing a physical exam, a systemic approach helps ensure that nothing is missed.
Each veterinarian may have their own preference for how to go through a scan in a stepwise fashion. For example, some may scan cranially to caudally. Others may scan clockwise, or have some other system. Any system is fine, so long as it covers everything you need to see and is easy to repeat on each patient. So choose what works best for you.
In addition to revealing unexpected abnormalities of the adrenal gland(s) sometimes, systemically examining the entire abdomen will also help a veterinarian gain experience. Then, when it’s time to locate the glands on a patient with suspected adrenal disease, you’ll have plenty of practice to fall back on and may feel less pressure.
Where to Find the LEFT Adrenal Gland
To narrow the search, first, find the left kidney by scanning the left dorsal mid-abdomen.
Next, narrow the search even further by finding the vascular landmarks: the aorta (in long view) and the left renal artery.
Look for the spot where the left renal artery branches off from the aorta. The left adrenal gland should be just cranial to this junction.
Where to Find the RIGHT Adrenal Gland
First, locate the right kidney by scanning the right cranial abdomen.
Next, locate the vascular landmarks: the caudal vena cava (in long view) and the cranial mesenteric artery.
Apply some pressure, which will cause compression of the caudal vena cava and allow better visualization of the adrenal gland. The gland is dorsolateral to the vena cava and just cranial to the cranial mesenteric artery.
A Few Tips
It may be tempting to use the kidneys as a primary landmark since the adrenal glands are located near each kidney. However, the kidneys may overshadow the small glands. So while the kidneys are a good starting point, it’s also important to use vascular landmarks.
Color Doppler can be a big help, too. It often makes it easier to find and view vascular landmarks.
Minimize the distance between the probe and the adrenal glands as much as possible. This can be done by moving the probe as needed, and by applying gentle pressure if the patient allows.
What to Include In the Medical Record
Be sure to describe any abnormalities. Additionally, rather than just noting ‘normal’ or ‘abnormal’, it’s good to provide specific details in case a comparison is needed in the future. Here are some things to note, even if the glands look normal…
Measure and record the size of each gland. Measurements are typically taken from the cranial to caudal pole, as well as a measurement of the thickness of each pole.
Note if the glands are hypoechoic to surrounding fat or if their appearance is different than expected.
Classic adrenal gland shape has been compared to a ‘peanut’, or sometimes an ‘arrowhead’ for the right adrenal. Note if the shape is as expected or if it’s abnormal.
If any abnormalities are noted, list the most likely rule-outs and a recommendation for follow-up/monitoring or further diagnostics if indicated.

With practice, locating the adrenal glands will become second nature. It may still be challenging on some patients, but having a repeatable system and gaining experience will help.
Written by: Dr. Tammy Powell, DVM

Ultrasound-Guided Cystocentesis: Pros & Cons for Veterinary

A cystocentesis offers advantages over other urine collection methods
If you work in a small animal veterinary practice, there’s a good chance you’ve performed, assisted with, ordered, or overseen a cystocentesis in many of your patients.
A cystocentesis offers advantages over other urine collection methods in that it provides a sterile sample, as opposed to free catch or even catheter methods that may contain contamination with pathogens or cells from the skin or urethra.
But how does an ultrasound-guided cystocentesis compare to a blind cystocentesis obtained via palpation or anatomical landmarks?
Your preference may depend on your practice style, experience, and patient needs. But here are a few things to consider…
Which Patients Are Good Candidates for Ultrasound-Guided Cystocentesis?
Here are a few factors that may determine if an ultrasound-guided cystocentesis is a good option for any particular patient…
Large or overweight patients. A blind (or non-ultrasound assisted) cystocentesis may be straightforward on cats, and even small dogs, who are not overweight. In these patients, it is often possible to palpate the urinary bladder and to easily reach the bladder with a standard-length needle.
However, difficulties arise in patients who are overweight, which makes it more challenging to feel and reach the bladder. Additionally, an ultrasound can help guide your needle with large dogs.
Patients with “hard to stick” bladders. Maybe your patient’s bladder is thickened due to chronic cystitis or another condition. Or, maybe the patient’s bladder is small.
Either way, an ultrasound provides additional direction (and visualization) of partially-full or otherwise difficult-to-obtain-a-sample-from bladders.
Patients whose bladders could use a visual evaluation. If you’re obtaining a cystocentesis because the patient has urinary symptoms, a quick scan can provide more information about any obvious lesions.
Use this for your own peace of mind (i.e., there’s no bladder tumor present at the time of the cysto), or create a charge for urinary ultrasound evaluation packaged together with other diagnostics.
Which Patients Are NOT Good Candidates for Ultrasound-Guided Cystocentesis?
Thin cats with big bladders. Depending on your practice style and preference, you may find it’s easier to do a blind cystocentesis on a cat with an easily palpable bladder, especially for routine health checks.
Although it may still be worth doing an ultrasound if the cat presented for urinary symptoms, so you can look at the bladder.
Patients with bladder masses or tumors. If a patient has transitional cell carcinoma, placing a needle into the bladder may “seed” tumor cells into the abdomen as the needle is withdrawn.
So any time a mass is present or suspected, it’s good to be cautious and skip the cysto (with or without ultrasound).
Fractious or wiggly patients. These patients may not be good candidates for either ultrasound-guided or blind cystocentesis, since it wouldn’t be good for them to move around while the needle is inserted.
However, sedation may make the procedure possible for these dogs and cats.
PROS of Ultrasound-Guided Cystocentesis Versus Blind Cystocentesis
Advantages include…
Quick and easy. If you’re new to ultrasound-guided cystocentesis, it may take some practice. But soon it becomes a habit and may even be faster than a blind cysto.
Visualization of the bladder. You know exactly where the needle is heading, and therefore you have an improved likelihood of getting a sample from a small or partially-full bladder.
Plus, you may want to do a quick bladder evaluation to look for things like uroliths, sludge, or bladder masses, as this could change your recommended course of treatment.
Safety. Supporters of ultrasound-guided cystocentesis point out that if you can see where the needle is going, there’s less risk of accidental puncture of other organs or blood vessels.
CONS of Ultrasound-Guided Cystocentesis Versus Blind Cystocentesis
Training and practice are needed. It may take a little time for your team to become comfortable with this new method. Fortunately, it’s simple and straightforward to learn.
Creating a charge for the service. This isn’t necessarily a bad thing—after all, you should be paid for your time and expertise when you provide a service.
However, there are differing opinions from practice to practice as to when and how to charge.
For example, will you charge for all ultrasound-guided cystocentesis?
Or only charge as part of a package with other diagnostics (urine analysis, urine culture and sensitivity, and quick ultrasound evaluation of the bladder, for example) in patients who are symptomatic?
And how much will you charge?
Small risk of side effects. The most common side effect is hematuria, which is mild and transient. Other risks do exist, such as bladder rupture or injury, organ or blood vessel puncture, urine leakage into the abdomen, the spread of bladder cancer, or vagal reactions (retching, panting, hypersalivation, collapse).
While these effects are quite rare, it’s always worth considering the risks of any procedure before performing it, especially in patients who may be at higher risk due to underlying health conditions.
Investing in Ultrasound Training
In addition to teaching your team members to do an ultrasound-guided cystocentesis, it’s worth considering training in ultrasound examinations for you or one of your DVM associates.

There are plenty of other uses, including but not limited to abdominal evaluation for organs, masses, ascites, or even pregnancy, and cardiac or pericardial evaluations.
By maximizing your ultrasound usage, you can offer more diagnostics to your patients, while also getting the best ROI on your equipment investment—a win-win.
Disclaimer: This article is for general informational purposes only, and not intended as a guide to the medical treatment of any specific animal.
Written by: Dr. Tammy Powell, DVM

Ultrasound vs. X-Rays for Monitoring Dog and Cat Pregnancies

When it comes to pregnancy in pets, sometimes it’s hard for clients to wait…
They want to know right away whether there are puppies/kittens present… how many there are… and if the babies are doing OK.
It’s understandable—whether this is a professional breeder or a pet parent who’s decided to proceed with a litter, the arrival of new puppies and kittens is an exciting time.
There are a few ways to check for pregnancy in dogs and cats. Each method has its own pros and cons, which you can explain to your clients to help set up realistic expectations and develop a plan that best suits their pet’s needs.
Early pregnancy checks may include…
Abdominal palpation
This method of pregnancy detection can yield information as soon as 3-4 weeks into the 9-week pregnancy.
Abdominal palpation has been used by vets for many years—and can often result in the detection of fetal “bumps.”
However, this method isn’t always accurate. There are plenty of things that could render palpation inconclusive. For example, in large breeds or overweight dogs, palpation is more difficult.
Relaxin testing
Testing for the relaxin hormone—a hormone unique to pregnancy—can be performed as soon as 20 days into gestation.
This test gives your client a very important “yes or no” answer—and helps to distinguish between true pregnancy versus pseudopregnancy—but it doesn’t provide information on how many fetuses are present.
The next test to consider is an abdominal ultrasound.
Canine and Feline Abdominal Ultrasound
The procedure of abdominal ultrasound in veterinary medicine involves examining the internal organs of dogs and cats. To begin the ultrasound study, transverse scanning is performed to locate the urinary bladder and colon, with the uterine body positioned between them.
Once the uterine body is identified, the scan is directed cranially towards each kidney, following the uterine horn towards the ovary. Along this path, each fetus can be identified by its appearance as a round, fluid-filled gestational sac.
Compared to other imaging methods like X-rays, abdominal ultrasound offers several advantages in veterinary practice.
One significant advantage is the ability to confirm pregnancy several weeks earlier than X-rays. Typically, an ultrasound is performed around 30 days into the pregnancy, although it's possible to detect a pregnancy as early as 20 days. At 30 days, it becomes easier to detect fetal heartbeats.
In addition to early pregnancy detection, ultrasound provides other valuable benefits for veterinarians, including:
1. Counting the number of puppies or kittens: The ideal time for this is between 30 and 35 days of pregnancy. After 50 days, the uterine horns may overlap, making it more challenging to accurately count the fetuses.
2. Assessing fetal viability: Ultrasound can confirm the presence of viable fetuses by detecting their heartbeats or movement.
3. Predicting gestation duration: Measurements of fetal size or certain anatomical structures can help estimate the gestation duration.
Another advantage of abdominal ultrasound in veterinary practice is its ability to involve clients in the process. Unlike X-rays, clients can be present during the ultrasound, allowing them to witness the heartbeats of the puppies or kittens.
This experience enhances the bond between the client and their pet, as well as strengthens their connection to the veterinary practice.
However, in the later stages of pregnancy, X-rays also play a valuable role in veterinary medicine. X-rays provide more information when the fetuses have developed significant skeletal structures, usually around 45 to 55 days after breeding.
At this stage, a single set of X-rays is safer for the fetuses compared to earlier in the pregnancy.
Radiographs (X-rays) are particularly useful for:
1. Confirm the fetal count.
2. Assessing the size ratio between the fetal skulls and the pelvic canal. This information helps in planning for potential dystocia and the need for a C-section.
As a veterinary practitioner, you have various diagnostic tools at your disposal to detect and monitor a healthy pregnancy in dogs and cats.

By utilizing the best combination of methods, you can reassure your clients along the way, and increase the chances of a healthy delivery of puppies or kittens!
Written by: Dr. Tammy Powell, DVM

Vertebral Heart Score: How and Why to Calculate One

A vertebral heart score (VHS) is a measurement used to determine if a patient’s heart is enlarged.
The VHS can provide valuable insight to complete your clinical picture, especially at times when you hear a heart murmur, for a general pre-anesthetic check, or to look for cardiac changes on breeds that are predisposed.
It’s a simple, non-invasive way to get more information and to monitor for changes over time.
How to calculate a vertebral heart score
Obtain a high-quality lateral thoracic radiograph. Be sure…
To collimate.
That the patient is straight and not twisted or at an angle.
That you can see enough detail, especially the thoracic vertebrae and the borders of the cardiac silhouette.
Make your first measurement along the longest axis of the cardiac silhouette, from the ventral border of the carina of the mainstem bronchus to the apex of the cardiac silhouette.
You don’t need to measure this in centimeters or inches—instead, just hold up a sheet of paper to your x-ray viewer and make a mark for your measurement, or use calipers. Or, with your digital x-ray system, use the VHS function to mark the measurement right on your screen.
Now, hold the measurement up to the vertebrae, starting with the cranial edge of T4—this is the 4th vertebra to have a rib connected. Count the number of vertebrae (including the vertebral body and the following disc space) that fall into the long axis measurement.
Measure to a decimal place of 0.1 (for example, let’s say your first measurement was 5.2 vertebrae).
Make your second measurement. This time, you’ll measure along the short axis, which is the widest part of the cardiac silhouette. It should be perpendicular (at a 90-degree angle) to your first measurement.
Repeat the process of transferring this measurement to the thoracic vertebrae, starting with the cranial edge of T4. For this example, let’s say your measurement was 4.5 vertebrae.
Add these two numbers together.
In this example, your VHS would be 5.2 + 4.5 = 9.7
How to interpret the results
For dogs, a normal vertebral heart score is less than 10.7 (with an average range of 8.5 to 10.5). For cats, an average VHS is 7.5 (with a range of 6.8 to 8.1).
Anything larger than that is considered abnormal.
Of course, this doesn’t tell you exactly what’s going on—you’ll need further information such as an echocardiogram to determine whether there is DCM, HCM, or some other issue causing the enlargement of the cardiac silhouette.
However, the VHS is a great screening tool to let you know to investigate further. And, if you have a patient who already has cardiac disease, a VHS can help you monitor their disease progression over time, and provide tangible information to a client who wants to know how their pet is doing on treatment.
Keep in mind that, as with any diagnostic tool, there is some individual variation. Some pets—especially certain breeds such as boxers—may fall outside the normal VHS range even if they’re completely healthy.
So, look at the overall clinical picture when assessing a patient. But with that in mind, a VHS is a quick, easy, valuable addition to your toolkit when it comes to evaluating and monitoring cardiac health.
Vetebral heart score tool video

Disclaimer: This article is for general informational purposes only, and not intended as a guide to the medical treatment of any specific animal.
Written by: Dr. Tammy Powell, DVM

Your Warranty and Service Coverage for Veterinary X-Ray

Today, every veterinarian recognizes the importance of incorporating digital X-rays into their animal hospitals.
A considerable number of them plan to transition from traditional film and chemical X-rays to digital systems this year.
While the initial concern typically revolves around the cost of acquiring a digital X-ray system, it is equally crucial to inquire about the warranty and its coverage.
Here are some pertinent questions to ask the prospective vendor when considering the purchase of a veterinary digital X-ray system:
1. What is the duration of the hardware warranty for my veterinary digital X-ray plate?
2. How long does the software warranty for my veterinary digital X-ray software last?
3. For how long will I receive software upgrades for the X-ray system used in my animal hospital?
4. How long will my veterinarian technicians have access to tech support, enabling them to seek answers to any queries that may arise during the daily implementation of digital X-rays in my animal practice?
5. What are the costs associated with continued phone support, software upgrades, and technical assistance after the warranty period ends?
6. Which entity is responsible for providing software and technical support? Who developed and owns the software?
7. Does the warranty cover labor and shipping expenses, as needed?
8. In the event that my X-ray plate requires repair, will a temporary replacement plate be provided?
It is common for vendors operating in the animal health sector to offer a minimum of a 1-year warranty.

Not all vendors possess ownership of the software that operates their veterinary digital X-ray plate, which holds significant importance. While a digital X-ray plate can remain functional for many years, the software it relies on may become outdated within a short span of time.
An example of this can be observed with Windows XP platforms. Unless companies continually update their software, it becomes incompatible with new computing platforms.
When veterinarians transition from computed radiography (CR) to direct radiography (DR), the predominant issue they encounter is not the failure of the CR system itself but rather the poor performance or lack of support for the software.
This issue is not limited to small companies alone. Renowned brands like Idexx and Sound have discontinued support for their older product lines by ceasing software upgrades.
Our aim is to offer you transparent service and support. Our animal health software has been developed in-house by JPI which has been manufacturing x-ray equipment, writing software, and providing telephone support for these products since 1994.
Here are the responses to the eight frequently asked questions:
1. What is the duration of the hardware warranty for my veterinary digital x-ray plate?
- The hardware warranty lasts for 5 years.
2. How long is the software warranty for my veterinary digital x-ray software?
- The software warranty is also valid for 5 years.
3. For how long will I receive software upgrades for my x-ray system to be used in my animal hospital?
- You will receive software upgrades for 5 years.
4. How long can my veterinarian technicians receive phone support for any questions they may have regarding the daily implementation of digital X-rays in my animal practice?
- Our tech support helpline will be available for your veterinarian technicians for 5 years.
5. What is the cost of continued phone support and software upgrades after the warranty period?
- The cost for continued phone support and software upgrades after the warranty period is $750.00 per year.
6. Who provides the software and tech support? Who developed and owns the software?
- Our Examvue Veterinary software is developed, supported, and owned by JPI. They have been offering industry support since 1994. For technical support, please call 516-513-1330, and select option 2. Our support team is based in New York.
7. Are labor and shipping costs covered under the warranty if needed?
- Yes, labor and shipping costs are included in the warranty as required.
8. Will a loaner plate be provided in case my X-ray plate needs repair?
- Yes, we will provide a loaner plate in the event that your X-ray plate requires repair.


Is the New Digital X-ray System Compatible with Innovet?

Many veterinarians invested in X-ray systems in the ’90s. Most purchased an Innovet Summit table and generator.
They used the table and generator along with cassettes enclosing film to capture X-rays and provide life-saving next steps for their pet patients.
Processing the film in the chemical rinse and developing the images in the darkroom enabled the practicing veterinarian to review the X-ray.
If the X-ray proved complicating or just interesting then the veterinarian would mail the X-ray to a specialist for a review or save the X-ray case for the next ‘radiology rounds’ in upcoming weeks and months.
During these radiology rounds, X-ray cases would be reviewed amongst veterinarian piers and sometimes even veterinary radiologist.
Even if the patient was deceased by the time of the review huge advances in pet medicine were and still are to this day applied.
If you're reading this you use to film with your old X-ray generator and table. You want to impact the neighborhood and village who depend on precise and timely diagnosis to treat their pets.
Digital X-rays can speed up the process not only of image acquisition but also provide clear diagnostic radiology rounds.
Most old tables and generators still can produce excellent X-rays.
Often times these old systems have new light bulb collimators and replaced fuses that enable the old workhorse to continue to provide the power for an X-ray.
Yes, you can use your old table and generator with two types of digital X-rays.
The first is computed radiography or CR which will work today with any generator as the image is captured on an erasable film cassette then scanned into the software where the digital image can now be interrupted, adjusted or emailed to pet owners.
The next is an AED cesium plate. Automatic exposure detection.
This allows the plate to prepare itself for the exposure to capture the image and send in second the inmate to the display monitor.
This is the newest way to capture X-rays.
Not having to wire the old X-ray system to the new digital X-ray system is a confinement advantage.
It removes an element of future failure in hardware by eliminating the interference box!
We can help answer more questions surrounding your old X-ray table and generator.
Reach out today and we would be happy to help.