


5 Tips for Radiation Safety During Uncertain Times
Your x-ray unit is something you use frequently—probably every day, or multiple times per day—in your practice.
You know radiation safety is important. But recently, if you’ve had to reduce the number of team members in the building at any given time, maybe it feels like there aren’t enough hands on deck for patient restraint and positioning.
The good news is, some of the same principles that reduce radiation exposure can also help your team operate more efficiently.
Here are some tips to maintain safety, even when you’re shorthanded…
A.L.A.R.A.: A Brief Reminder
A.L.A.R.A. stands for “As Low As Reasonably Achievable,” and it’s the guiding set of principles that help you reduce radiation exposure to yourself, your staff, and your patients.
This is important because ionizing radiation from x-rays can damage cells, and cumulative exposure can lead to health risks such as cancer and genetic damage to reproductive cells.
To minimize exposure, there are 3 principles to keep in mind:
Time
Distance
Shielding
Decreasing exposure times, increasing the distance between your team and the x-ray source, and using PPE, all can help to decrease radiation exposure.
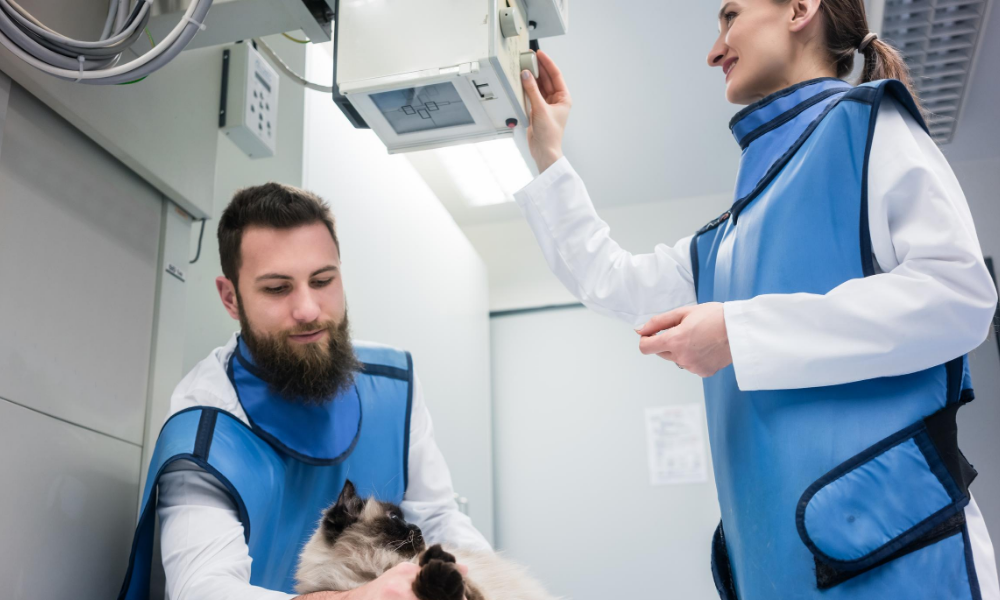
Tips for Radiography Safety and Efficiency
Hands-Free Restraint
Increasing the distance between your team members and the x-ray source is one of the most effective ways to decrease x-ray exposure.
Think of the inverse square law, which states that doubling your distance away from the x-ray source results in ¼ of the dose of x-ray radiation.
That’s a significant decrease!
Also, scatter radiation comes from the patient—so by not touching the patient, you’re reducing your exposure.
This can be accomplished by using:
Chemical restraint.
Positioning aids such as sandbags and tape.
A combination of both.
In addition to contributing to safety, hands-free restraint also increases staffing efficiency.
Especially for large or wiggly patients, it takes fewer staff members to position the patient when hands-free restraint is used.
Patient Comfort
A patient who wiggles at the last moment can lead to a crooked radiographic image—and thus, the need to retake that view.
The more shots you take, the higher the x-ray exposure to your team members.
Keeping a dog or cat’s comfort in mind can help you get the shot you need the first time—and decrease the need for retakes.
Here’s how you can do this…
Minimize fear and pain (for example, pain from stretching a sore leg to get the right position) by using chemical restraint.
Use a trough or other aid for comfort. Lying with their back on a cold, hard table can cause even the most cooperative of pets to squirm. Giving them a cozy place to settle into can really help.
Play white noise or background music. This helps make the big buzzing and beeping sounds from the x-ray machine less startling to a dog or cat.
In addition to a better patient experience and less x-ray exposure, these methods help save your staff time by getting your views more quickly.
Getting Things Right the First Time
The fewer images you take, the less radiation exposure there will be.
In addition to the measures listed above, here are some ideas for taking the fewest views possible…
Good planning. Be sure to know exactly which views you need ahead of time and what position the patient needs to be in for those views. Communicate these expectations clearly with your staff.
Proper measurement. Measure the patient in the position they will be in during the shot (lying down rather than standing).
Have a technique chart, or use appropriate settings in your digital unit. Teach team members how to make quick and accurate adjustments in settings, too.
Use collimation. In addition to producing a higher-quality image, collimation decreases scatter radiation.
A thorough understanding of x-ray positioning and machine settings will save your staff time and headaches—in addition to minimizing radiation exposure.
Who Should Be in the X-Ray Suite?
Only the team members taking the radiographs should be near the machine. Clients shouldn’t be in the x-ray suite, and other team members should be fulfilling other duties—especially when you’re shorthanded.
Rotating the staff you have on x-ray duty can also help minimize their cumulative exposures.
So, it’s smart to invest in training multiple team members. That way, you’ll also avoid delays if your “go-to” x-ray staff member ever needs to call out sick or otherwise miss a day.
PPE Care and Use
Even though the nature of your daily practice may have changed, it’s still important to keep up with x-ray safety measures, such as making sure your PPE is in good condition.
Experts recommend checking PPE every six months, and this includes radiographing your aprons, gloves, and thyroid shields to check for cracks. Of course, check and replace sooner if there are any notable defects.

Uncertain times may be stressful, but you and your team can continue to help the patients who need you while keeping yourselves safe.
Written by: Dr. Tammy Powell, DVM

Good Exam Room and Dental Lighting: Why It Matters

When it comes to upgrading your veterinary practice, maybe the first things that come to mind are new exam tables, high-tech anesthesia monitoring equipment, or an in-house chemistry analyzer.
Was a new LED exam room light also on your list? If not, it should be. Here’s why…
While lighting is often overlooked, just think about how many times per day a good, strong light could make your life easier.
Times, when a high-quality LED light could come in handy in your exam room, include the evaluation of…
Lesions and wounds.
Dental disease or oral lesions.
Ocular health (you’ll use your ophthalmoscope and other equipment for a more detailed exam, but good room lighting can help you pick up subtle lesions during a routine checkup).
Paw pads and the spaces between the paw pads.
External ear structures.
Dander, fleas, and other skin and coat issues.
These are a few good examples—but really, good lighting can help with much of the physical exam by making it easier for you to accurately document tissue colors, textures, lesions, and other notable abnormalities in your medical record.
Good lighting is essential for dental procedures and surgeries
In our last blog post, we gave some advice on how to pick a good surgical light.
And along those same lines, don’t forget about dental procedures!
The mouth is like a dark cave, making it difficult for you and your staff to see what you’re working on if you don’t have good lighting.
Some things a good light will help you visualize include…
Calculus that needs to be cleaned—and verifying that all calculus was removed.
Enamel defects and small chips or fractures.
Staining, or other color changes such as pulpitis.
Subtle bleeding or mild gingivitis.
Oral abnormalities such as masses or inflammation.
Pharyngeal or tonsillar abnormalities.
Extraction sites—before, during, and after the extraction.
Placement and manipulation of small sutures.
Not to mention, a good overhead light can aid your laryngoscope light during intubation.
How affordable are good LED lights?
In the past, LED lights were very expensive compared to halogen bulbs—so it’s understandable if you’ve not purchased one before.
However, some brands are now 30-40% less than previous LED prices.
So, LEDs don’t have to be expensive anymore. And considering their performance and efficiency, a good LED light can be a great addition to your practice.
Plus, many cities, counties, states, and even electric power companies offer rebates for upgrading to LED lights, due to the decrease in power used.
Specific requirements for rebates vary by location—so be sure to check with your local municipality and utility providers to see what’s available in your area. Because it’s always great to get a cash rebate that can help cover the cost of your upgrades!
How do you choose a good exam room or dental light?
When it comes to selecting the best lighting, there are many things to consider…
Affordability. LED lights are much more affordable now than they used to be, so shop around and be sure you’re getting a good deal (to be sure you’re comparing apples to apples, check for the other factors on this list, too).
Quality and dependability. Plus, a good-value warranty helps to back up your investment.
Lighting adjustability in terms of intensity and dimming options, as well as area of focus.
Precise positioning. The light head and arm should be easy to move and manipulate—but then, stay right where you put it without drifting.
Easy to clean.
User-friendly, with simple controls on or near the handle.
Shadow-free illumination—or at least a design that minimizes shadows as much as possible.
Mounting options that match the layout of your rooms.
Comfortable and safe for pets, with adjustable settings you can change as needed, and low heat output.
Here’s what we recommend…
We recommend the new Burton veterinary LED exam light because it checks all the boxes listed above.
Plus, it has a high-quality LED (virtually heat-free and with a 75% energy savings compared to halogen), is assembled in the USA, and is backed by an industry-leading 5-year warranty.
At a competitive price point that optimizes design, performance, and value, it’s pretty hard to pass up!
Why invest in new lighting?
As we said, lighting is often overlooked in terms of equipment upgrades…
But, just think of how many times per day you’ll use a good-quality light in your exam rooms or dental area.
In terms of cost per use, that can make new lighting a great investment—something you’ll benefit from using many times per day.
And if your new light makes your life easier in terms of visualizing the patient and making accurate medical notes… that’s an investment that could save you time and headaches, and be well worth it!


Vivamus pellentesque vitae neque at vestibulum. Donec efficitur mollis dui vel pharetra.