Veterinary Autoclave Troubleshooting Guide
In the fast-paced environment of a veterinary clinic, the autoclave is the unsung hero. When it works, surgical packs are sterile and ready for the next spay or dental. When it doesn't? Your entire schedule grinds to a halt.
Here is a guide to the most common autoclave headaches and how to fix them before they disrupt your day.
1. The Temperature Just Won’t Rise
If your unit is stuck in a preheat loop or isn’t hitting the required 121°C (250°F), you aren’t just losing time—you’re compromising sterility.
The Culprit: Often, this is a water level issue. If the reservoir is low, the heating element can't generate enough steam.
Check This: Ensure you are using distilled water only. Tap water can cause mineral buildup (scale) on heating elements, acting as insulation that prevents heat transfer.
The Fix: Clean the heating element with a specialized autoclave cleaner and ensure the water sensor is free of debris.
2. The Infamous "Wet Pack."
You open the door, and the surgical wraps are damp. In the veterinary world, a wet pack is one that is contaminated.
The Culprit: This is usually a loading error. If packs are stacked too tightly or "nestled" together, steam can't circulate, and moisture gets trapped.
Check This: Is your chamber filter clogged? If the air-jet or drain filter is blocked with lint or hair (a common vet clinic reality!), the vacuum/drying phase will fail.
The Fix: Use a rack to separate pouches. Ensure paper-plastic pouches are placed on their sides (like files in a folder) rather than flat.
3. Steam Leaking from the Door
If you hear a "hissing" sound or see steam escaping around the front of the machine, your cycle will likely fail due to pressure loss.
The Culprit: The door gasket (the rubber ring) is likely worn, dry, or dirty.
Check This: Look for small cracks or bits of surgical tape stuck to the gasket. Even a tiny piece of debris can break the seal.
The Fix: Wipe the gasket daily with a damp, lint-free cloth. If it’s cracked, it’s time to order a replacement.
4. "Error Code XXX."
Modern autoclaves are smart—sometimes too smart. They’ll throw a code like "E001" or "Cycle Aborted" and refuse to move.
The Culprit: This could be anything from a power surge to a faulty solenoid valve.
The Fix: Don’t guess. Every brand has a specific "Error Code Table." Below, I’ve provided a way to get the answer instantly.
The Autoclave "Power Prompt"
If your autoclave is acting up and the manual is nowhere to be found, use this prompt with an AI assistant to get a specialized diagnosis.
Copy and paste the text below, filling in the bracketed information:
"I am a veterinary professional troubleshooting an autoclave. The brand is [Insert Brand, e.g., Midmark, Tuttnauer, Ritz] and the model is [Insert Model Number].
The specific issue I am seeing is: [Describe the problem, e.g., Error Code E007 / Water leaking from bottom / Cycle won't start].
Based on the manufacturer’s service manual for this specific model, can you tell me:
What are the most likely causes for this specific error?
What are the 'first-step' fixes I can do in the clinic?
At what point do I need to stop and call a professional technician?"
Pro-Tip: The "Golden Rule" of Autoclaves
90% of autoclave failures in vet clinics are caused by two things: Poor water quality and hair/lint buildup. A weekly cleaning routine can save you thousands in repair bills.
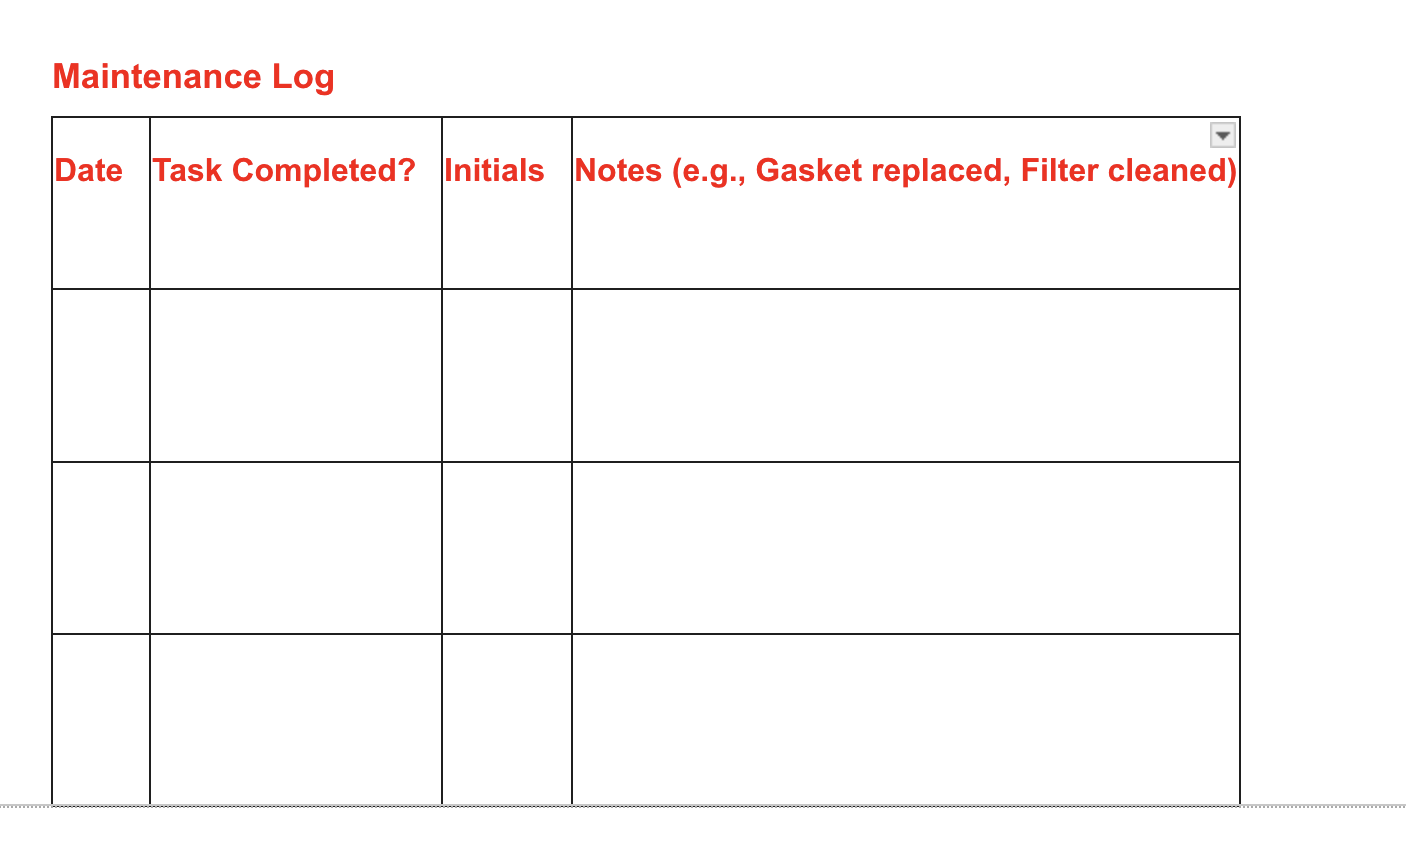
Since many autoclave issues in a veterinary clinic stem from hair, dander, and mineral buildup, a consistent maintenance schedule is the best defense.
Here is a printable-style Weekly Maintenance Checklist you can post in your sterilization area.
🏥 Veterinary Autoclave: Weekly Maintenance Checklist
Goal: Prevent "Error Codes," "Wet Packs," and heating element failure.
✅ Monday: The Deep Clean
Drain the Reservoir: Empty all water from the reservoir. Stagnant water grows biofilm and concentrates minerals.
Chamber Scrub: Use a non-chlorinated, manufacturer-approved cleaner (like Omni-Cleaner or Speed-Clean). Scrub the bottom of the chamber to remove any "cooked-on" debris or surgical tape residue.
Rinse & Refill: Rinse the chamber thoroughly with distilled water and refill the reservoir to the "Full" line.
✅ Wednesday: The "Seal & Filter" Check
Gasket Inspection: Wipe the door gasket with a damp, lint-free cloth. Look for cracks, pits, or any pet hair that might break the vacuum seal.
Clean the Chamber Filter: Locate the small mesh filter at the bottom or back of the chamber. Remove it and rinse away any lint or hair.
Tip: If this is clogged, your packs will stay wet!
✅ Friday: The Performance Test
Biological Indicator (BI) Test: Run a spore test to ensure the autoclave is actually killing microorganisms, not just getting hot. Log the results in your clinic’s sterilization binder.
Tray & Rack Check: Remove the trays and the wire rack. Wipe them down to prevent oxidation (rust) from forming, which can transfer to your stainless steel instruments.
🚫 The "Never" List (Post this for new staff!)
NEVER use tap water. It will ruin the heating elements within weeks.
NEVER use steel wool or wire brushes to clean the chamber (it causes pitting and rust).
NEVER overload the trays. If steam can't circulate, the center of the pack isn't sterile.
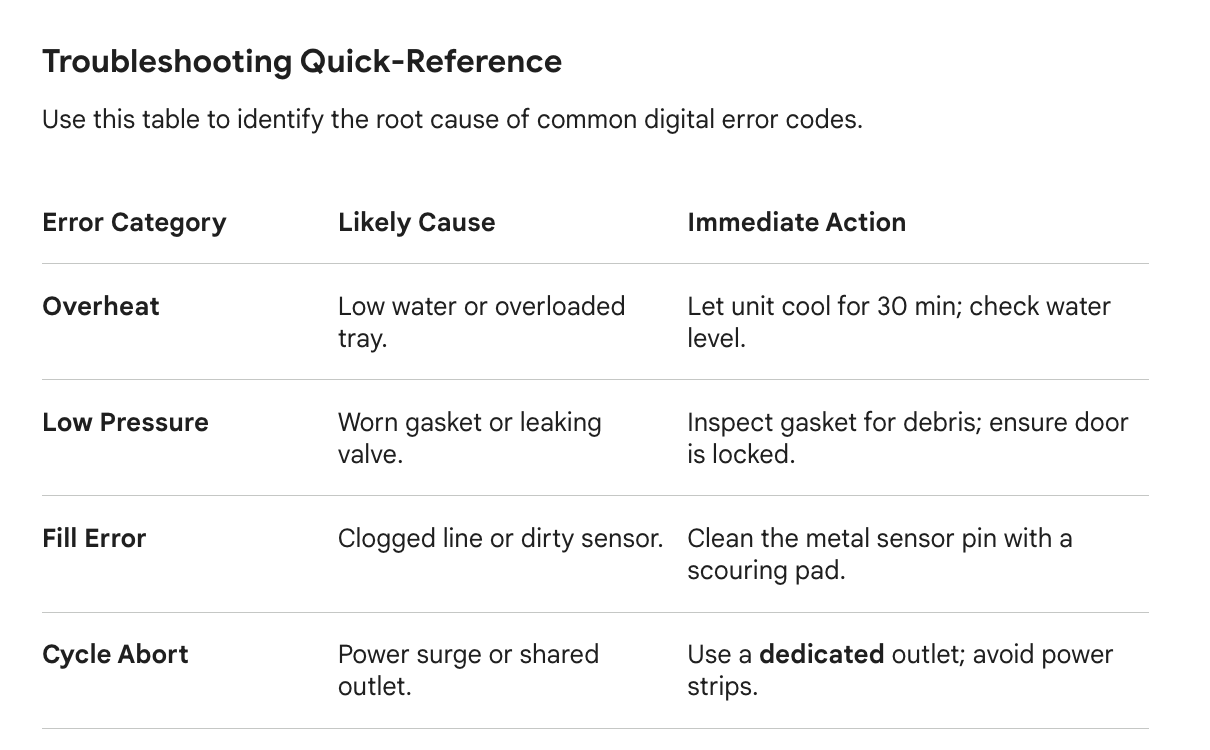
Since different brands use different codes (for example, a "C-001" on one machine might be an "E-003" on another), I’ve designed this Troubleshooting Quick-Reference by "Error Type."
This makes it easy for your staff to identify the root cause based on what the machine is doing or saying.
⚡ Autoclave Troubleshooting Quick-Reference
Keep this near the autoclave for immediate diagnosis.
Common Error Categories
Error Type
Common Codes (Varies)
Probable Cause
Immediate Action
Overheat
E001, E1, Hi-Temp
Low water, overloaded chamber, or faulty sensor.
Vent steam, let the unit cool for 30 min, and check the water level.
Low Pressure
E002, P-Low, Vac-Fail
Worn door gasket or leaking safety valve.
Inspect the gasket for debris; ensure the door is locked tight.
Fill Error
E003, No-Water
Clogged water line or dirty water sensor.
Clean the sensor (the small metal pin) with a scouring pad.
Cycle Abort
E007, Power-Fail
Power surge or unstable voltage.
Plug the unit into a dedicated outlet (no power strips!).
Dry Failure
Wet Pack, E009
Clogged chamber filter or poor loading.
Clean the filter mesh; reload packs on their sides.
The "3-Step Rescue" Protocol
If an error occurs mid-cycle, follow these steps immediately:
Safety First: Do not attempt to force the door open if the pressure gauge is above zero.
The "Hard Reset": Many software glitches can be cleared by turning the power switch OFF for 60 seconds and then back ON.
Check the "Big Three":
Is it Distilled Water?
Is the Gasket clean?
Is the Filter clear of hair/lint?
When to Call for Service 📞
If you see these "Red Flag" issues, stop using the machine and call a technician:
Burning smell: Indicates a short circuit or a fried heating element.
Constant Hissing: Even after cleaning the gasket, steam continues to escape.
Water Under the Unit: A sign of a blown internal hose or a failing weld.
Customizing This for Your Clinic
To make this perfectly accurate for your team, you can look up the "Error Code Table" in your manual and jot down the most common ones here:
Code ______: Meaning: ____________________________________
Code ______: Meaning: ____________________________________